


# UIViewController使用详解
# 一、UIViewController 基础使用
# 1. 不使用 storyboard 设置首页
通常我们创建一个工程之后,默认会创建一个 Main.storyboard 作为首页;但是如果我们不使用 storyboard 的方式又该如何做呢?
删除 Main.storyboard 中的箭头
找到项目工程中的 Main Interface,置空
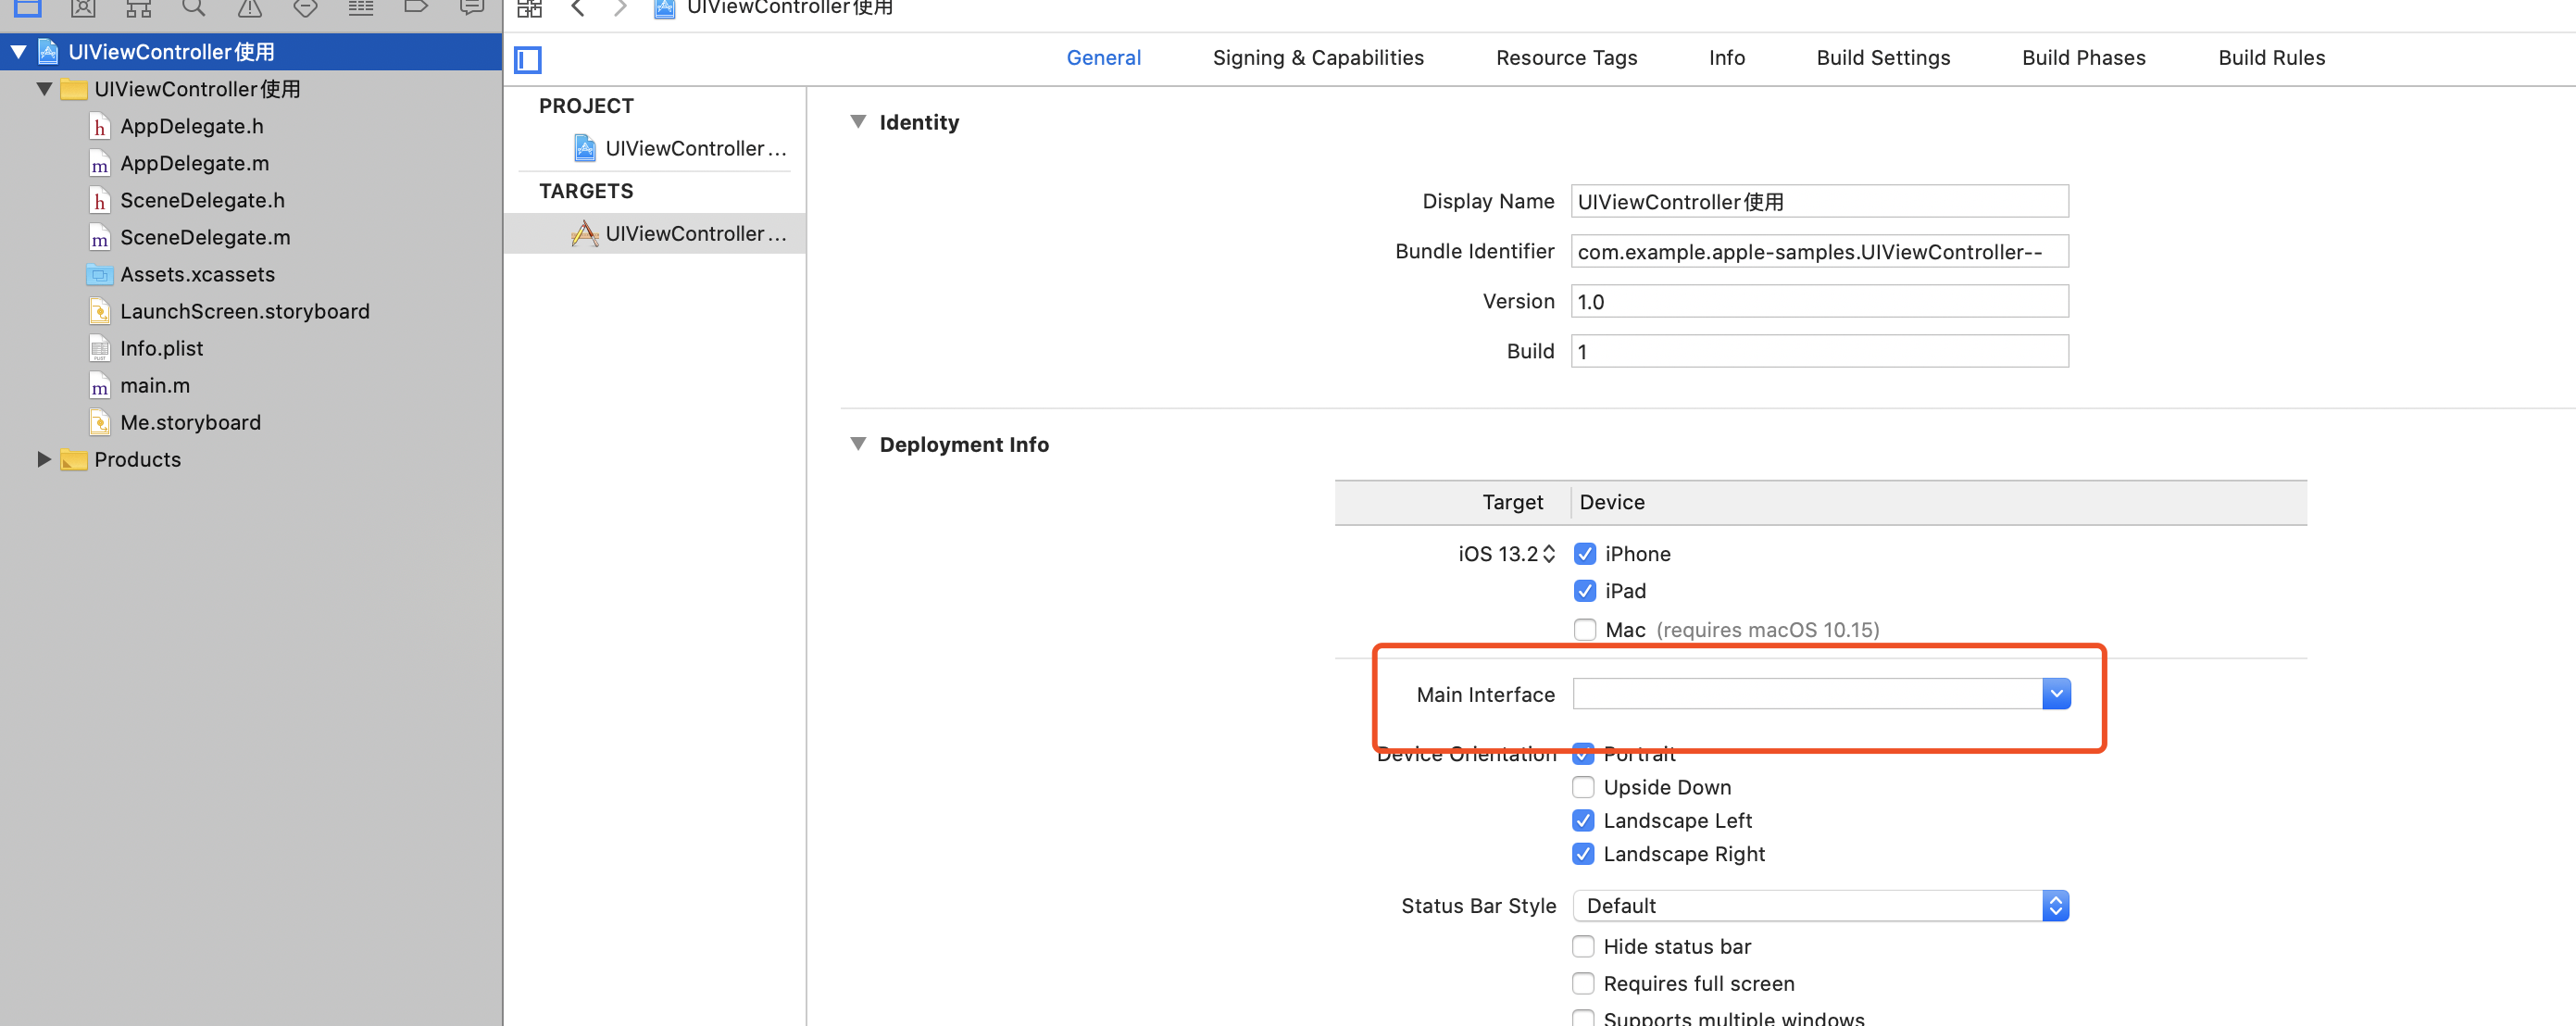
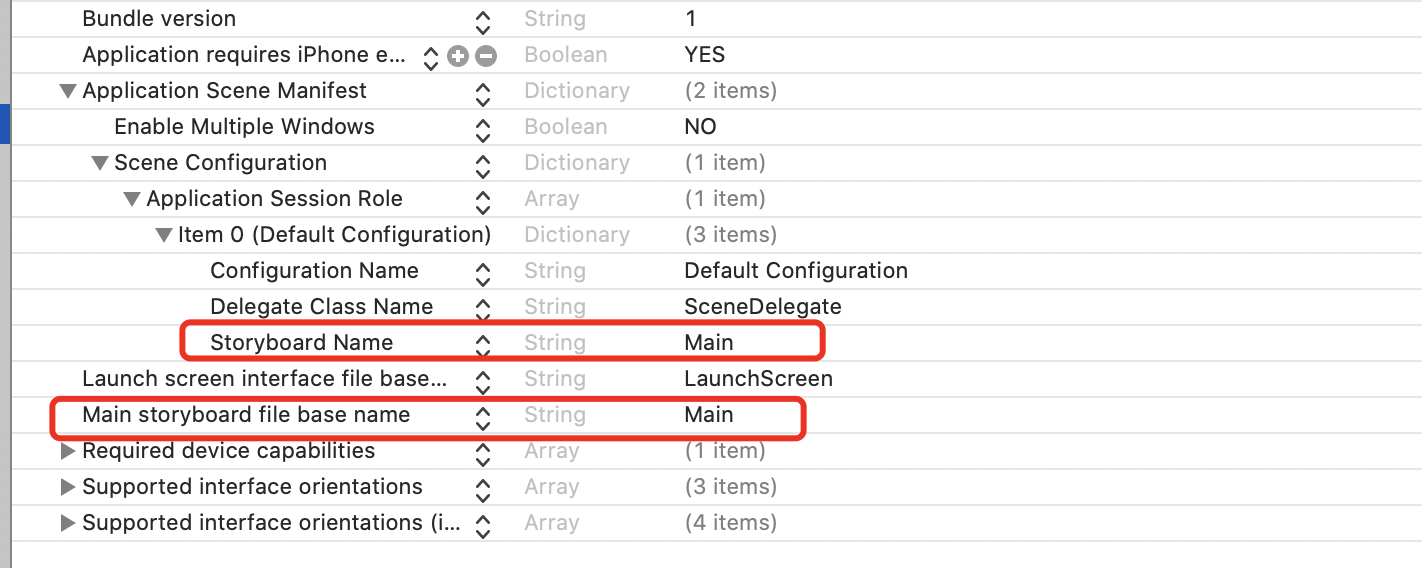
删除 Info,plist 中的信息
- 在
SceneDelegate.m中编写代码启动页面,
- (void)scene:(UIScene *)scene willConnectToSession:(UISceneSession *)session options:(UISceneConnectionOptions *)connectionOptions{
    // Override point for customization after application launch.
    //    1. 创建一个显示的UIWindow,大小和屏幕一样、
    self.window = [[UIWindow alloc] initWithWindowScene:(UIWindowScene *)scene];

    //    2. 创建一个显示的控制器
    UIViewController *vc =  [[UIViewController alloc] init];
    // 为了查看展示效果,设置为红色
    vc.view.backgroundColor = UIColor.redColor;

    self.window.rootViewController=vc;

    //    4. 将window显示出来
    [self.window makeKeyAndVisible];
}
其实本质上来讲,一个 storyboard 做的工作也是和我们上面写的代码是一致的。
# 2. 使用代码的方式加载 Storyboard
众所周知,首页肯定是只有一个的,也就是 Storyboard 中箭头指向的;但是很多情况下 Storyboard 中是没有箭头的,那么我们应该如何去加载 Storyboard 呢?
在上面的例子基础上,我能首先创建一个 Me.storyboard,然后手动拖动一个 ViewController 过来;并给 storyboard 设置一个唯一标识符 abc ;
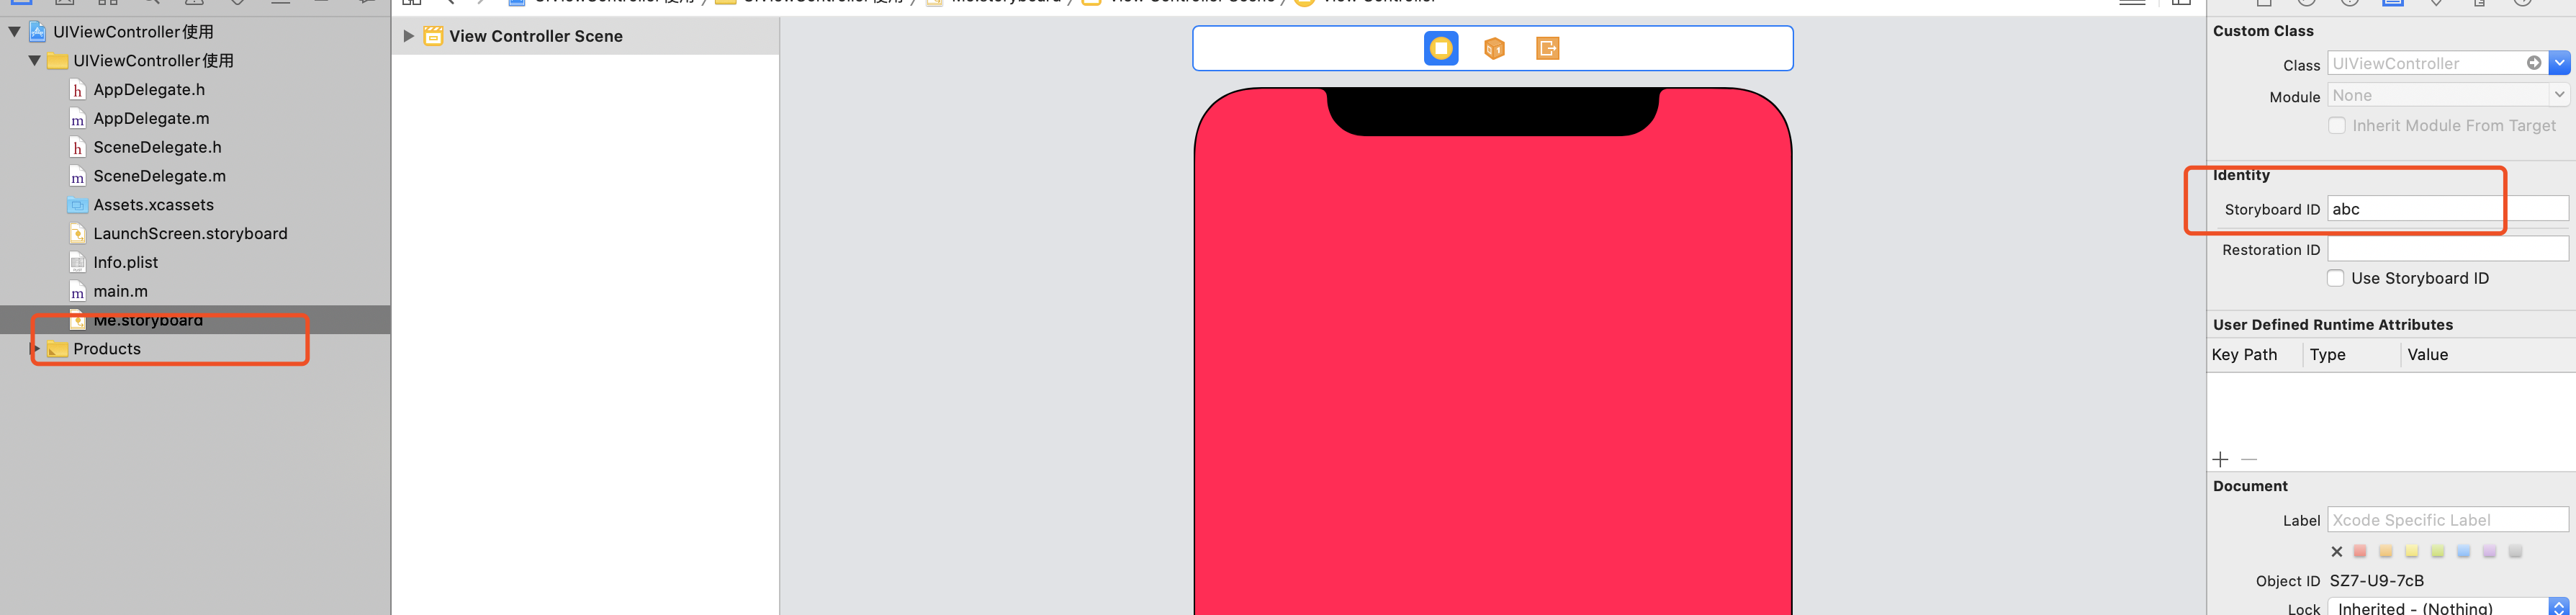
然后在代码中只需要吧之前的代码进行更换即可:
- (void)scene:(UIScene *)scene willConnectToSession:(UISceneSession *)session options:(UISceneConnectionOptions *)connectionOptions {
    // Override point for customization after application launch.
    //    1. 创建一个显示的UIWindow,大小和屏幕一样、
    self.window = [[UIWindow alloc] initWithWindowScene:(UIWindowScene *)scene];;
    //    2. 创建一个显示的控制器
    //    UIViewController *vc = [[UIViewController alloc] init];
    //    vc.view.backgroundColor = UIColor.redColor;
    //    加载Storyboard,注意Storyboard的名字不需要添加后缀
    UIStoryboard *sb = [UIStoryboard storyboardWithName:@"Me" bundle:nil];
    //    使用唯一标识符加载UIViewController
    UIViewController *vc = [sb instantiateViewControllerWithIdentifier:@"abc"];
    //    可以加载箭头指向的Storyboard
    //    UIViewController *vc = [sb instantiateInitialViewController];
    //    3. 将控制器和window关联
    self.window.rootViewController=vc;

    //    4. 将window显示出来
    [self.window makeKeyAndVisible];

}
# 3. XIB 与纯代码方式创建 UIViewController
创建项目 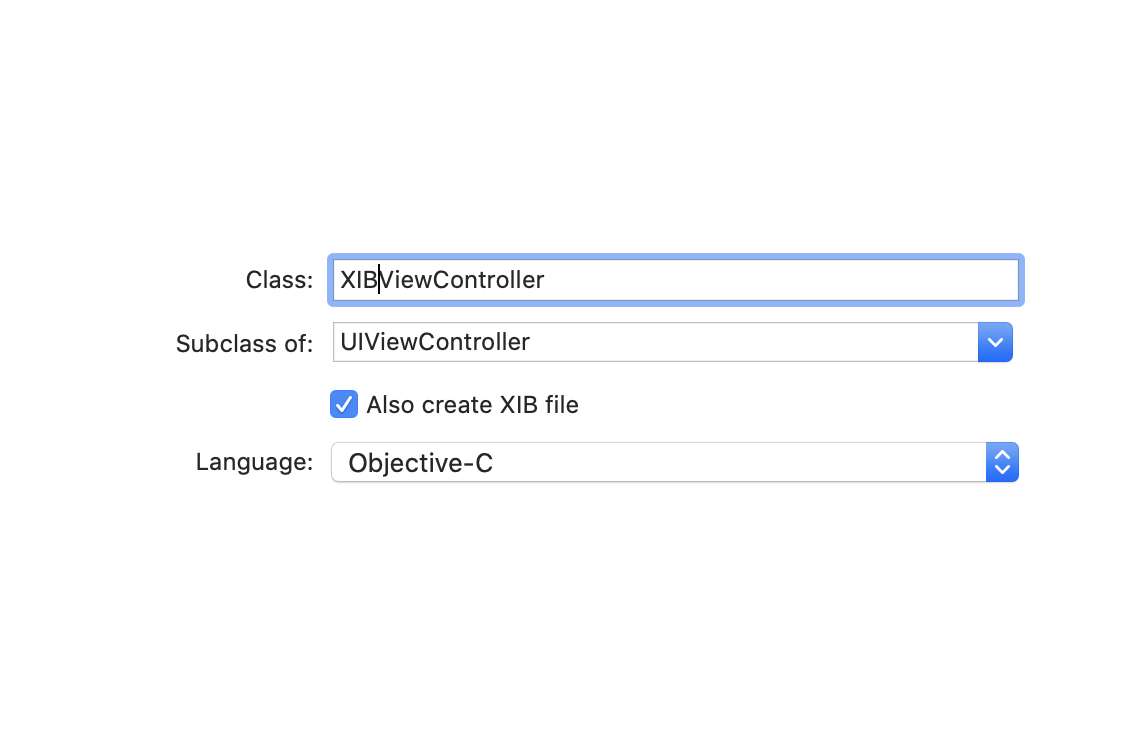
结合前面的两种,我们一起来看一下,如何自定义 UIViewController。
- (void)scene:(UIScene *)scene willConnectToSession:(UISceneSession *)session options:(UISceneConnectionOptions *)connectionOptions{
    // Override point for customization after application launch.
    //    1. 创建一个显示的UIWindow,大小和屏幕一样、
    self.window = [[UIWindow alloc] initWithWindowScene:(UIWindowScene *)scene];
    //    2. 创建一个显示的控制器
    //    UIViewController *vc = [[UIViewController alloc] init];
    //    vc.view.backgroundColor = UIColor.redColor;


    //    2.1 加载Storyboard,注意Storyboard的名字不需要添加后缀
    //    UIStoryboard *sb = [UIStoryboard storyboardWithName:@"Me" bundle:nil];
    //    2.1 使用唯一标识符加载UIViewController
    //    UIViewController *vc = [sb instantiateViewControllerWithIdentifier:@"abc"];
    //    可以加载箭头指向的Storyboard
    //    UIViewController *vc = [sb instantiateInitialViewController];

    //    2.2.1 使用自定义的UIViewController
    XIBViewController *vc= [[XIBViewController alloc] initWithNibName:@"XIBViewController" bundle:nil];
    // 2.2.2 或者直接使用  XIBViewController *vc= [[XIBViewController alloc] init];


    //    3. 将控制器和window关联
    self.window.rootViewController=vc;

    //    4. 将window显示出来
    [self.window makeKeyAndVisible];

}
# 4. 使用 XIB 创建 UIViewController 可能遇到的问题
- 如果创建文件的时候没有勾选同步创建 xib 文件,而在后续需要使用 XIB 的话(手动创建 View/手动创建了一个 XIB),则会遇到 程序直接崩溃

如果手动创建的 XIB 文件的名字,和.h/.m 文件的名字 的前缀一样,都会报错;比如如果我创建的.h/.m 文件为 OneViewController.m/.h,那么我创建的 XIB 文件,如果为 OneView 或者 OneViewController.xib 或者前缀包含在 OneViewController 中,都会报错。如果名字不相似就不会报错
# 解决方案一: UI 方式
手动设置 ClassName
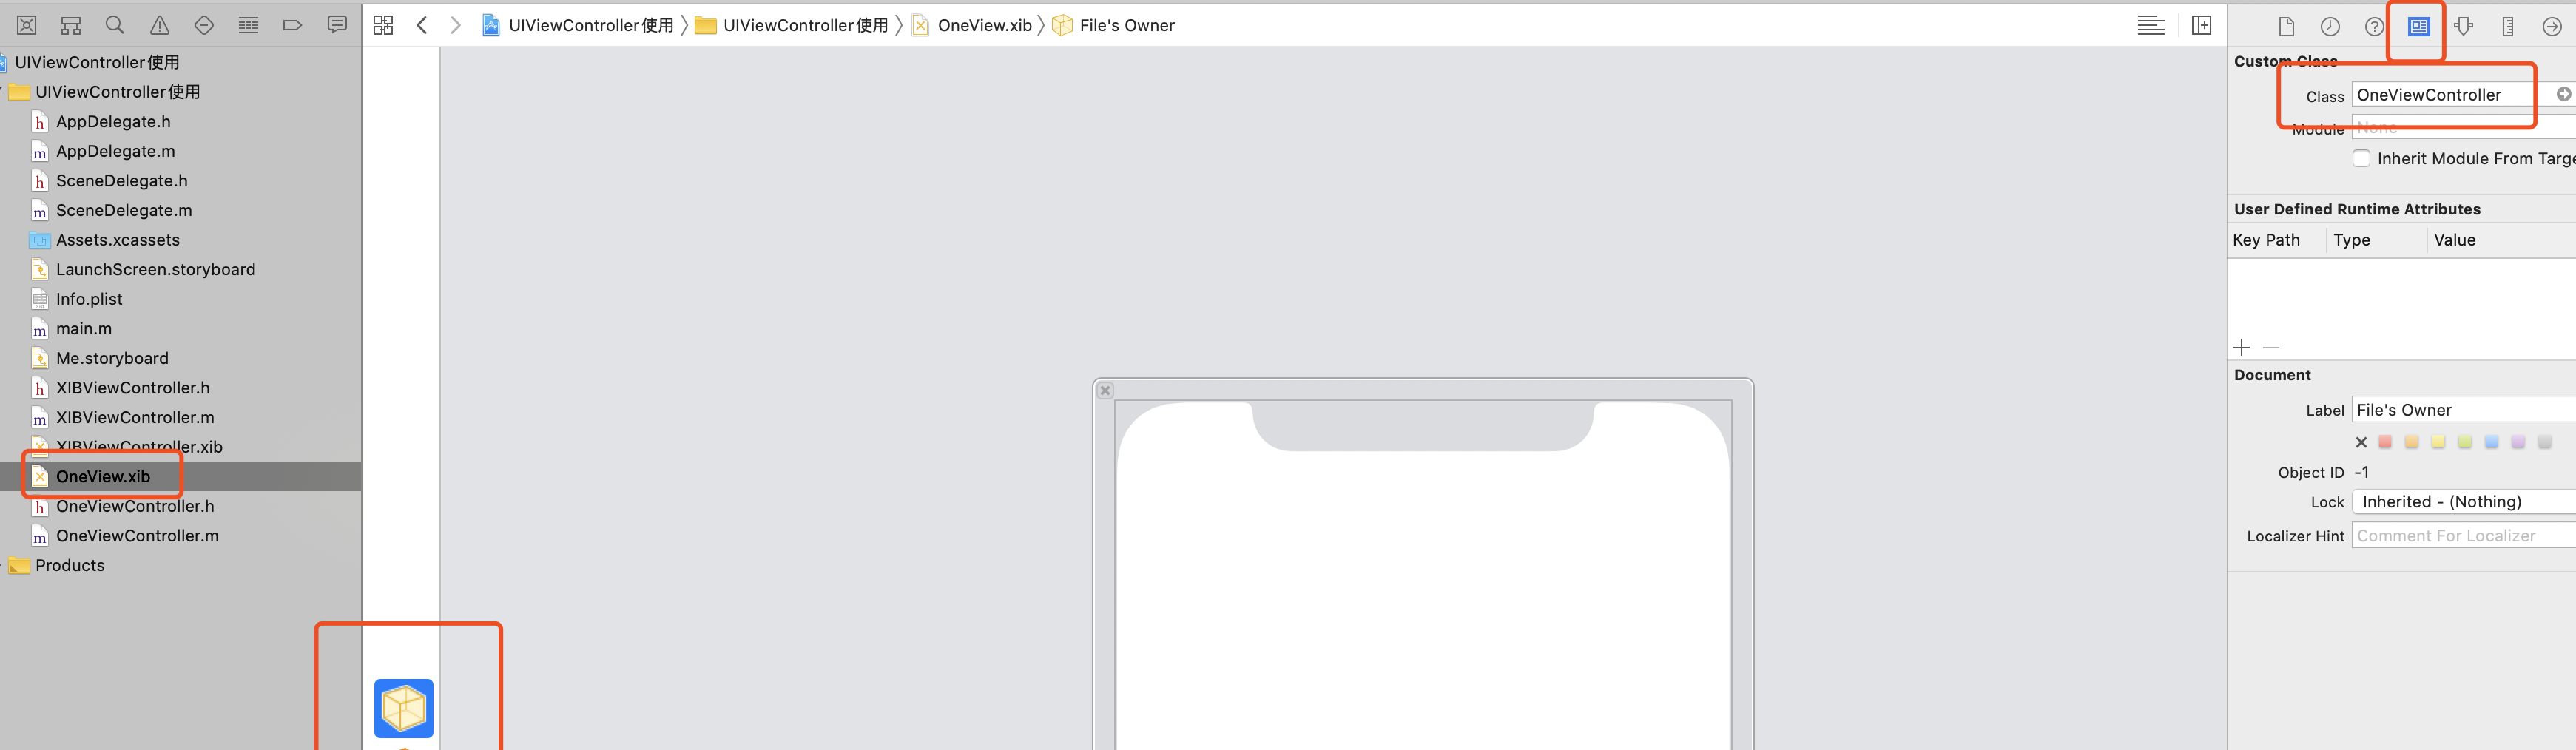
将 OneView 和 OneViewController 进行关联
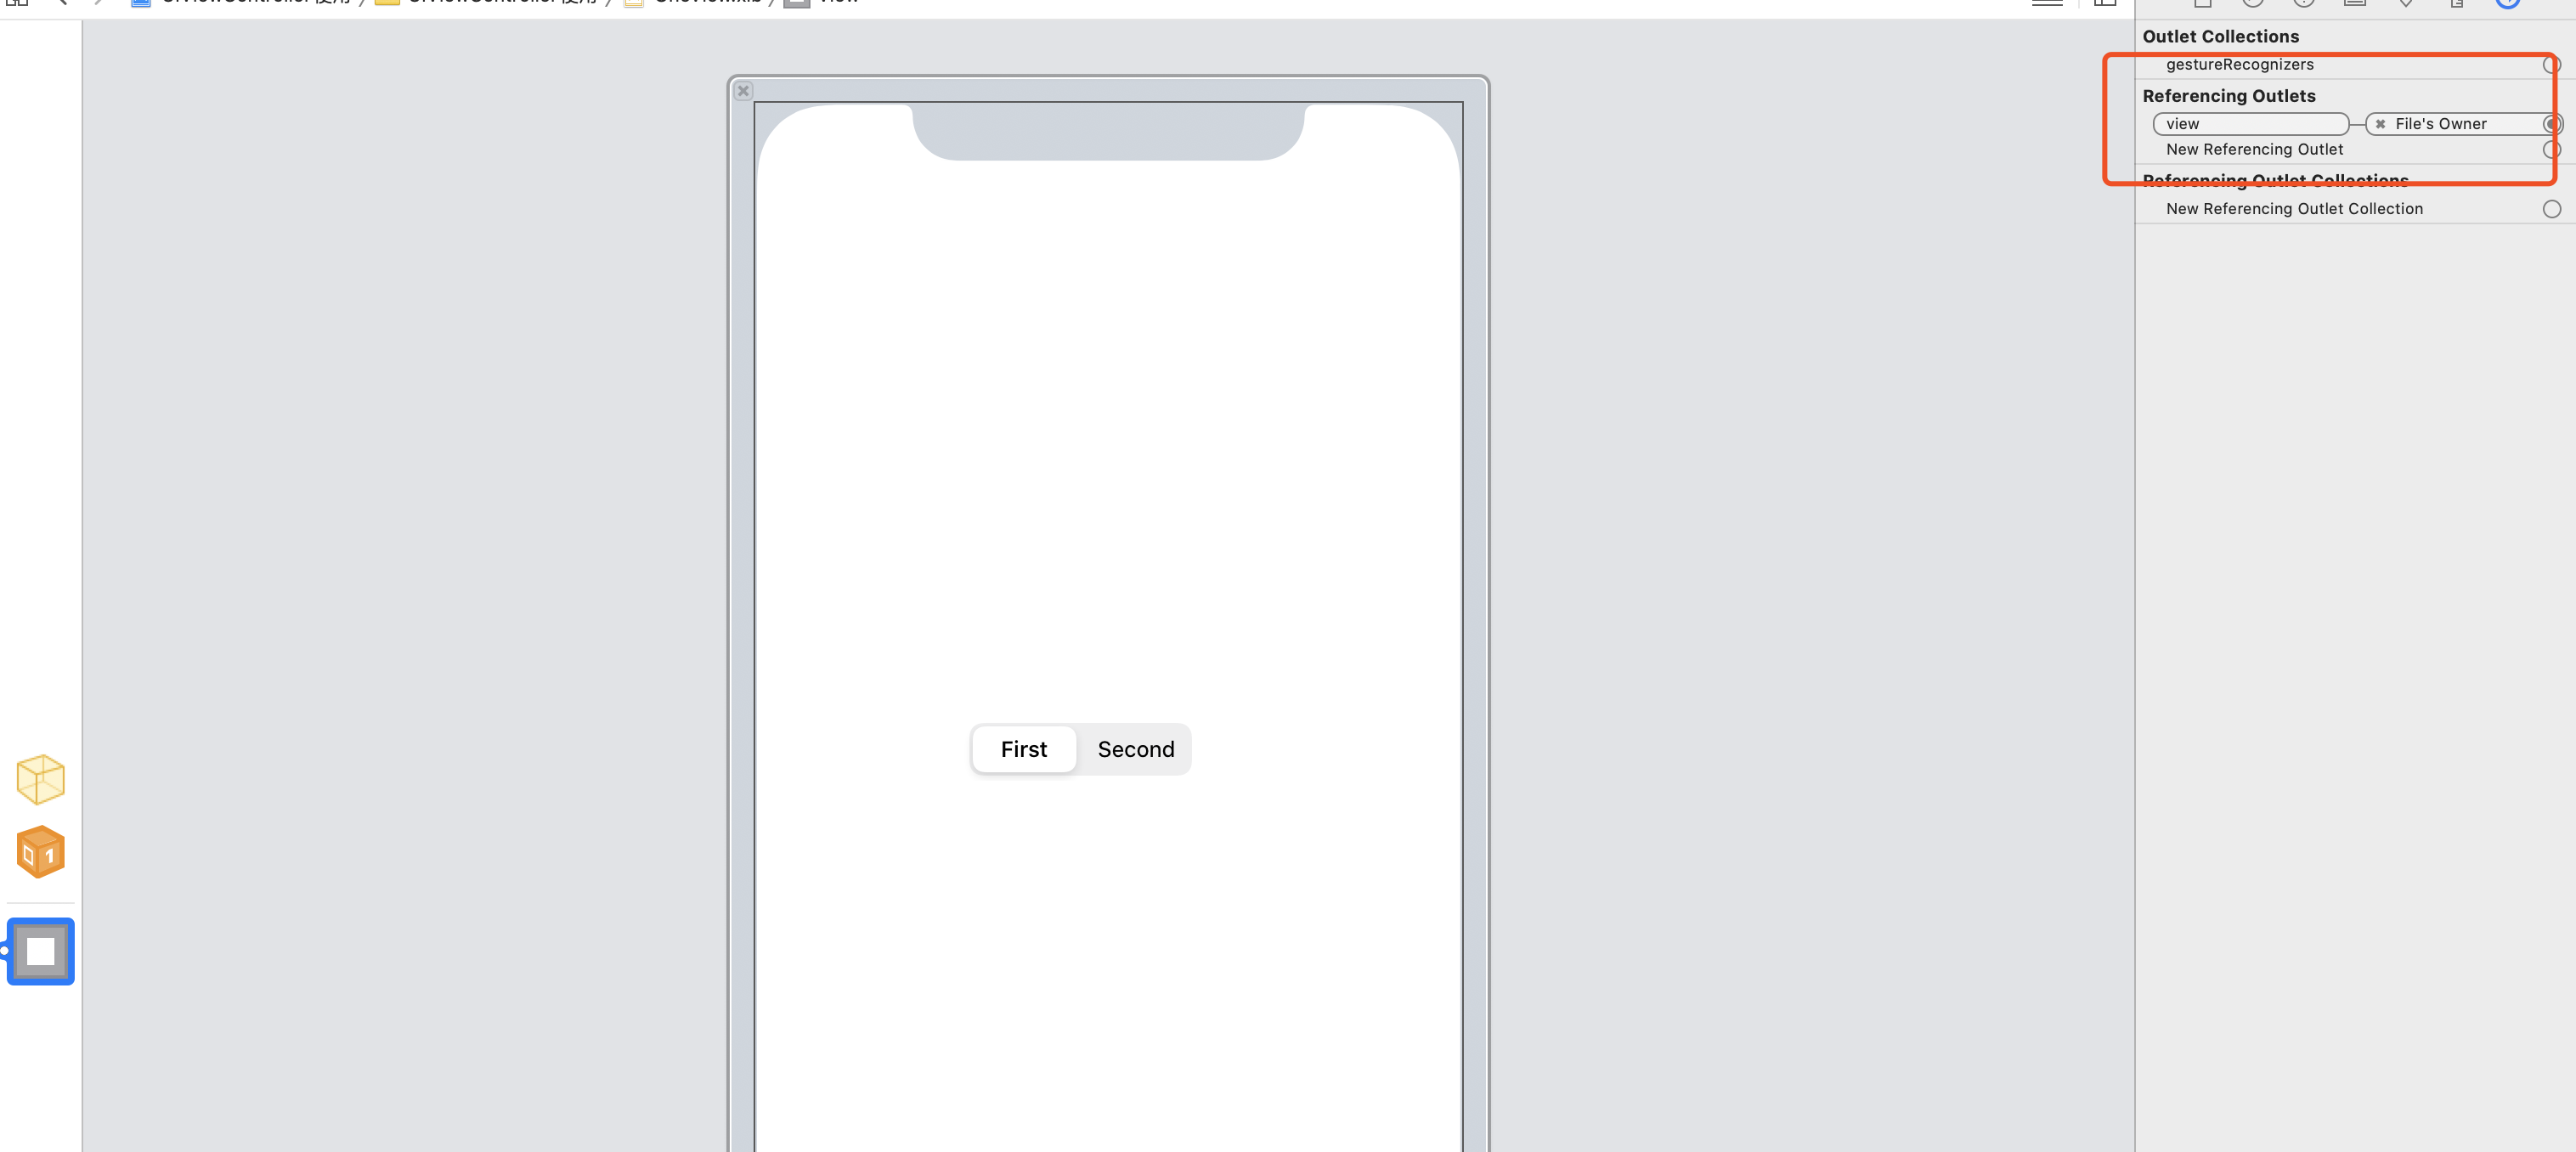
将 Files' Owner 按住 control 按键 拖动到 第三个按钮 View 上;
 可以查看是否关联成功
# 解决方案二:代码方式
从 XIB 中加载 View
 TwoViewController *vc= [[TwoViewController alloc] init];
    //    加载Nib,返回的是一个数组,因为一个xib中可以返回多个View
    NSArray *array= [[NSBundle mainBundle] loadNibNamed:@"Common" owner:nil options:nil];
    vc.view = [array firstObject];
# XIB 加载 View 的尺寸问题
在日常工作中 XIB 创建的视图,更多的可能只是屏幕中的某一个控件;而不是整个屏幕。
//
//  ViewController.m
//  XIB创建View的尺寸问题

#import "ViewController.h"

@interface ViewController ()

@end

@implementation ViewController

- (void)viewDidLoad {
    [super viewDidLoad];
    // Do any additional setup after loading the view.
    UIView *view = [[[NSBundle mainBundle] loadNibNamed:@"Common" owner:nil options:nil] firstObject];
    // 记得手动设置尺寸
    view.frame =CGRectMake(0, 20, UIScreen.mainScreen.bounds.size.width, 200);
    [self.view addSubview:view];

}


@end
# 5. loadView 方法的使用
注意点:
如果在控制器中重写得了 loadView 方法,如果使用 storyborad 或者使用 xib 的方式都会失效
如果 loadView 中没有设置 view,此时不能再 viewDidLoad 中调用 self.view,否则会造成程序死循环。
#import "ViewController.h"

@interface ViewController ()

@end

@implementation ViewController
// 如果在控制器中重写得了loadView方法,如果使用storyborad或者使用xib的方式都会失效
// 此时需要我们手动编写 View的初始化
- (void)loadView{
    //     如果loadView中没有设置view,此时不能再viewDidLoad中调用self.view,否则会造成程序死循环
    self.view = [[UIView alloc] initWithFrame:UIScreen.mainScreen.bounds];
    NSLog(@"loadView");
}

- (void)viewDidLoad {
    [super viewDidLoad];
    NSLog(@"viewDidLoad");


}

/***
 打印的结果:
 loadView
 viewDidLoad

 表示 loadView会优先于 viewDidLoad加载,
 如果loadView中没有设置,此时不能再viewDidLoad中调用self.view,否则会造成程序死循环

 */

@end
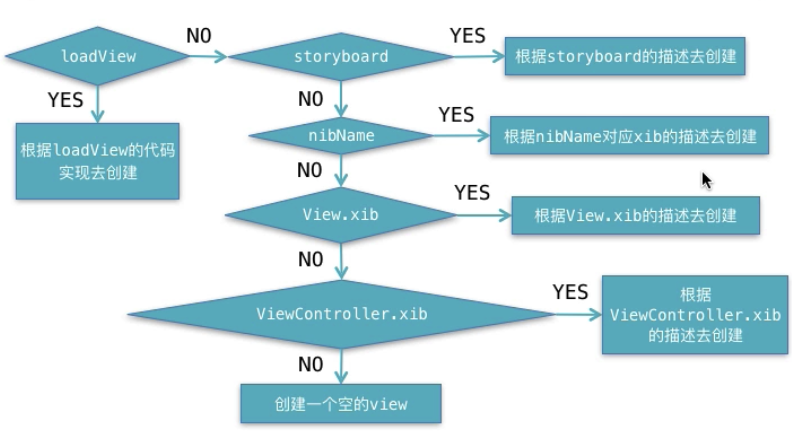
其整个视图控制器的创建流程如下:
# 5. UIViewController 中 View 的懒加载
首先我们在 AppDelegte 中初始化 Controller,并为 View 设置背景色:
 NSLog(@"%s",__func__);

    //    1. 创建一个显示的UIWindow,大小和屏幕一样、
    self.window= [[UIWindow alloc] initWithFrame: UIScreen.mainScreen.bounds ];
    //    2. 创建一个显示的控制器
    MainViewController *vc = [[MainViewController alloc] init];
    NSLog(@"访问View之前");

    vc.view.backgroundColor = UIColor.redColor;
    NSLog(@"访问View之后");
第二步:我们在 MainViewController 中也设置一下背景色:
- (void)viewDidLoad {
    [super viewDidLoad];
    // Do any additional setup after loading the view.
    NSLog(@"%s",__func__);
    self.view.backgroundColor = UIColor.yellowColor;

}
如果程序运行你会神奇的发现,程序的 背景色为红色,而不是黄色。这就是 View 的懒加载导致的;
查看 NSLog 我们得知:Controller 的 viewDidLoad 方法,其实在我们在访问到了 controller 对应的 view(也就是 vc.view.backgroundColor)的时候才会调用;而不是在初始化的时候,也不是在访问完成之后才会调用
2020-06-25 11:55:42.175168+0800 UIViewController使用[12216:17014362] -[SceneDelegate application:willConnectToSession:]
2020-06-25 11:55:42.176636+0800 UIViewController使用[12216:17014362] 访问View之前
2020-06-25 11:55:42.177088+0800 UIViewController使用[12216:17014362] -[MainViewController viewDidLoad]
2020-06-25 11:55:42.177305+0800 UIViewController使用[12216:17014362] 访问View之后
进一步验证查看:
    NSLog(@"访问View之前");
    if([vc isViewLoaded]){
        NSLog(@"是否加载1");
         vc.view.backgroundColor = UIColor.blueColor;
    }
    vc.view.backgroundColor = UIColor.redColor;

    if([vc isViewLoaded]){
         vc.view.backgroundColor = UIColor.greenColor;
    }
    NSLog(@"访问View之后");
运行此代码,你会发现,最后颜色为绿色,而是否加载 1,根本没有打印。
# 二、Controller 跳转
# 1. Modal 方式跳转
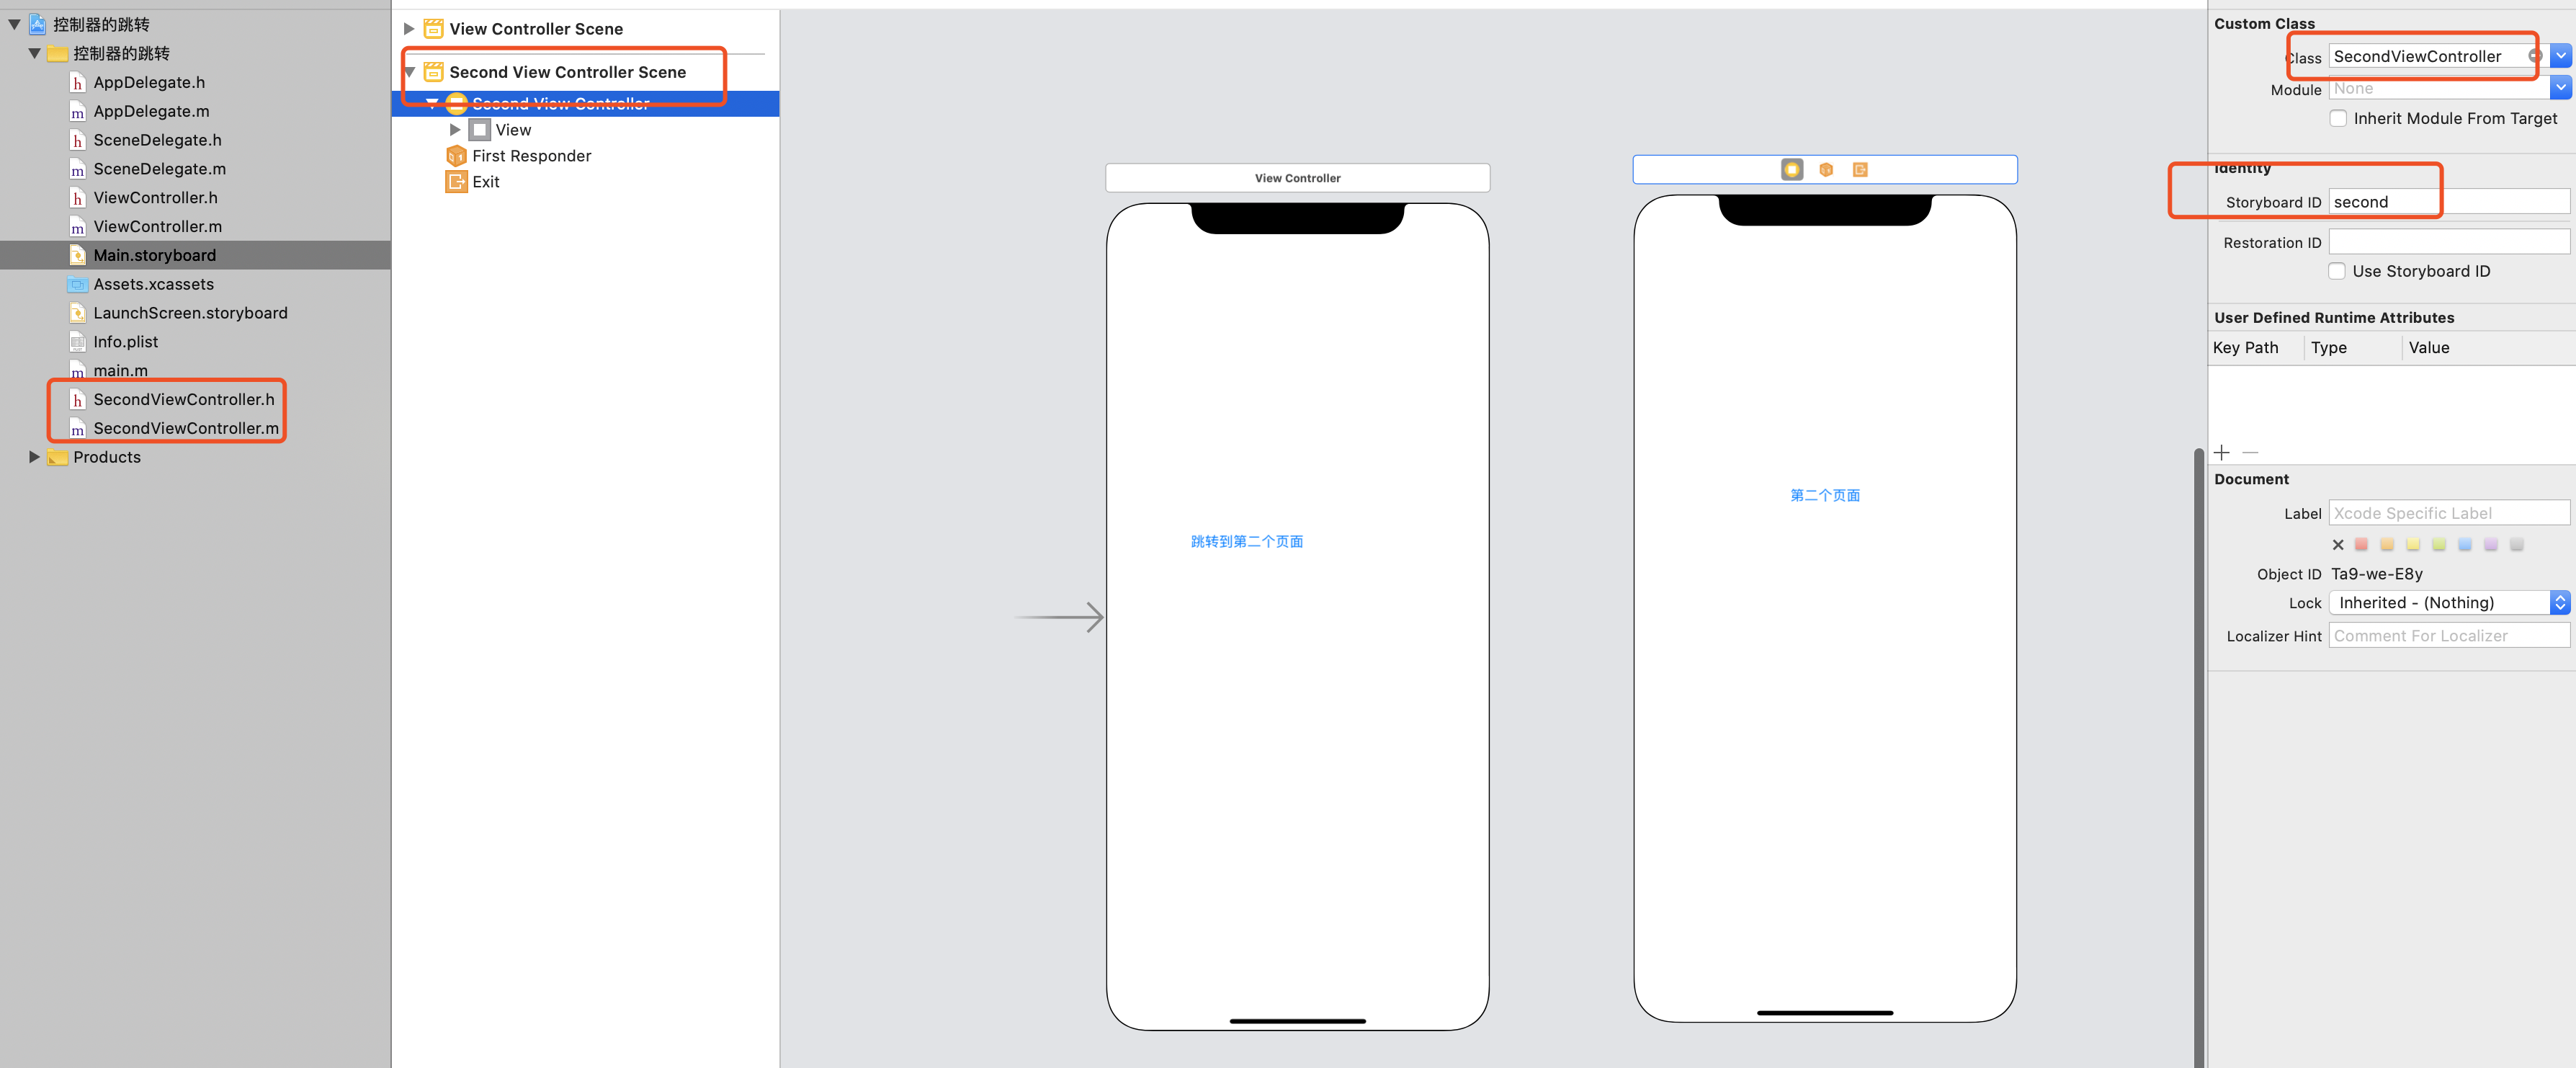
首先拖动一个 ViewController 进来,并设置 Class 为 SecondController 并设置唯一标识符为 second。
编写跳转逻辑:
#import "ViewController.h"
#import "SecondViewController.h"
@interface ViewController ()
- (IBAction)moveToSecond:(id)sender;

@end

@implementation ViewController

- (void)viewDidLoad {
    [super viewDidLoad];
    // Do any additional setup after loading the view.
}
- (IBAction)moveToSecond:(id)sender {
    //    1. 初始化要跳转的控制器
    SecondViewController *vc = [[UIStoryboard storyboardWithName:@"Main" bundle:nil] instantiateViewControllerWithIdentifier:@"second"];
    // ios13 presentViewController不能铺满全屏,所以需要设置样式为全屏
    if (@available(iOS 13.0, *)) {
        vc.modalPresentationStyle =UIModalPresentationFullScreen;
    }

    //    执行跳转逻辑,使用Modal的方式
    [self presentViewController:vc animated:YES completion:nil];
}
@end
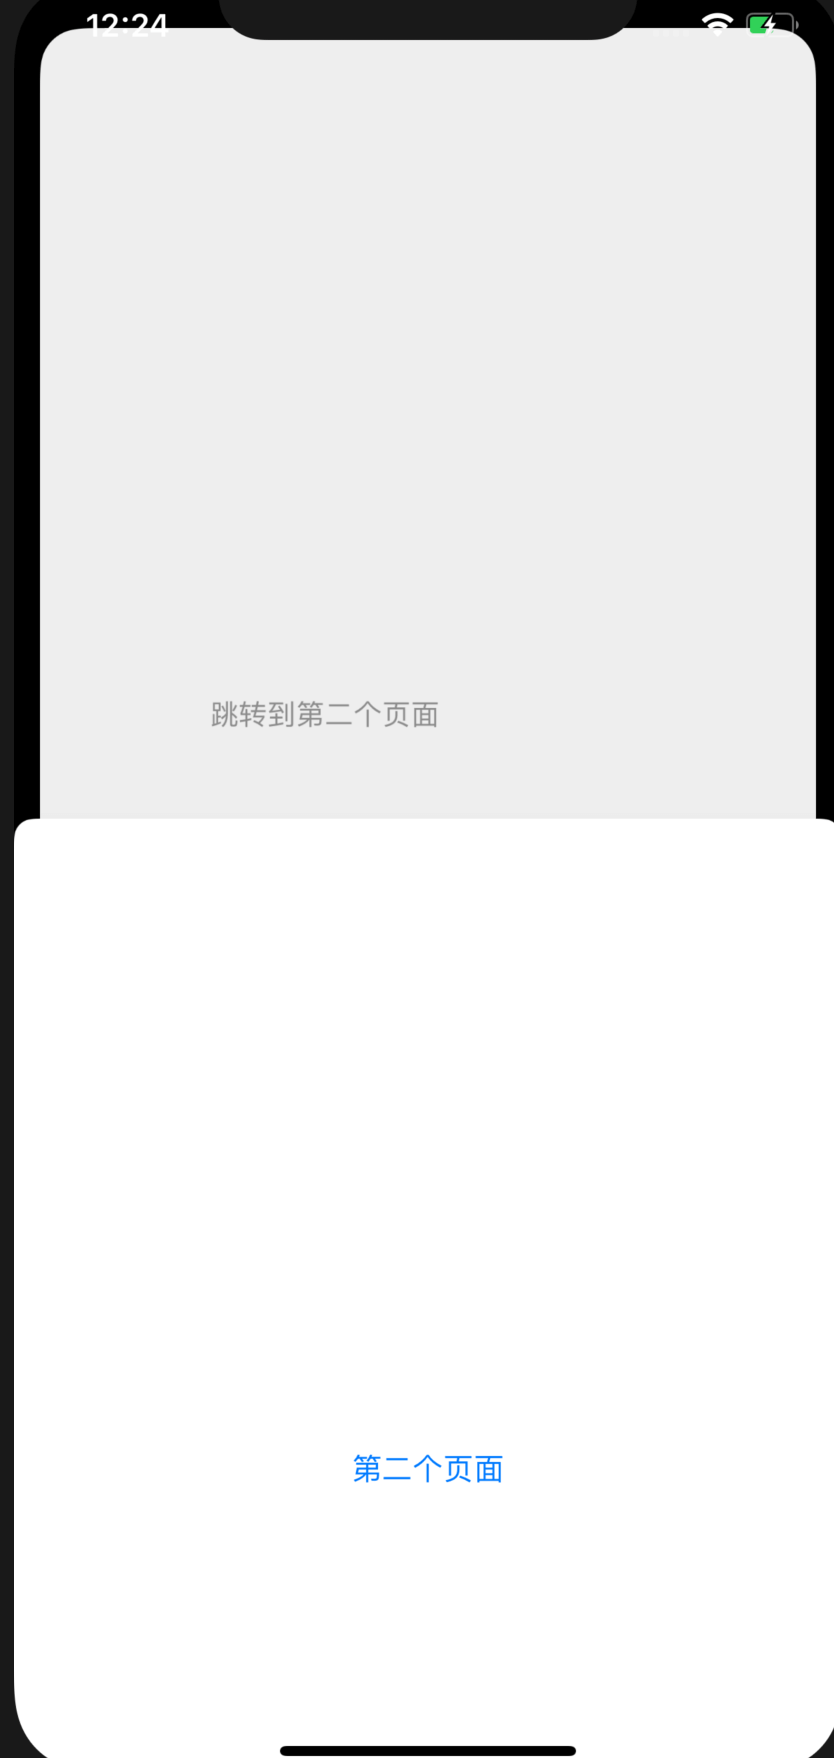
从下往上的显示出来,覆盖整个页面
# 2. 通过 Segue 连线的方式
这种方式仅仅局限于使用 storyboard 中使用
创建连接线
设置线的唯一标识符:

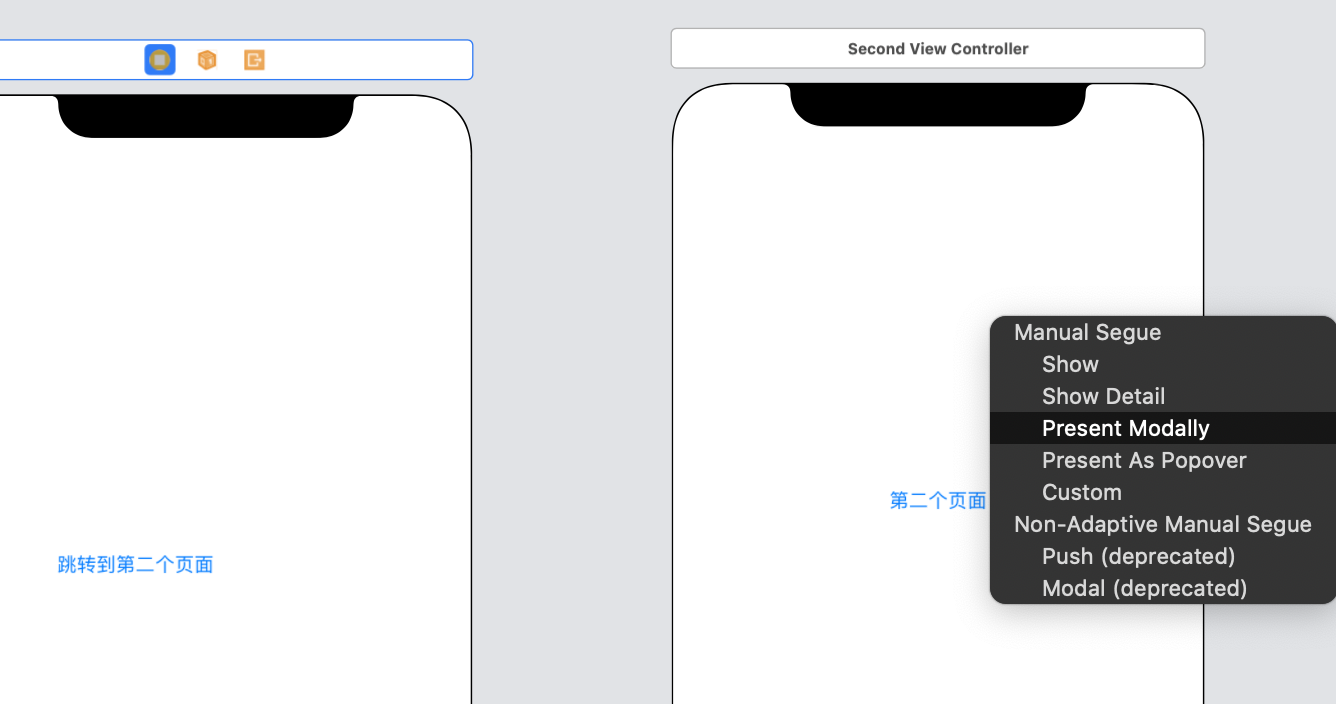
使用segue方式连接
Segue过渡类型(modalTransitionStyle)上面图片的Translation: 是从一个场景切换到另一个场景时播放的动画。一般用默认的就好了。
Cover Vertical -- 新场景从下向上移动,逐渐覆盖旧场景。
Flip Horizontal -- 视图水平翻转,以显示背面的新场景。
Cross Dissolve -- 旧场景淡出,新场景淡入。
Partial Curl -- 旧场景像书页一样翻开,显示下面的新场景。
Segue显示样式(modalPresentationStyle): 它决定了模态视图在屏幕上的显示方式,(只在iPad应用程序中)
Form Sheet(表单) -- 将场景调整到比屏幕小(不管朝向),并在当前场景后面显示原始场景,这几乎相当于在一个iPad窗口中显示。
Page Sheet(页面) -- 调整场景大小,使其以纵向格式显示。
Full Screen(全屏) -- 调整场景大小,使其覆盖整个屏幕。
Current Context(当前上下文) -- 以原始场景的显示方式展示场景。
代码中按钮点击,让连线执行:performSegueWithIdentifier
- (IBAction)segueMoveToSecond:(id)sender {
    [self performSegueWithIdentifier:@"abcd" sender:nil];
}
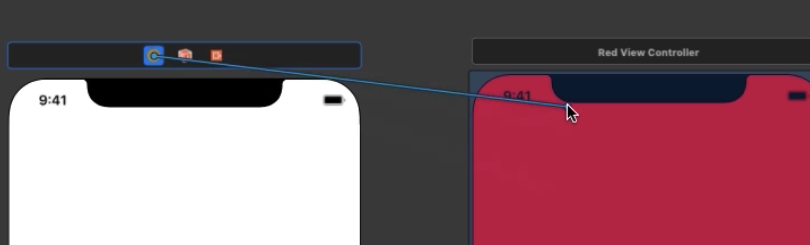
也可以让按钮自动的跳转,但是不带有任何的条件过滤,将按钮拖拽到另外一个 storyborad 中,并选择 Modally;一般很少使用这种除非做类似于打开设置页面 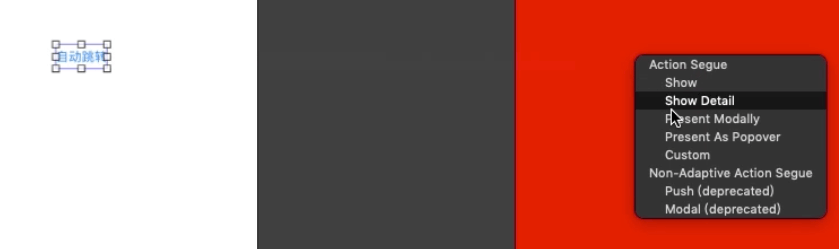
# 3. UIAlertController 的 Alert 方式跳转
准备工作:在一个 StoryBoard 中新增一个按钮,并触发点击事件。
屏幕中央弹出对话框: UIAlertControllerStyleAlert 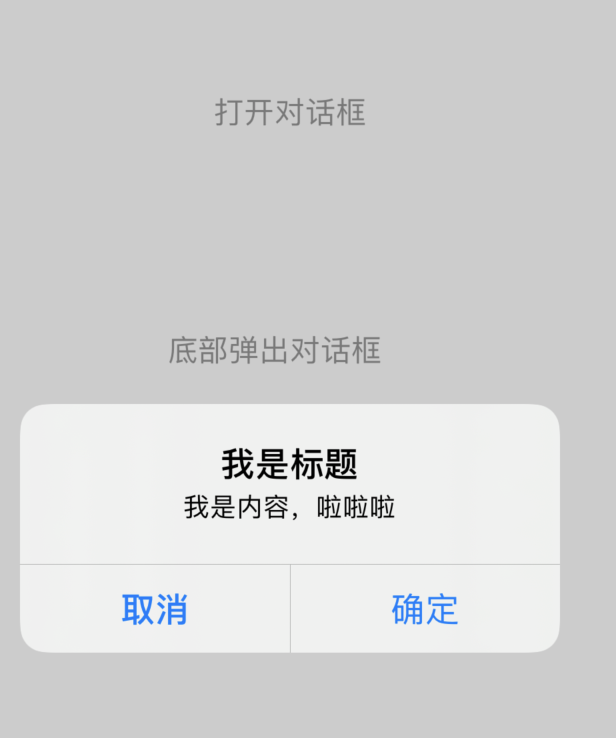
- (IBAction)showAlert:(id)sender {
    UIAlertController *alert = [UIAlertController alertControllerWithTitle:@"我是标题" message:@"我是内容,啦啦啦" preferredStyle: UIAlertControllerStyleAlert];

    //    创建确认按钮
    UIAlertAction *ok = [UIAlertAction actionWithTitle:@"确定" style:UIAlertActionStyleDefault handler:^(UIAlertAction * _Nonnull action) {
        NSLog(@"点击了确认按钮");
    }];
    //    创建取消按钮
    UIAlertAction *cancel = [UIAlertAction actionWithTitle:@"取消" style:UIAlertActionStyleCancel handler:^(UIAlertAction * _Nonnull action) {
        NSLog(@"点击了取消按钮");
    }];
    //    添加确认按钮
    [alert addAction:ok];
    //    给对话框添加x取消按钮
    [alert addAction:cancel];

    [self presentViewController:alert animated:true completion:nil];
}
@end
屏幕底部弹出对话框:UIAlertControllerStyleActionSheet 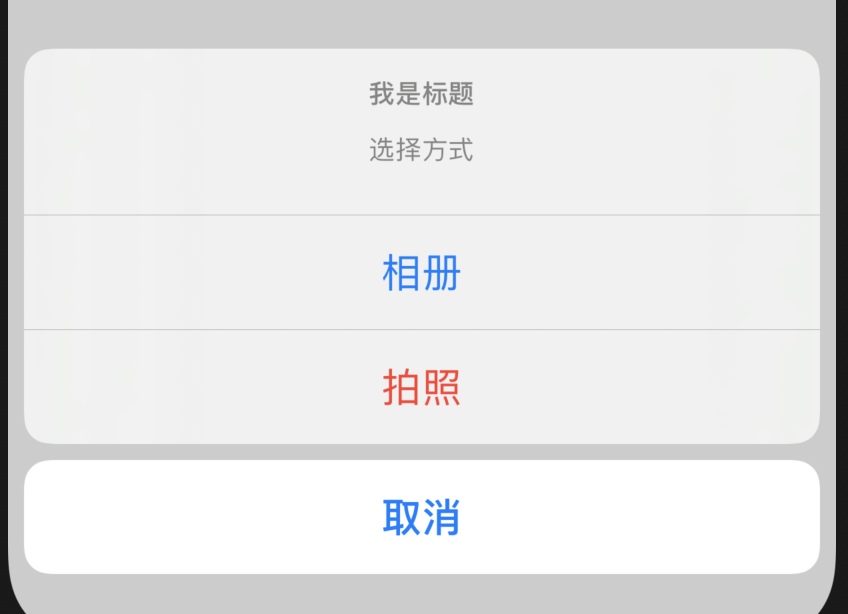
- (IBAction)showAlertInBottom:(id)sender {
    //    创建ActionSheet并设置为UIAlertControllerStyleActionSheet类型
    UIAlertController *actionSheet = [UIAlertController alertControllerWithTitle:@"我是标题" message:@"选择方式" preferredStyle:UIAlertControllerStyleActionSheet];
    //    分别设置选项
    UIAlertAction *one = [UIAlertAction actionWithTitle:@"相册" style:UIAlertActionStyleDefault handler:^(UIAlertAction * _Nonnull action) {
        NSLog(@"点击了相册");
    }];
    //    此处为了演示,设置为UIAlertActionStyleDestructive你会发现选项是红色
    UIAlertAction *two = [UIAlertAction actionWithTitle:@"拍照" style:UIAlertActionStyleDestructive handler:^(UIAlertAction * _Nonnull action) {
        NSLog(@"点击了拍照");

    }];
    //    取消按钮
    UIAlertAction *cancel = [UIAlertAction actionWithTitle:@"取消" style:UIAlertActionStyleCancel handler:^(UIAlertAction * _Nonnull action) {
        NSLog(@"点击了取消按钮");

    }];

    [actionSheet addAction:one];
    [actionSheet addAction:two];
    [actionSheet addAction:cancel];

    [self presentViewController:actionSheet animated:YES completion:nil];
}
# 三、 Controller 的传值
# 1. 控制器顺向传值 A->B
我们拿本章,第二节的数据,使用 Modal 方式跳转的例子进行实验如何顺向传值。
# 传值方式一:使用代码的方式跳转传值(非 Segue 的方式)
操作步骤:
- 要传值到第二个页面,只需要在第二个页面.h 文件中声明一个属性即可
//
//  SecondViewController.h
//  控制器的跳转

#import <UIKit/UIKit.h>

NS_ASSUME_NONNULL_BEGIN

@interface SecondViewController : UIViewController
@property(nonatomic,copy) NSString *passValue;//用来接收上一个页面传递过来的值
@end

NS_ASSUME_NONNULL_END
然后展示出来:
//
//  SecondViewController.m
//  控制器的跳转
#import "SecondViewController.h"

@interface SecondViewController ()

@property (weak, nonatomic) IBOutlet UILabel *infoLabel;

@end

@implementation SecondViewController

- (void)viewDidLoad {
    [super viewDidLoad];
    self.infoLabel.text=self.passValue;
}
@end
- 再构建 ViewController 的时候将值附上即可
- (IBAction)moveToSecond:(id)sender {
    //    1. 初始化要跳转的控制器
    SecondViewController *vc = [[UIStoryboard storyboardWithName:@"Main" bundle:nil] instantiateViewControllerWithIdentifier:@"second"];
    vc.passValue=@"我是第一个页面传递过来的数据";
    //    执行跳转逻辑,使用Modal的方式
    [self presentViewController:vc animated:YES completion:nil];
}
# 传值方式二:使用 Segue 的方式跳转 传值
此种情况的主要示例可以见本章的第二节,使用 Segue 连线的方式跳转。
那么其传值的方式,由于不能拿到 Controller 的实例,那么我们应该如何传值呢 ?
我们可以查看 SecondController,在创建的时候为我们创建了一个额外的方法:prepareForSegue
我们可以使用 [segue destinationViewController] 的方式获取到源 Controller 和目标 Controller;并且 UIStoryboardSegue 我们发现,其实就是那一条线
那么我们是不是就可以在第一个页面使用此方法 获取到目标 Controller,并赋值呢?
//
//  ViewController.m
//  控制器的跳转

#import "ViewController.h"
#import "SecondViewController.h"
@interface ViewController ()
- (IBAction)moveToSecond:(id)sender;
- (IBAction)segueMoveToSecond:(id)sender;

@end

@implementation ViewController

- (void)viewDidLoad {
    [super viewDidLoad];
    // Do any additional setup after loading the view.
}


- (IBAction)moveToSecond:(id)sender {
    //    1. 初始化要跳转的控制器
    SecondViewController *vc = [[UIStoryboard storyboardWithName:@"Main" bundle:nil] instantiateViewControllerWithIdentifier:@"second"];
    vc.passValue=@"我是第一个页面传递过来的数据";
    //    执行跳转逻辑,使用Modal的方式
    [self presentViewController:vc animated:YES completion:nil];
}
// 使用此方法才会真正的传值
- (void)prepareForSegue:(UIStoryboardSegue *)segue sender:(id)sender{
    SecondViewController *second = segue.destinationViewController;
    second.passValue =@"我是通过Segue的方式传递的值";
}

- (IBAction)segueMoveToSecond:(id)sender {
    [self performSegueWithIdentifier:@"abcd" sender:nil];
}
@end

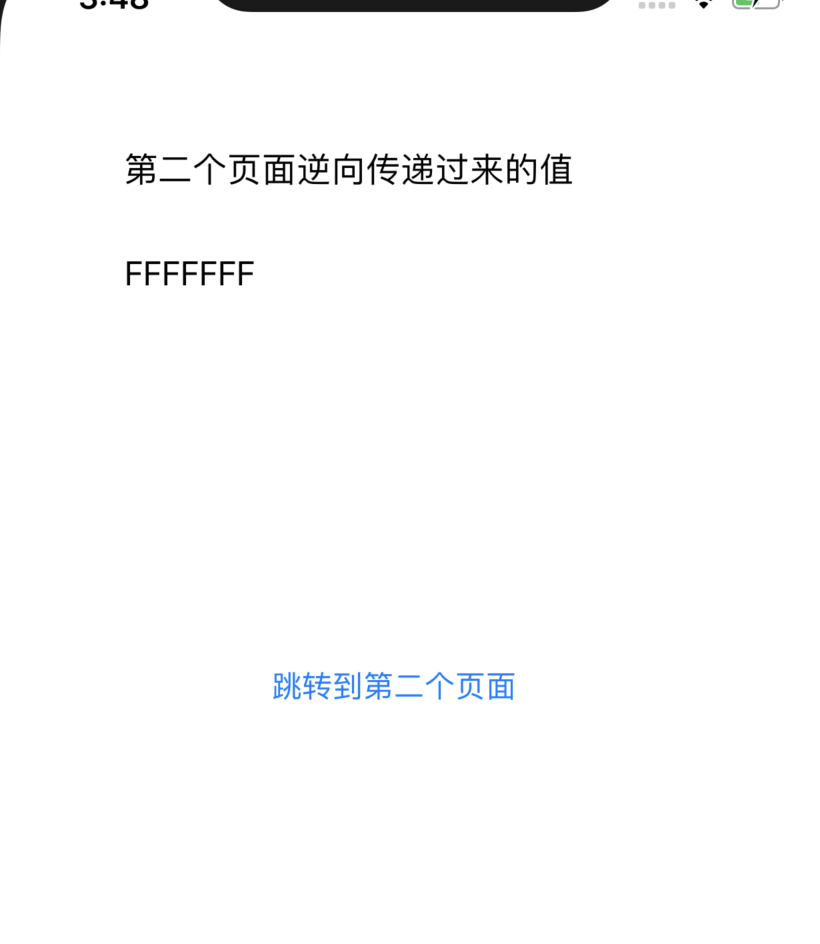
# 2. 控制器逆向传值 B->A
逆向传值一般比较复杂;常用的方式有如下几种:
- 使用代理
- 使用 Block
- 使用通知的方式
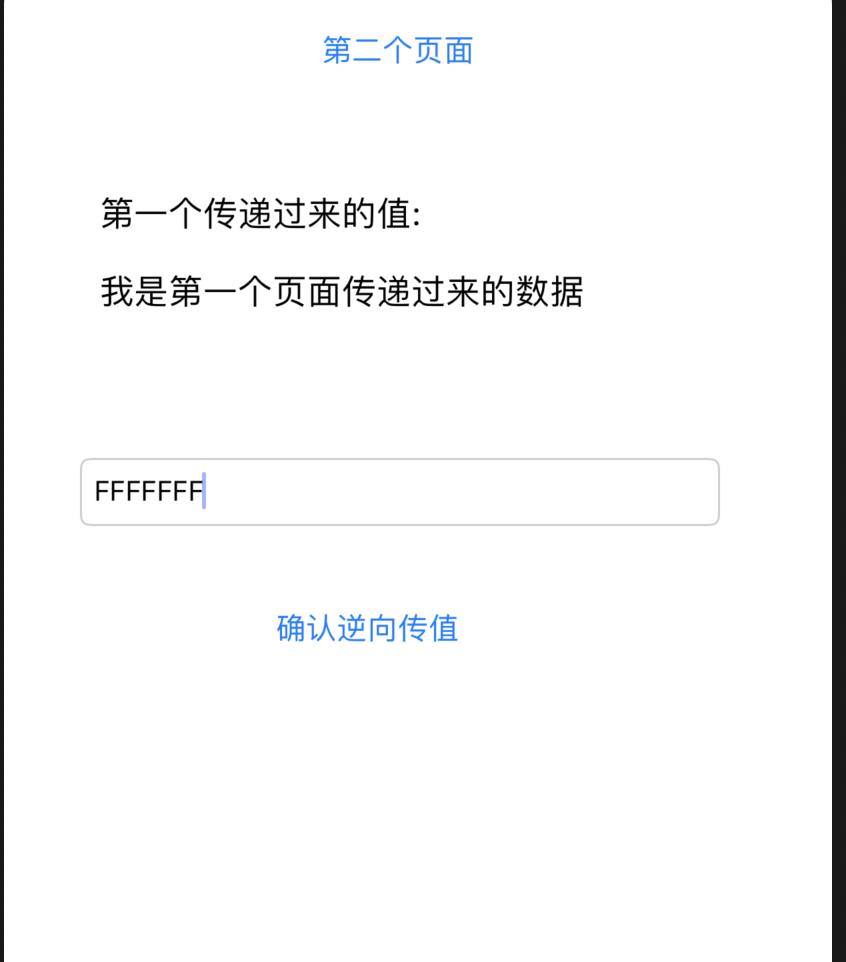
事先准备:
- 在第二个页面设置一个输入框和点击按钮
- 按钮点击关闭当前页面,回到第一个页面
- 第一个页面展示数据
# (1) 使用代理逆向传值
要使用代理方式逆向传值,一共有如下几个步骤:
- B 页面声明协议和需要实现的方法;
- B 页面声明代理属性;
- B 页面完成传值;
- A 页面必须遵循第一步声明的协议;
- A 页面必须实现协议的方法;
- B 页面的代理必须设置为 A 页面;
//
//  SecondViewController.h
//  控制器的跳转

#import <UIKit/UIKit.h>
// 1. B页面声明协议
@protocol passValueProtocol <NSObject>
// 声明一个方法,传递值给第一个页面,传递的参数为NSString的类型,当然 如果你要传递的类型为其他的类型请注意参数类型
- (void) passValueToOne:(NSString *) value;

@end

NS_ASSUME_NONNULL_BEGIN

@interface SecondViewController : UIViewController
@property(nonatomic,copy) NSString *passValue;//用来接收上一个页面传递过来的值
// 2. 定义一个属性,必须遵循passValueProtocol协议
@property(nonatomic,assign) id <passValueProtocol> delegate;
@end

NS_ASSUME_NONNULL_END
//
//  SecondViewController.m
//  控制器的跳转

#import "SecondViewController.h"

@interface SecondViewController ()
@property (weak, nonatomic) IBOutlet UILabel *infoLabel;
- (IBAction)passValueClick:(id)sender;
@property (weak, nonatomic) IBOutlet UITextField *inputValue;

@end

@implementation SecondViewController

- (void)viewDidLoad {
    [super viewDidLoad];
    // Do any additional setup after loading the view.
    self.infoLabel.text=self.passValue;
}

- (IBAction)passValueClick:(id)sender {
    NSString *str = self.inputValue.text;
    //    3, 将要传递的值给代理对象
    [self.delegate passValueToOne:str];
    //    关闭当前页面
    [self dismissViewControllerAnimated:YES completion:nil];
}
@end
然后在第一个页面实现代理并获取到值:
//
//  ViewController.m
//  控制器的跳转
#import "ViewController.h"
#import "SecondViewController.h"
//4. A页面必须遵循第一步声明的协议
@interface ViewController ()<passValueProtocol>
- (IBAction)moveToSecond:(id)sender;
@property (weak, nonatomic) IBOutlet UILabel *secondPassValueLabel;

@end

@implementation ViewController

- (IBAction)moveToSecond:(id)sender {
    //    1. 初始化要跳转的控制器
    SecondViewController *vc = [[UIStoryboard storyboardWithName:@"Main" bundle:nil] instantiateViewControllerWithIdentifier:@"second"];

    //6. B页面的代理必须设置为A页面;
    vc.delegate=self;

    vc.passValue=@"我是第一个页面传递过来的数据";
    //    执行跳转逻辑,使用Modal的方式
    [self presentViewController:vc animated:YES completion:nil];
}

// 5. A页面必须实现协议的方法

- (void)passValueToOne:(NSString *)value{
    self.secondPassValueLabel.text=value;
}

@end
# (2) 使用 Block 逆向传值
使用 Block 的方式和使用代理的方式是类似的;
- B 页面声明 Block;
- B 页面声明 Block 属性;
- B 页面完成传值;
- A 页面实例化 B Controller 的时候实现 Block;
B 页面声明 Block 并 B 页面声明 Block 属性
//
//  SecondViewController.h
//  控制器的跳转

#import <UIKit/UIKit.h>


NS_ASSUME_NONNULL_BEGIN
// 1. 定义block
typedef void (^ PassValueBlock)(NSString *info);

@interface SecondViewController : UIViewController
@property(nonatomic,copy) NSString *passValue;//用来接收上一个页面传递过来的值

// 2. 声明属性
@property(nonatomic,copy) PassValueBlock passValueBlock;
@end

NS_ASSUME_NONNULL_END
B 页面完成传值
//  SecondViewController.m
//  控制器的跳转

- (IBAction)passValueClick:(id)sender {
    NSString *str = self.inputValue.text;
    //    3. 完成传值
    if(self.passValueBlock){
        self.passValueBlock(str);
    }
    //    关闭当前页面
    [self dismissViewControllerAnimated:YES completion:nil];
}
A 页面实例化 B Controller 的时候实现 Block
// 第一个页面
    SecondViewController *vc = [[UIStoryboard storyboardWithName:@"Main" bundle:nil] instantiateViewControllerWithIdentifier:@"second"];
    //    4. A页面实例化B Controller的时候实现Block
    vc.passValueBlock = ^(NSString * _Nonnull info) {
        self.secondPassValueLabel.text= info;
    };
    vc.passValue=@"我是第一个页面传递过来的数据";
    [self presentViewController:vc animated:YES completion:nil];
# (3) 使用通知方式逆向传值
众所周知,使用广播其实是一个一对多的传值方式,也就是说 事件中心,不关心是否是谁来得到具体的值;
使用通知的方式传值有如下几个步骤:
- A 页面注册事件,并实现事件响应函数
- B 页面发送事件,传递值
A 页面注册事件,并实现事件响应函数
#import "ViewController.h"
#import "SecondViewController.h"
//4. A页面必须遵循第一步声明的协议
@interface ViewController ()<passValueProtocol>
- (IBAction)moveToSecond:(id)sender;
- (IBAction)segueMoveToSecond:(id)sender;
@property (weak, nonatomic) IBOutlet UILabel *secondPassValueLabel;

@end

@implementation ViewController

- (void)viewDidLoad {
    [super viewDidLoad];
    // Do any additional setup after loading the view.
    // 1. 注册事件名称为 @abc,并设置响应方法为handlerNoti
    [[NSNotificationCenter defaultCenter] addObserver:self selector:@selector(handlerNoti:) name:@"abc" object:nil];
}

// ...无关代码

// 2. 处理监听到来,从字典中获取到对应的Key值
- (void)handlerNoti:(NSNotification *)noti{
    NSDictionary *userInfo= noti.userInfo;
    self.secondPassValueLabel.text=userInfo[@"info"];
}

@end
B 页面发送事件,传递值
- (IBAction)passValueClick:(id)sender {
    NSString *str = self.inputValue.text;
    // 2. 发送事件,注意,事件名称必须和之前注册的一致,传递数据最好放在userInfo中,其主要接受一个key:value的字典。
    [[NSNotificationCenter defaultCenter] postNotificationName:@"abc" object:nil userInfo:@{
        @"info" : str
    }];
    //    关闭当前页面
    [self dismissViewControllerAnimated:YES completion:nil];
}
# 四、导航控制器 NavigationController
导航控制器本质上不展示具体的内容,
# 1. 导航控制器的添加
如何添加一个导航控制器呢?
Storyboard 添加 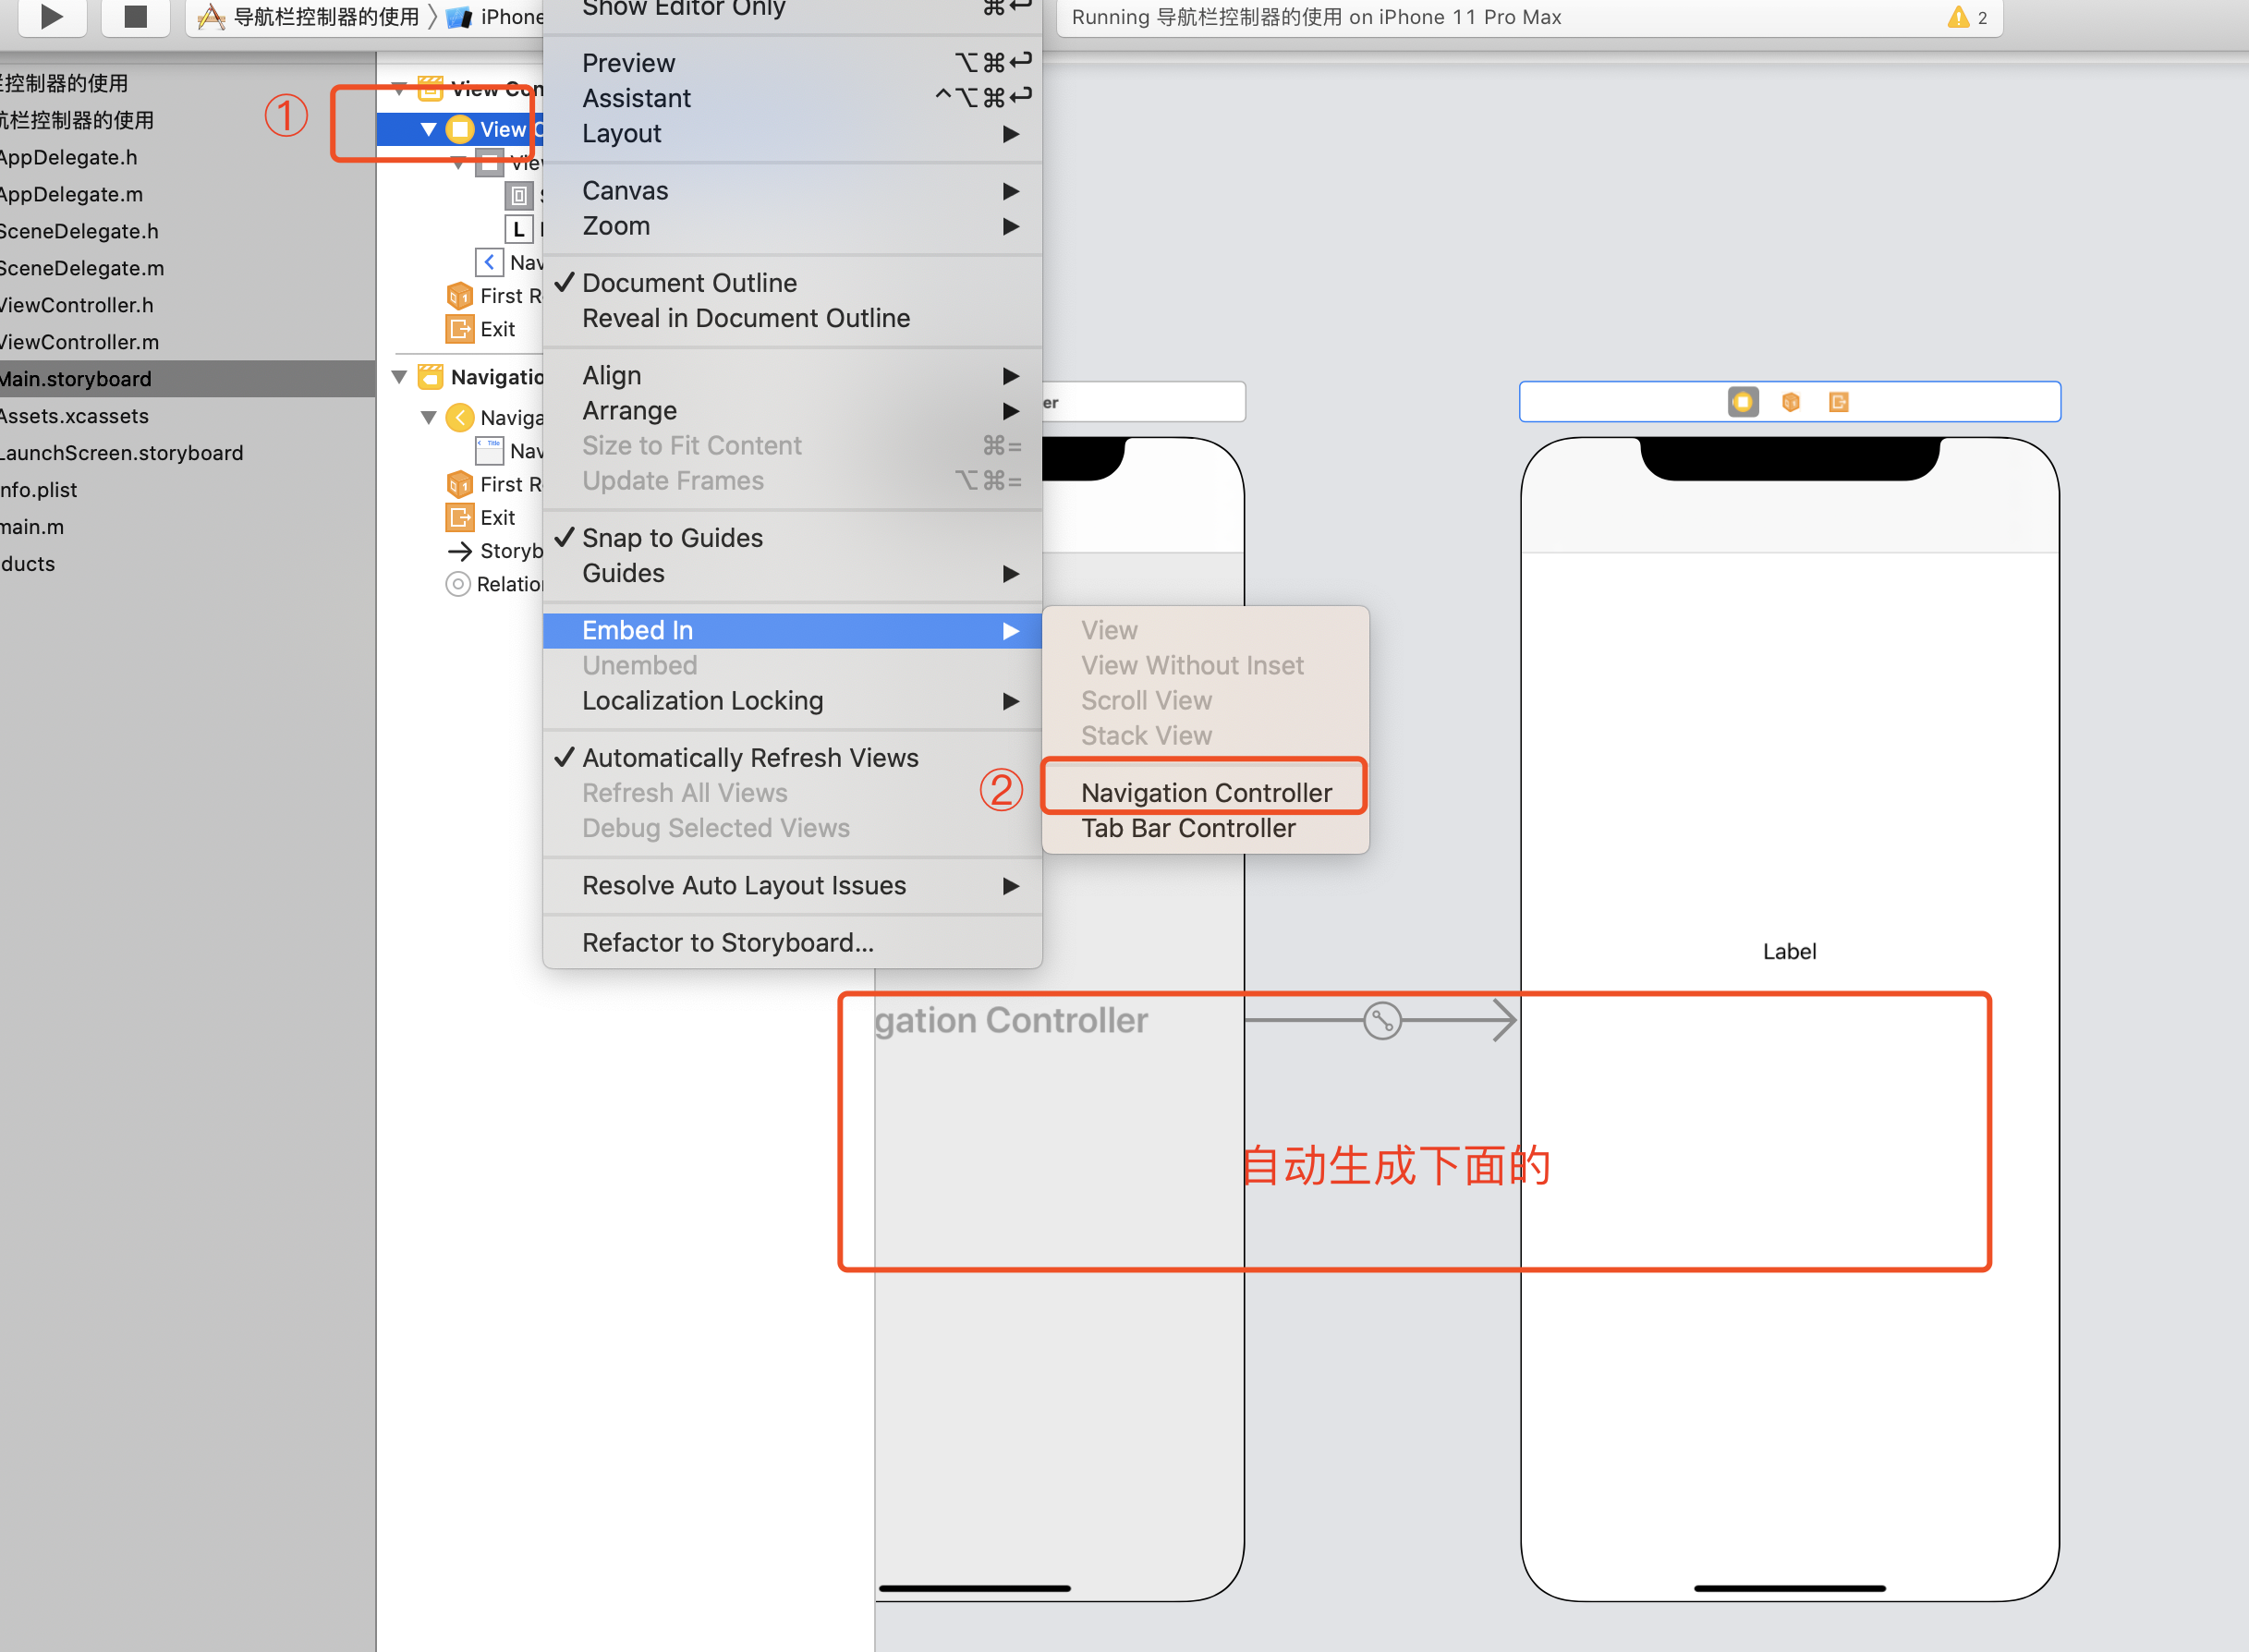
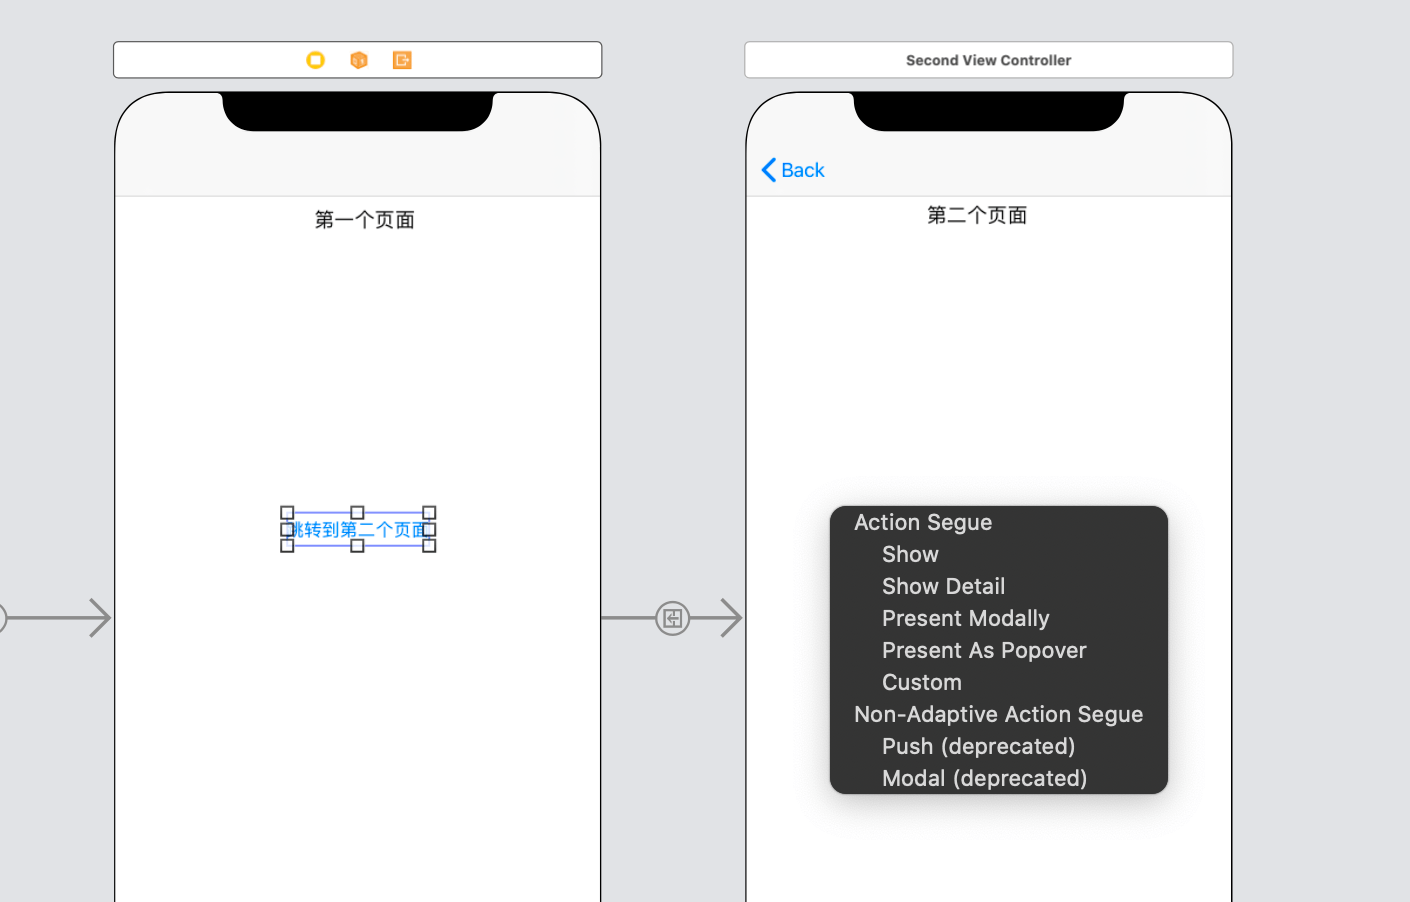
# 2. 使用导航控制器实现跳转
提前准备:准备第二个 ViewController,并设置 Class 为 SecondViewController。
1. 自动型跳转 将按钮拖动到第二个页面并选择 Show,在运行会发现可以跳转了,并且顶部有一个返回按钮;
2. 手动型导航 提前准备:准备第二个 ViewController,并设置 Class 为 SecondViewController。并设置 Indentifer 为 abc;
第一个页面点击按钮跳转到第二个页面的逻辑为:
- (IBAction)gotoSecondByCode:(id)sender {
    //    从storyboard中获取到第二个controller
    SecondViewController *vc = [[UIStoryboard storyboardWithName:@"Main" bundle:nil] instantiateViewControllerWithIdentifier:@"codeSecond"];
    //    将controller亚茹导航控制器的堆栈中
    [self.navigationController pushViewController:vc animated:YES];
}
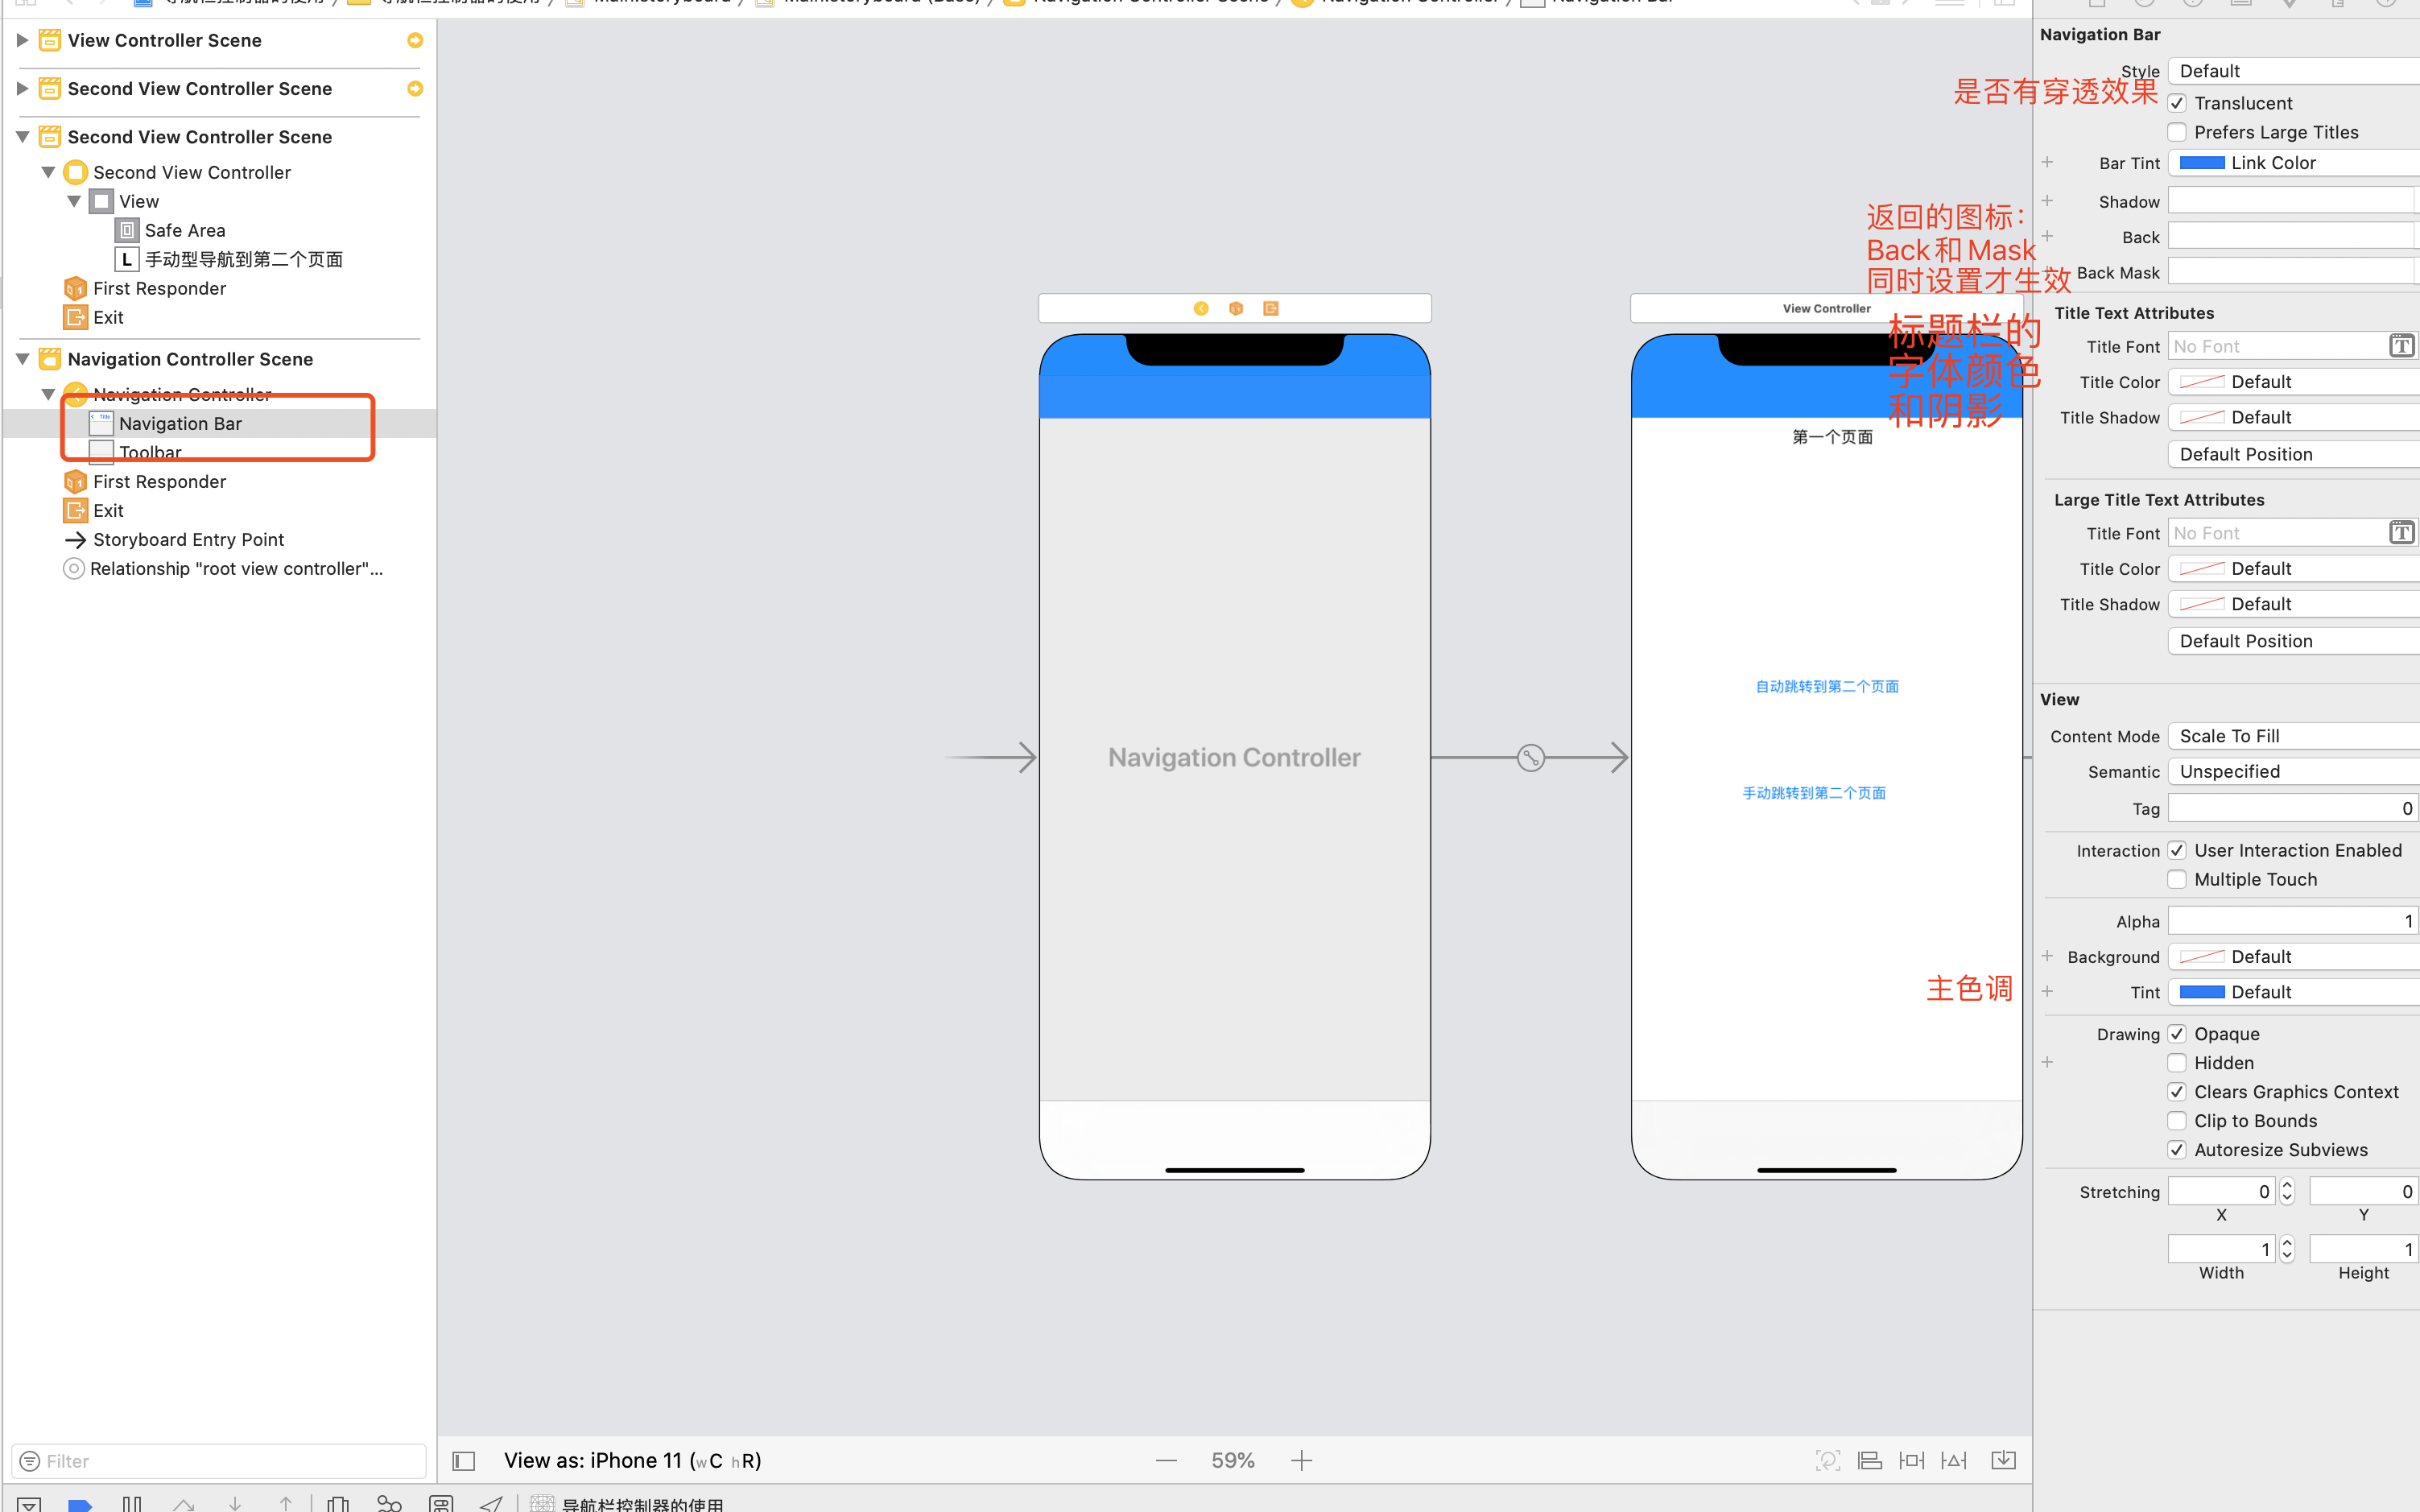
# 3. 导航条的设置
(1)普通的颜色等设置
(2)每个页面的标题和返回按钮设置
其实每一个页面的navigationItem都是不一样的,都是可以自定义的
// 标题设置:设置展示为一个文本
if (self.navigationItem) {
        self.navigationItem.title=@"首页";
}
// 标题设置:设置展示为自定义的内容,此处拿图片作为例子

 if (self.navigationItem) {
        //        self.navigationItem.title=@"首页";
        UIImageView *img = [[UIImageView alloc] initWithImage: [UIImage imageNamed:@"header"]];
        self.navigationItem.titleView=img;
}
(2)自定义返回按钮和右侧按钮
要想自定义,只需要自己拖入一个或者多个 Bar Button Item到顶部左侧和右侧替换到原来的即可。
甚至我们也可以在代码中使用自定义 View 的方式,定义:
//        self.navigationItem.leftBarButtonItem
        self.navigationItem.rightBarButtonItem = [[UIBarButtonItem alloc] initWithCustomView:img];
# 4. 代码设置 UINavigationController(包括自定义返回)
# (1) 自定义 UINavigationController
按照之前的方式,使用自定义启动页面的方式(tips: 请见第一章第一部分):
    //    1. 创建一个显示的UIWindow,大小和屏幕一样、
    self.window= [[UIWindow alloc] initWithFrame: UIScreen.mainScreen.bounds ];
    //    2. 创建一个显示的控制器
    MainViewController *vc = [[MainViewController alloc] init];
    vc.view.backgroundColor = UIColor.redColor;
    // 设置标题
    vc.navigationItem.title=@"首页";
    // 初始化UINavigationController
    UINavigationController *navVC =[[UINavigationController alloc] initWithRootViewController:vc];

    //    3. 将控制器和window关联
    self.window.rootViewController=navVC;

    //    4. 将window显示出来
    [self.window makeKeyAndVisible];
# (2)代码方式设置顶部按钮
此处举个例子点击右侧按钮展示另外一个页面;同理左侧的按钮都是可以自定义的。只是使用了self.navigationItem.leftBarButtonItem
//
//  MainViewController.m
//  UIViewController使用

#import "MainViewController.h"
#import "ListViewController.h"
@interface MainViewController ()

@end

@implementation MainViewController

- (void)viewDidLoad {
    [super viewDidLoad];
    // Do any additional setup after loading the view.
    NSLog(@"%s",__func__);
    self.view.backgroundColor = UIColor.yellowColor;
    //   自定义右侧按钮,此处使用UIBarButtonItem手写代码的方式,当然前面已经讲到UIBarButtonItem可以使用自定义View的方式,我们这里只是展示普通的文本
    UIBarButtonItem *right = [[UIBarButtonItem alloc] initWithTitle:@"列表" style:UIBarButtonItemStylePlain target:self action:@selector(rightClick:)];
    self.navigationItem.rightBarButtonItem=right;

}

- (void)rightClick:(UIBarButtonItem *) btn{
    // 我们的ListViewController是直接使用代码的方式创建/xib 么有使用storyboard
    ListViewController *listVC= [[ListViewController alloc] init];
    // 压入堆栈
    [self.navigationController pushViewController:listVC animated:YES];
}

@end
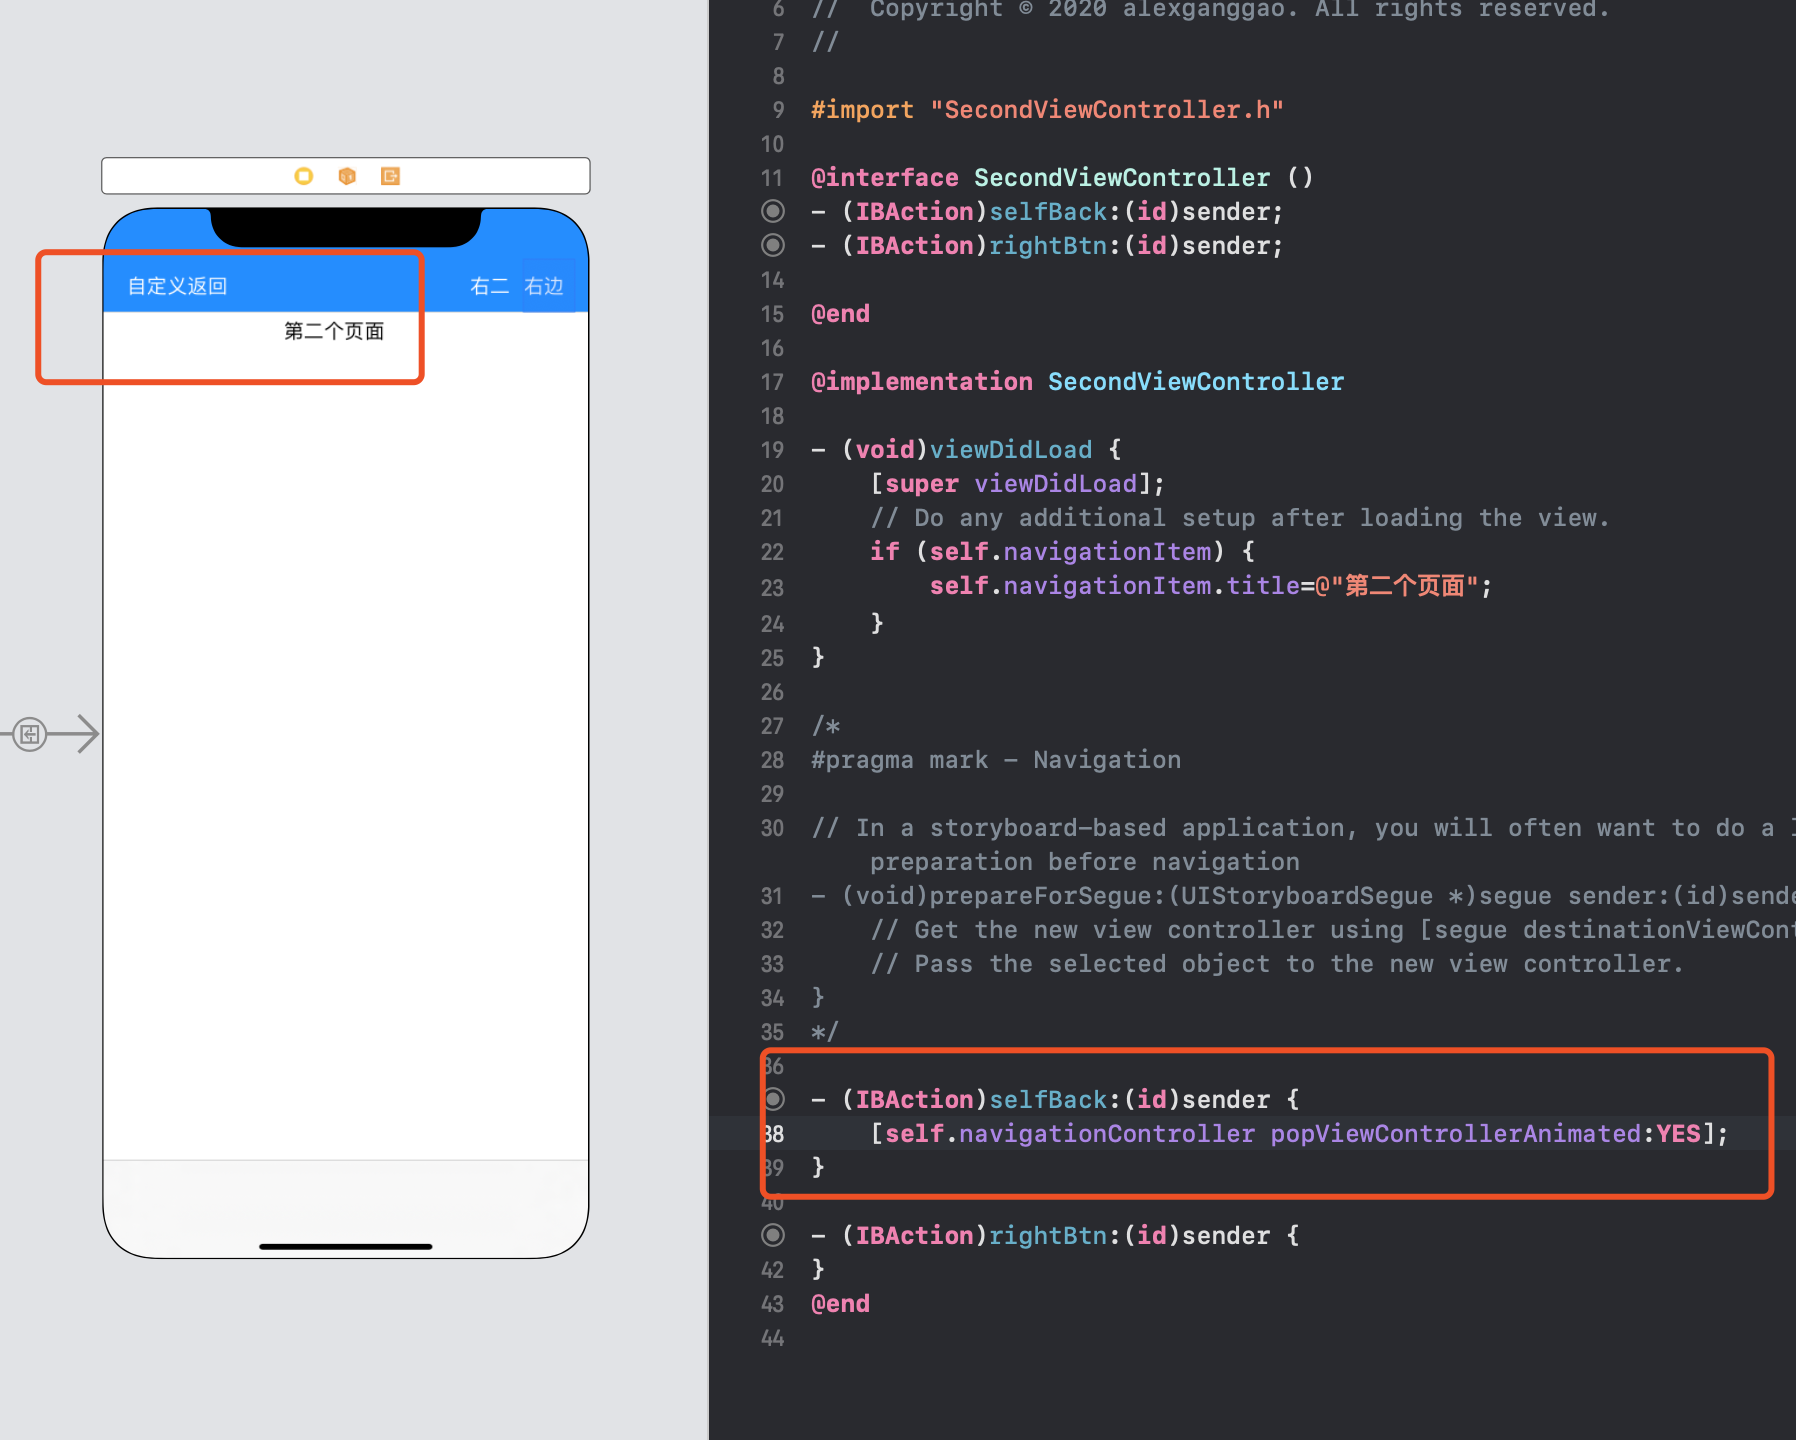
# (3) 自定义页面返回
// 返回到上一个页面
 [self.navigationController popViewControllerAnimated:YES];
//  返回到首页
[self.navigationController popToRootViewControllerAnimated:YES];

// 返回到指定页面,可以通过childViewControllers获取到所有的controller,然后自己选择跳转到a那里,这里只是做一个演示,回到第一个
NSArray *array= self.navigationController.childViewControllers;
    [self.navigationController popToViewController:array[0] animated:YES];
# (4) 自定义左侧按钮
默认情况下,左侧返回按钮,一直会存在一个返回的箭头,和一个文本;如果上一页页面设置了标题,那么返回的文本就是上一个页面的标题,否则为 Back;
如果我们要自定义左侧的返回的话,和自定义右侧的方式是一样的:
- (void)viewDidLoad{
//    此处只是简单的使用文字,当然你也可以使用customView的方式,设置图片等等
    UIBarButtonItem *left = [[UIBarButtonItem alloc] initWithTitle:@"返回" style:UIBarButtonItemStylePlain target:self action:@selector(leftClick:)];
    self.navigationItem.leftBarButtonItem=left;
}

- (void)leftClick:(UIBarButtonItem *) btn{
    [self.navigationController popToRootViewControllerAnimated:YES];
}
注意:当前讲解的都是在指定的页面设置的,如果要一劳永逸的设置标题/左侧返回/右侧按钮,则需要使用自定义 UINavigationController
# 五、自定义 UINavigationController
创建一个文件的时候记得继承 UINavigationController;当然也要记得在项目初始化的时候,改写成 UINavigationController
此处举一个例子:统一替换左侧的返回的样式:
//
//  CustomNavigationController.m
//  UIViewController使用
#import "CustomNavigationController.h"

@interface CustomNavigationController ()

@end

@implementation CustomNavigationController

- (void)viewDidLoad {
    [super viewDidLoad];
    // Do any additional setup after loading the view.
}


- (void)leftClick:(UIBarButtonItem *) btn{
    [self popToRootViewControllerAnimated:YES];
}


- (void)pushViewController:(UIViewController *)viewController animated:(BOOL)animated{

    //    此处只是简单的使用文字,当然你也可以使用customView的方式,设置图片等等;此处将会统一设置所有的返回样式
    UIBarButtonItem *left = [[UIBarButtonItem alloc] initWithTitle:@"返回" style:UIBarButtonItemStylePlain target:self action:@selector(leftClick:)];
    viewController.navigationItem.backBarButtonItem=left;

    //    重点:一定要记得调用父类的
    [super pushViewController:viewController animated:animated];
}

@end
# 六、其他特性
IOS8.0之后才可以使用如下特性。
点击屏幕消失标题栏
self.navigationController.hidesBarsOnTap=YES;滑动的时候消失,需要搭配 ScrollView 及其子类,消失之后就不会展示了
self.navigationController.hidesBarsOnSwipe=YES;将键盘弹出的时候影藏,隐藏之后不会再出现
self.navigationController.hidesBarsWhenKeyboardAppears=YES;当屏幕横屏的的时候消失
self.navigationController.hidesBarsWhenVerticallyCompact=YES;
参考
- 本文链接: https://mrgaogang.github.io/ios/controller/UIViewController%E4%BD%BF%E7%94%A8%E8%AF%A6%E8%A7%A3.html
- 版权声明: 本博客所有文章除特别声明外,均采用 CC BY-SA 4.0 许可协议。转载请注明出处!