


# IOS的数据存取
有开发经验的同学应该都清楚,不管是前端,客户端有些数据都需要在本地落地的;那么这一章我们就来一起了解一下 iOS 的数据存取常用的方法。
在对 iOS 数据 进行具体的操作之前,我们需要首先了解一下 Bundle 和沙盒的概念。
# 一、Bundle 和沙盒
Bundle 和沙盒是 iOS 数据存储的具体地方;
# 1. Bundle
Bundle 是一个目录,其中包含了程序会使用到的资源.这些资源包含了如图像,声音,编译好的代码,nib 文件等待
使用 pathForResource 的路径为真实环境 APP 下面的路径
 //    加载Info.plist资源,mainBundle的资源都是放到RootFolder下
    NSString *infoPath= [[NSBundle mainBundle] pathForResource:@"Info" ofType:@"plist"];
    NSLog(@"Info路径为: %@",infoPath);
    //    找到图片路径
    NSString *imgPath = [[NSBundle mainBundle] pathForResource:@"ff_IconAdd_25x25_@2x" ofType:@"png"];
    NSLog(@"图片路径为: %@",imgPath);

    UIImageView *img = [[UIImageView alloc] initWithFrame:CGRectMake(100, 100, 100, 100)];
    img.image = [UIImage imageWithContentsOfFile:imgPath];

    [self.view addSubview:img];
输出为:
Info路径为: /Users/xxx/Library/Developer/CoreSimulator/Devices/8EA1B565-17F4-47FF-8ECA-C23F3EF4594A/data/Containers/Bundle/Application/76750996-9428-448E-8662-553CA22DCB28/NSBundle的使用.app/Info.plist
图片路径为: /Users/xxxx/Library/Developer/CoreSimulator/Devices/8EA1B565-17F4-47FF-8ECA-C23F3EF4594A/data/Containers/Bundle/Application/76750996-9428-448E-8662-553CA22DCB28/NSBundle的使用.app/ff_IconAdd_25x25_@2x.png
其他常用的方法
//获取XML文件
NSString *filePath = [[NSBundle mainBundle] pathForResouse:@"re" ofType:@"xml"];
NSData *data = [[NSData alloc] initWithContentsOfFile:filePath];
//获取app包的readme.txt文件路径
NSString *path = [[NSBundle mainBundle] pathForResource:@"readme" ofType:@"txt"];


//app资源目录路径
NSString *resPath = [[NSBundle mainBundle] resourcePath];

//获取app包路径
NSString *path = [[NSBundle mainBundle] bundlePath];

//通过使用下面的方法得到程序的main bundle
NSBundle *otherBundle = [NSBundle mainBundle];

//获取资源目录下a.bundle
NSString *path = [resPath stringByAppendingPathComponent:@"a.bundle"];
NSBundle *bundle = [NSBundle bundleWithPath:path];

//一旦我们有了bundle,就可以访问其中的资源文件了。
NSString path = [otherBundle pathForImageResource:@"img"];
NSImage *img = [[NSImage alloc] initWithContentsOfFile:path];

//bundle中可以包含一个库. 如果我们从库得到一个class, bundle会连接库,并查找该类:
Class newClass = [otherBundle classNamed:@"Person"];
id person = [[newClass alloc] init];

//如果不知到class名,也可以通过查找主要类来取得
Class aClass = [otherBundle principalClass];
id classInstance = [[aClass alloc] init];

//可以看到, NSBundle有很多的用途.在这章中, NSBundle负责(在后台)加载nib文件. 我们也可以不通过NSWindowController来加载nib文件, 直接使用NSBundle:
BOOL flag = [NSBundle loadNibNamed:@"ViewController" owner:someObject];
//注意: 我们指定了一个对象someObject作为nib的File”s Owner

//获取属性列表
NSDictionary *dict = [NSDictionary dictionaryWithContentsOfFile:[[NSBundle mainBundle] pathForResource:@"ViewControllers" ofType:@"plist"]]
————————————————
获取 mainBundle 包内容信息
/1.获取app的info.plist详细信息

//build 版本号
NSString *version = [[[NSBundle mainBundle] infoDictionary] objectForKey:@"CFBundleVersion"];
//version 版本号
NSString *version2 = [[NSBundle mainBundle] objectForInfoDictionaryKey:@"CFBundleShortVersionString"];

//应用标识:Bundle identifier
NSString *bundleId = [[[NSBundle mainBundle] infoDictionary] objectForKey:@"CFBundleIdentifier"];

//Bundle name
NSString *appName = [[NSBundle mainBundle] objectForInfoDictionaryKey:@"CFBundleName"];

//应用展示的名字
NSString *appName = [[NSBundle mainBundle] objectForInfoDictionaryKey:@"CFBundleDisplayName"];

//2.应用程序语言本地化
//app本地化宏
#define XLocalizedString(key, comment)[[NSBundle mainBundle] localizedStringForKey:(key) value:@"" table:nil]
# 2. 沙盒
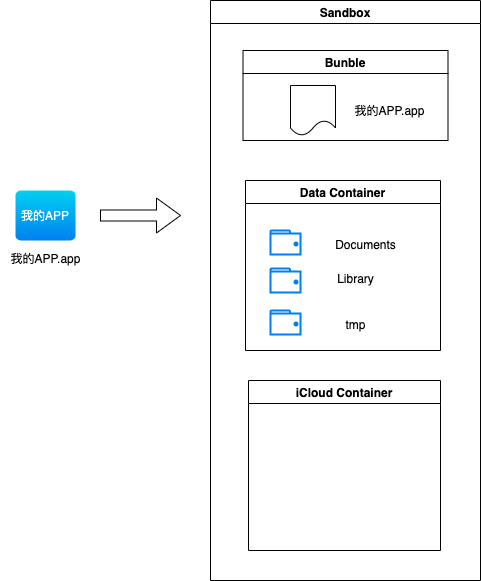
每一个 IOS 程序都是单独运行在一个沙盒内部的,以保证不会篡改或者读取其他 APP 的信息。
其中 Data Container 包含如下三个目录:
Documents: 应用程序在运行时生成的一些需要长久保存的重要数据放在此文件中;Library:Cache:存放缓存文件,比如从网路上下载的数据或数据。一般用来保存应用需要长期使用的,数据量大,不需要备份的非重要数据。iTunesPrefrence:保存应用的所有偏好设置,比如账号,设置等。由系统自动管理
tmp: 用于保存应用在运行时产生的一些临时数据文件,手机重启,系统空间不足的,关闭应用等场景下可能会删除该文件下的文件
# 3. 沙盒路径访问
沙盒入口
NSLog(@"%@",NSHomeDirectory());沙盒 tmp 目录
NSLog(@"%@",NSTemporaryDirectory());沙盒 Documents 目录
// 1:  拼接方式
NSLog(@"%@",[NSHomeDirectory() stringByAppendingPathComponent:@"Documents"]);
//    沙盒Documents目录 2: 建议使用的方式
NSLog(@"%@",[NSSearchPathForDirectoriesInDomains(NSDocumentDirectory, NSUserDomainMask, YES) firstObject]);
- 沙盒 Library 目录
   // 1:  拼接方式
   NSLog(@"%@",[NSHomeDirectory() stringByAppendingPathComponent:@"Library"]);
   //    沙盒Library目录 2: 建议使用的方式
   NSLog(@"%@",[NSSearchPathForDirectoriesInDomains(NSLibraryDirectory, NSUserDomainMask, YES) firstObject]);
- 沙盒 Library 下的 Caches 目录 建议使用的方式
NSLog(@"%@",[NSSearchPathForDirectoriesInDomains(NSCachesDirectory, NSUserDomainMask, YES) firstObject]);
- 沙盒 Library 下的 Preferences 目录,只能采用拼接的方式,此处使用的 Library+Preferences 的方式
NSLog(@"%@",[[NSSearchPathForDirectoriesInDomains(NSLibraryDirectory, NSUserDomainMask, YES) firstObject] stringByAppendingPathComponent:@"Preferences"]);
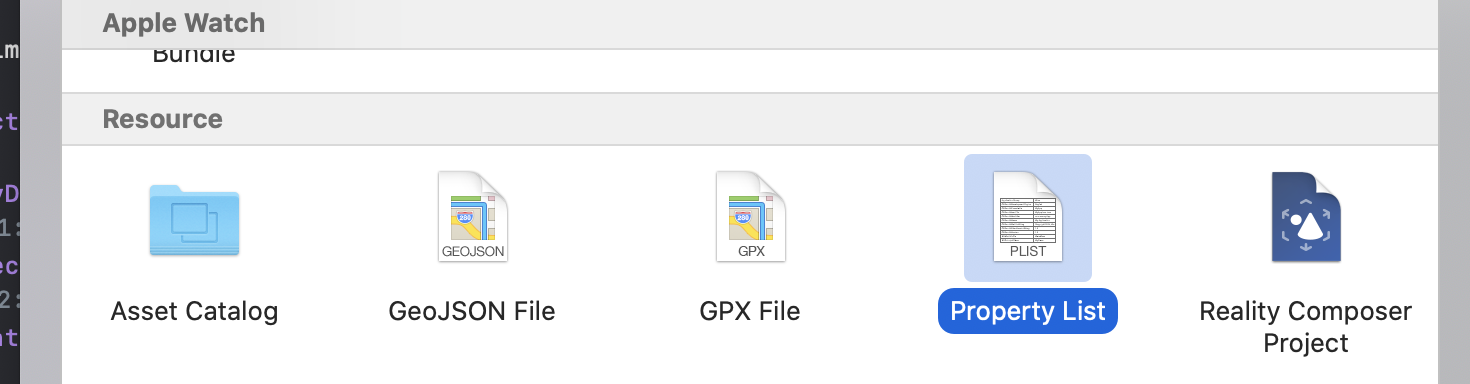
# 二、数据存取: plist
plist 文件本质上是一个 xml 文件,按照key:value的形式存储。
# 1. plist 文件的读取
读取系统自带的 Info.plist
NSDictionary *sysInfo = NSBundle.mainBundle.infoDictionary;
NSLog(@"%@",sysInfo);
NSLog(@"%@",sysInfo[@"CFBundleShortVersionString"]);
自定义的 plist 文件
 ;
;
    //    可以使用NSBundle.mainBundle pathForResource 读取项目工程目录下的文件
    NSString *userPath = [NSBundle.mainBundle pathForResource:@"user" ofType:@"plist"];
    NSDictionary *userDic = [NSDictionary dictionaryWithContentsOfFile:userPath];
    NSLog(@"username= %@ , password = %@",userDic[@"username"],userDic[@"password"]);

    //    解析一个复杂的plist; value为array的情况
    NSString *cityPath = [NSBundle.mainBundle pathForResource:@"cityData" ofType:@"plist"];
    NSDictionary *cityDic = [NSDictionary dictionaryWithContentsOfFile:cityPath];

    NSArray *allKeys = cityDic.allKeys;
    for (int i=0; i<allKeys.count; i++) {
        NSLog(@" key = %@ , value = %@",allKeys[i],cityDic[allKeys[i]]);
    }

    // 读取沙盒中Documents中的数据
    NSString *path = NSSearchPathForDirectoriesInDomains(NSDocumentDirectory,NSUserDomainMask, YES)[0];
    NSString *dataPath = [path stringByAppendingPathComponent:@"data.plist"];
    NSDictionary *dataDict = [NSDictionary dictionaryWithContentsOfFile:path];
    NSLog(@"%@", dataDict);
注意点
- plist 文件接收需要使用一个 NSDictionary
- plist 文件中 key 对应的 value 需要使用合适的类型接收数据;(tips: 如果为 Array 的情况需要使用 NSArray 来接收)
- plist 文件读取主要使用:
dictionaryWithContentsOfFile方法
# 3. plist 文件写入
    //    将cityData.plist存储到沙盒的Documents中
    NSString *saveFilePath = [[NSSearchPathForDirectoriesInDomains(NSDocumentDirectory, NSUserDomainMask, YES) firstObject] stringByAppendingPathComponent:@"city.plist"];
    [cityDic writeToFile:saveFilePath atomically:YES];

    // 写入部分数据
    NSString *fujianPath = [[NSSearchPathForDirectoriesInDomains(NSDocumentDirectory, NSUserDomainMask, YES) firstObject] stringByAppendingPathComponent:@"福建.plist"];
    [cityDic[@"福建"] writeToFile:fujianPath atomically:YES];
# 三、数据存取: NSUserDefaults(偏好设置)
# 1. NSUserDefaults 基础使用(登录 demo)
NSUserDefaults 偏好设置存储,不需要路径,一般用于存储账号密码等信息。
// 存数据
- (void)saveForPreference {

    // 获取偏好设置对象
    NSUserDefaults *defaults = [NSUserDefaults standardUserDefaults];

    //存储数据
    [defaults setObject:@"mrgao" forKey:@"name"];
    [defaults setInteger:24 forKey:@"age"];

    // 同步调用,立刻写到文件中,不写这个方法会异步,有延迟
    [defaults synchronize];
}
//读数据
- (void)readForPreference {

    NSUserDefaults *defaults = [NSUserDefaults standardUserDefaults];

    NSString *name = [defaults objectForKey:@"name"];
    NSInteger *age = [defaults integerForKey:@"age"];

    NSLog(@"%@-------%ld",name,age);
}
举一个保存用户名和密码的例子:
//
//  ViewController.m
//  NSBundle的使用
#import "ViewController.h"

@interface ViewController ()
@property (weak, nonatomic) IBOutlet UITextField *userName;
@property (weak, nonatomic) IBOutlet UITextField *password;
- (IBAction)savePassword:(id)sender;
- (IBAction)login:(id)sender;
@property (weak, nonatomic) IBOutlet UISwitch *remenber;

@end

@implementation ViewController

- (void)viewDidLoad {
    [super viewDidLoad];
    NSDictionary *info = [self readForPreference];
    self.userName.text =info[@"name"];
    self.password.text =info[@"pass"];
    //    字典类型,传递Bool类型的值,需要转换成 NSNumber; 获取值的时候,先要获取NSNumber,然后在获取对应的boolean的值
    self.remenber.on =[info[@"isOn"] boolValue];
}

// 存数据
- (void)saveForPreference {

    // 获取偏好设置对象
    NSUserDefaults *defaults = [NSUserDefaults standardUserDefaults];
    NSString *username = self.userName.text;
    NSString *password = self.password.text;
    //存储数据
    [defaults setObject:username  forKey:@"username"];
    [defaults setObject:password  forKey:@"password"];
    //    [defaults setInteger:24 forKey:@"age"];
    // 同步调用,立刻写到文件中,不写这个方法会异步,有延迟
    [defaults synchronize];
}
//读数据
- (NSDictionary *)readForPreference {

    NSUserDefaults *defaults = [NSUserDefaults standardUserDefaults];

    NSString *name = [defaults valueForKey:@"username"];
    NSString *pass = [defaults valueForKey:@"password"];
    Boolean isOn = [defaults boolForKey:@"isOn"];
    //    NSInteger *age = [defaults integerForKey:@"age"];
    NSLog(@"%@-------%@",name,pass);
//    字典类型,传递Bool类型的值,需要转换成 NSNumber
    return @{@"name":name,@"pass":pass,@"isOn": [NSNumber numberWithBool:isOn]};
}

- (IBAction)savePassword:(id)sender {
    UISwitch *swc = (UISwitch *)sender;
    NSLog(@"%@", self.remenber.isOn ? @"YES" : @"NO");
    NSUserDefaults *defaults = [NSUserDefaults standardUserDefaults];
    [defaults setBool:self.remenber.isOn forKey:@"isOn"];
    [defaults synchronize];
}

- (IBAction)login:(id)sender {
    [self saveForPreference];
}
@end
注意点
NSDictionary 不能直接传播 Bool 类型的值,需要先将其转换成 NSNumber 然后读取的时候转换成 bool;
NSLog 打印的时候不能直接打印 Bool 类型的值,建议使用这种方式展示:
NSLog(@"%@", boolValue ? @"YES" : @"NO");偏好设置存储 记得调用
[defaults synchronize];存储
那么我们使用 NSUserDefaults 保存的数据最终存放到哪里?
前面我们讲过沙盒里面有一个 Library->Preferences 是专门用来存放应用的所有偏好设置,比如账号,设置等,由系统自动管理。
那我们一探究竟:

结论: NSUserDefaults 的数据最终存放在沙盒下的 Library->Preferences 文件夹中,且类型为 plist 类型
# 2. 使用 NSUserDefaults 制作新特性页面
所谓新特性页面,就是在一个 APP 的某一个版本下,按照的时候展示一次该特性页面;以后再次打开就不展示了。例如:王者荣耀新赛季更新的时候,开场赛季介绍动画播放,当此赛季我们再次打开的时候 就不会播放此动画了.
- (void)scene:(UIScene *)scene willConnectToSession:(UISceneSession *)session options:(UISceneConnectionOptions *)connectionOptions {
    // Override point for customization after application launch.
    self.window = [[UIWindow alloc] initWithWindowScene:(UIWindowScene *)scene];
    // 获取当前应用的版本
    NSString *currentVersion = NSBundle.mainBundle.infoDictionary[@"CFBundleShortVersionString"];
    // 获取到本地的版本
    NSUserDefaults *defaults = [NSUserDefaults standardUserDefaults];
    NSString *localVersion = [defaults valueForKey:@"version"];
    //    如果版本更新了就显示新特性页面
    if (![currentVersion isEqualToString:localVersion]) {
        UIViewController *newVC = [[UIViewController alloc] init];
        newVC.view.backgroundColor = UIColor.greenColor;
        self.window.rootViewController= newVC;
        //  保存当前版本
        [defaults setObject:currentVersion forKey:@"version"];
        [defaults synchronize];
    }else{
        UIViewController *normalVC = [[UIViewController alloc] init];
        normalVC.view.backgroundColor = UIColor.redColor;
        self.window.rootViewController= normalVC;
    }

    [self.window makeKeyAndVisible];
}
# 四、数据存取: 归档-NSKeyedArchiver
归档一般都是保存自定义对象的时候,使用归档.因为 plist 文件不能够保存自定义对象.如果一个字典当中保存有自定义对象,如果把这个字典写入到文件当中,它是不会生成 plist 文件的.
# 1. NSKeyedArchiver 的基础使用
NSArray, NSString, NSInteger, NSDictionary 等 iOS 自带的数据类型,归档是原生支持的。
@interface NSKeyedArchiverViewController ()
- (IBAction)archive:(id)sender;
- (IBAction)unarchive:(id)sender;
@property(strong,nonatomic) NSData *data;
@end

@implementation NSKeyedArchiverViewController

- (IBAction)archive:(id)sender {
//    数据存储,此处案例是序列化一个数组
    self.data =[NSKeyedArchiver archivedDataWithRootObject:@[@"a",@"b",@"c"] requiringSecureCoding:YES error:nil];
}

- (IBAction)unarchive:(id)sender {
//    数据读取,转换成数组
  NSArray *array=  [NSKeyedUnarchiver unarchivedObjectOfClass:NSArray.class fromData:self.data error:nil];
    NSLog(@"%@",array);
}
@end
# 1. NSKeyedArchiver 自定义对象归档
上面讲到 NSArray, NSString, NSInteger, NSDictionary 等 iOS 自带的数据类型,归档是原生支持的,但是如果是自定义对象,就和上面的方式有所不同。
如果我们按照上面的方式去将自定义对象归档:
 NSError *error;
    self.userData= [NSKeyedArchiver archivedDataWithRootObject:user requiringSecureCoding:YES error:&error];
    if(error!=nil){
        NSLog(@"%@",error);
    }
肯定会报错:因为我们没有让自定义的对象去遵守 安全编码NSSecureCoding 协议
Domain=NSCocoaErrorDomain Code=4866 "The data couldn’t be written because it isn’t in the correct format." UserInfo={NSUnderlyingError=0x6000016d0210 {Error Domain=NSCocoaErrorDomain Code=4864 "This decoder will only decode classes that adopt NSSecureCoding. Class 'User' does not adopt it." UserInfo={NSDebugDescription=This decoder will only decode classes that adopt NSSecureCoding. Class 'User' does not adopt it.}}}
所以,我们自定义对象归档有如下几个步骤:
- 让自定义对象实现
NSSecureCoding协议;
- 让自定义对象实现
- 至少实现
NSSecureCoding协议中的三个方法;
encodeWithCoderinitWithCodersupportsSecureCoding
- 至少实现
之前使用的数组其实是已经帮我们实现了encodeWithCoder和initWithCoder;那么我们如何编写?
// User.h 实现NSSecureCoding协议
#import <Foundation/Foundation.h>

NS_ASSUME_NONNULL_BEGIN

@interface User : NSObject<NSSecureCoding>
@property(nonatomic,copy) NSString *userName;
@property(nonatomic,assign) int age;
@end

NS_ASSUME_NONNULL_END
在 User.m 去实现协议的几个方法
#import "User.h"

@implementation User
// 编码,将对象写入流中
- (void)encodeWithCoder:(nonnull NSCoder *)coder {
    // 要记得将所有的对象都序列化
    [coder encodeObject:self.userName forKey:@"userName"];
    [coder encodeInt:self.age forKey:@"age"];

}
// 解码,将流初始化为对象
- (nullable instancetype)initWithCoder:(nonnull NSCoder *)coder {
    if(self = [super init]){
        self.userName = [coder decodeObjectForKey:@"userName"];
        self.age = [coder decodeIntForKey:@"age"];
    }
    return self;
}
// 是否支持安全编码
+ (BOOL)supportsSecureCoding{
    return YES;
}

@end
自定义对象 User 的归档和解档:
- (IBAction)archive:(id)sender {
// 自定义对象需要存储在沙盒中
User *user = [[User alloc] init];
user.userName=@"mrgaogang";
user.age=123;
NSError *error;
self.userData= [NSKeyedArchiver archivedDataWithRootObject:user requiringSecureCoding:YES error:&error];
if(error!=nil){
NSLog(@"%@",error);
}
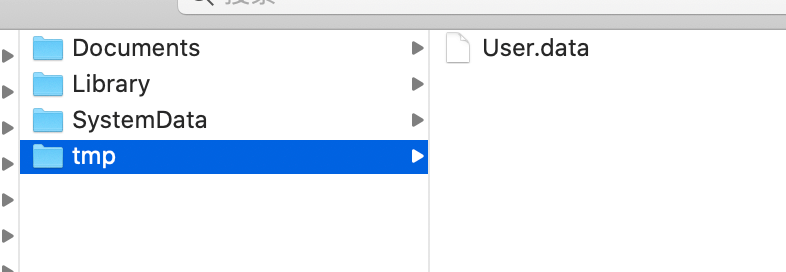
// 我们也可以将归档的数据存放在沙盒中
NSString *filePath = [NSTemporaryDirectory() stringByAppendingPathComponent:@"User.data"];
[self.userData writeToFile:filePath atomically:YES];
}
- (IBAction)unarchive:(id)sender {
// 从沙盒中取出我们归档的数据
NSData *data = [NSData dataWithContentsOfFile:[NSTemporaryDirectory() stringByAppendingPathComponent:@"User.data"]];
User *user= [NSKeyedUnarchiver unarchivedObjectOfClass:User.class fromData:data error:nil];
NSLog(@"userName = %@ , age = %d",user.userName,user.age);
}
# 打印情况
userName = mrgaogang , age = 123
# 五、数据存取: 数据库-sqlite3
# 1. sqlite 简单介绍
SQLite,是一款轻型的数据库,是遵守 ACID 的关系型数据库管理系统,它包含在一个相对小的 C 库中. sqlite 是嵌入式的,占用内存小,且支持 windows,linux,unix 操作系统,所以当前的 android/ios 都是支持的
sqlite 支持的数据类型:
- NULL : NULL 值
- INTEGER: 整形值
- REAL: 浮点值
- TEXT: 文本字符串,存储时使用编码方式为 utf-8 或者 utf-16
- BLOB: 二进制文件存储
sqlite 常用函数:
- sqlite3_open: 开数据库
- sqlite3_close: 关数据库
- sqlite3_exec: 执行函数
- sqlite3_prepare_v2: 查询时使用的,执行得到结果集
- sqlite3_step : 查询时使用的,遍历结果集
- sqlite3_column_text: 查询时使用,获取对应 column 的值
# 2. sqlite3 基础使用-工程搭建及自定义 Model
# (1) 引入 sqlite3 包
由于 sqlite3 并非 ios 自带的,所以我们需要额外的引入:
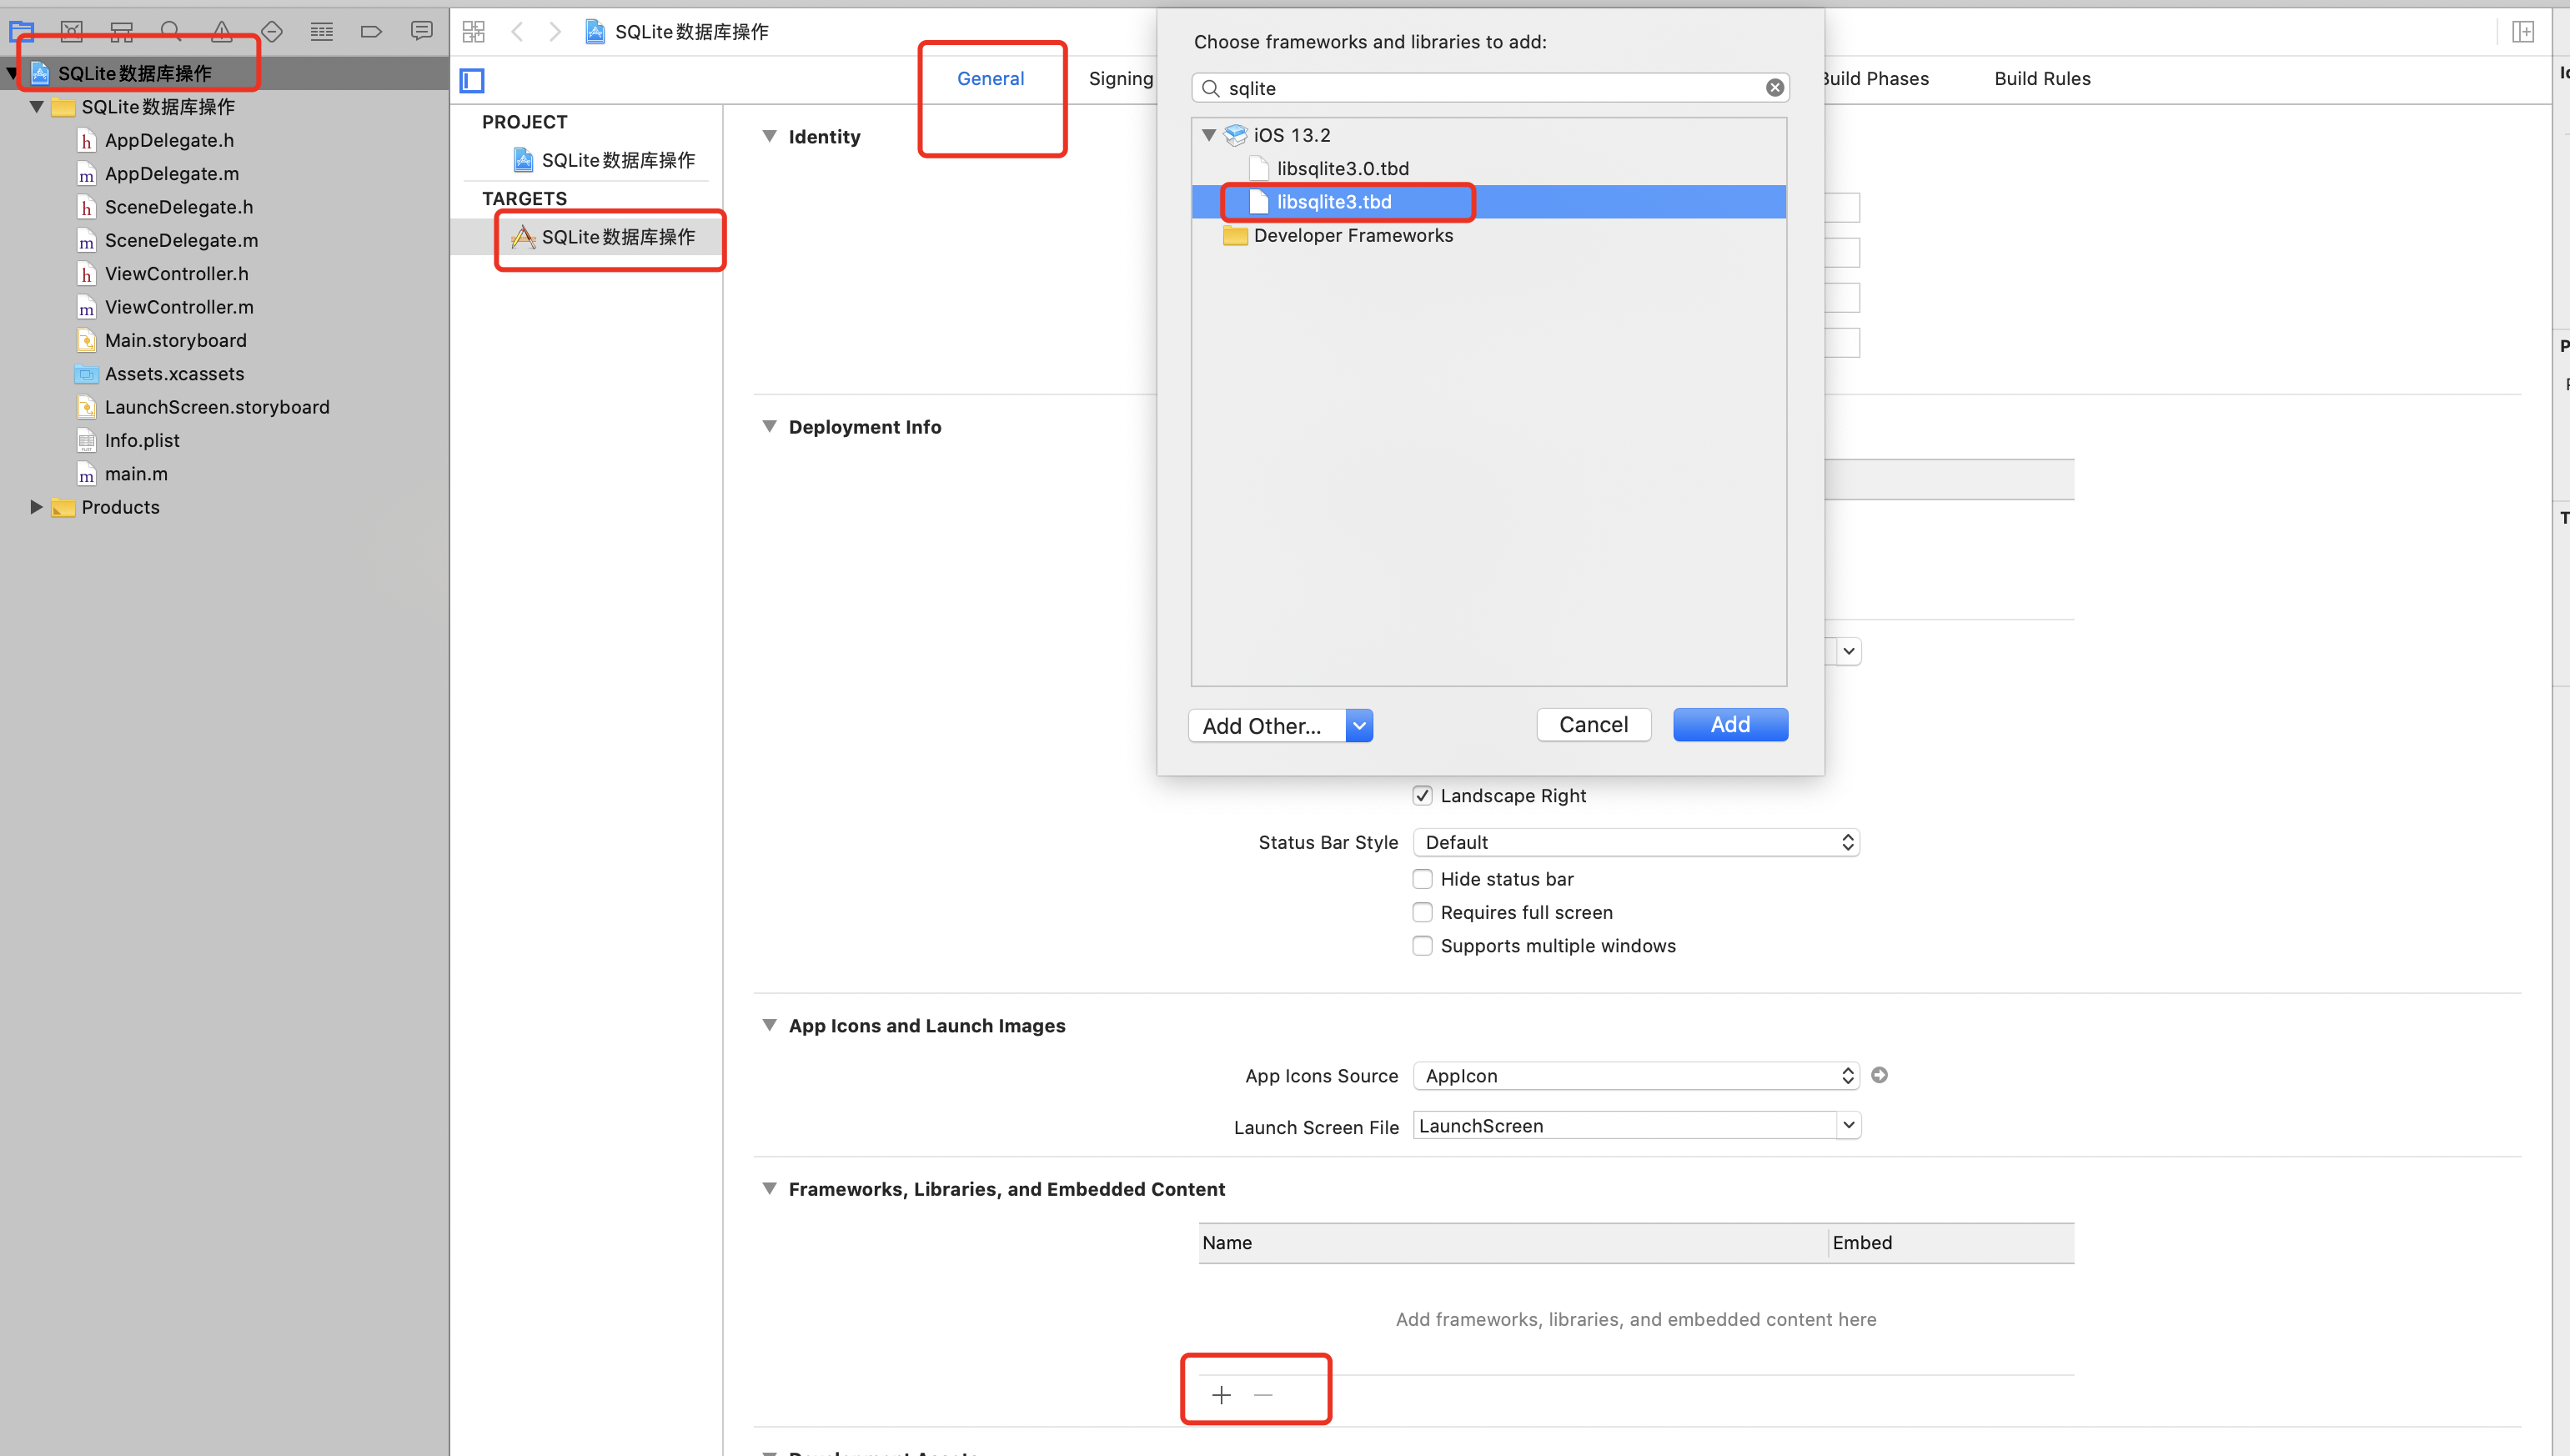
# (2) 自定义 Model
由于操作数据库,对应的映射肯定是一个对象,那么我们首先将 Model 构造出来:
//
//  Person.h
//  SQLite数据库操作
#import <Foundation/Foundation.h>

NS_ASSUME_NONNULL_BEGIN

@interface Person : NSObject
@property(nonatomic,copy) NSString *name;
@property(nonatomic,copy) NSString *phone;
@property(nonatomic,copy) NSString *address;

- (instancetype) initWithName:(NSString *) name andPhone:(NSString *) phone andAddress:(NSString *) address;
@end

NS_ASSUME_NONNULL_END
并实现对应的构造函数
//
//  Person.m
//  SQLite数据库操作
#import "Person.h"

@implementation Person
- (instancetype)initWithName:(NSString *)name andPhone:(NSString *)phone andAddress:(NSString *)address{
    if(self = [super init]){
        self.name= name;
        self.phone=phone;
        self.address=address;
    }
    return self;
}

- (NSString *)description
{
    return [NSString stringWithFormat:@"name = %@ , phone = %@, address = %@", self.name,self.phone,self.address];
}
@end
# 3. sqlite 操作工具类(增删改查)
由于对数据库的操作是独立的,我们不应该将其放在 UI/Controller 中,而应该将数据库的操作单独放在一个文件中进行;以便于后续的维护和程序的开发。
# (1) 对外声明 sql 操作方法
此处主要演示对数据库的六种操作:
- 数据库的创建
- 表格的创建
- 数据的添加
- 数据的删除
- 数据的更新
- 数据的查询
//
//  DBTools.h
//  SQLite数据库操作

#import <Foundation/Foundation.h>
#import "Person.h"
NS_ASSUME_NONNULL_BEGIN

@interface DBTools : NSObject
// 创建db
- (void) createDB;
// 创建表
- (void) createTable:(NSString *) tableName;
// 插入数据
- (void) insertPerson:(Person *) person;
// 条件删除
- (void) deletePerson:(NSString *) personName;
// 更新数据
- (void) updatePerson:(Person *) person;
// 查询所有数据
- (NSArray<Person *> *) queryPerson;
// 通过条件查询
- (NSArray<Person *> *) queryPersonByName:(NSString *) personName;
//  数据库的名字
@property(nonnull,copy) NSString *dbName;

@end

NS_ASSUME_NONNULL_END
# (2) 数据库的增删改查
//
//  DBTools.m
//  SQLite数据库操作

#import "DBTools.h"
#import "Person.h"
#import "sqlite3.h"

@interface DBTools(){
    sqlite3 *sqlite;
}

@end
@implementation DBTools


// 创建数据库,存放在沙盒中
- (void)createDB{
    //    1. 查找沙盒
    NSString *docPath= [NSSearchPathForDirectoriesInDomains(NSDocumentDirectory, NSUserDomainMask, YES) firstObject];
    //    2. 拼接数据库
    NSString *dbPath = [docPath stringByAppendingPathComponent: [NSString stringWithFormat:@"%@.db",self.dbName]];
    NSLog(@"%@",dbPath);

    //    3. 创建数据库,需要传递2个参数,1: 数据库名称(c语言的字符串), 2: 数据库的句柄,后续我们需要使用句柄进行数据库的操作
    int result = sqlite3_open([dbPath UTF8String], &sqlite);

    if(result == SQLITE_OK){
        NSLog(@"数据库创建成功");
    }else{
        NSLog(@"数据库创建失败");
    }
}
// 数据库的关闭
- (void) closeDB{
    sqlite3_close(sqlite);
}
// 针对创建表格,增加,删除都可以统一使用执行 sqlite3_exec
- (void) execSQL:(NSString *) sql{
    //    1. 执行之前需要打开数据库
    [self createDB];
    //    2. 创建sql语句
    NSLog(@"%@",sql);
    char *error;
    //    3. 执行sql语句
    int result= sqlite3_exec(sqlite, [sql UTF8String], NULL, NULL, &error);
    if(result == SQLITE_OK){
        NSLog(@"sql执行成功");
    }else{
        NSLog(@"sql执行失败, %s" ,error);
    }
    //    4. 一定要记得关闭数据库
    [self closeDB];
}
// 执行创建表格的sql语句
- (void)createTable:(NSString *)tableName{
    NSString *sql = [NSString stringWithFormat: @"create table %@(id integer primary key autoincrement, name text , phone text ,address text)",tableName];
    [self execSQL: sql];
}
// 执行插入的sql语句
- (void)insertPerson:(Person *)person{
    NSString *sql = [NSString stringWithFormat: @"insert into person (name , phone ,address) values ('%@','%@','%@')",person.name,person.phone,person.address];
    [self execSQL: sql];
}

// 执行删除的sql语句
- (void)deletePerson:(NSString *)personName{
    NSString *sql = [NSString stringWithFormat: @"delete from person where name='%@'",personName];
    [self execSQL: sql];
}

// 执行更新的sql语句
- (void)updatePerson:(Person *)person{
    NSString *sql = [NSString stringWithFormat: @"update person set phone='%@' ,address='%@' where name='%@'",person.phone,person.address,person.name];
    [self execSQL:sql];
}

// 查询全部
- (NSArray<Person *> *)queryPerson{
    [self createDB];
    NSString *sql = [NSString stringWithFormat: @"select name,phone,address from person"];

    sqlite3_stmt *stmt;
    // 使用sqlite3_prepare_v2查询数据
    int result= sqlite3_prepare_v2(sqlite, [sql UTF8String], -1, &stmt, NULL);

    NSMutableArray *array = [NSMutableArray array];
    if(result == SQLITE_OK){
        //   遍历结果集
        while (sqlite3_step(stmt) == SQLITE_ROW) {
            // 参数为结果集和查询结果集的第几列;且返回的结果为c语言的string
            const char *cName= (const char*) sqlite3_column_text(stmt, 0);
            const char *cPhone= (const char*) sqlite3_column_text(stmt, 1);
            const char *cAddress=   (const char*) sqlite3_column_text(stmt, 2);
            // 要记得将c语言的string 改成NSString
            Person *person = [[Person alloc] initWithName:[NSString stringWithUTF8String:cName] andPhone:[NSString stringWithUTF8String:cPhone] andAddress:[NSString stringWithUTF8String:cAddress]];
            [array addObject:person];

        }
    }else{
        NSLog(@"查询失败");
    }

    [self closeDB];

    return array;

}

//  条件查询
- (NSArray<Person *> *)queryPersonByName:(NSString *)personName{
    [self createDB];
    NSString *sql = [NSString stringWithFormat: @"select * from person where name = '%@'",personName];

    sqlite3_stmt *stmt;
    // 使用sqlite3_prepare_v2查询数据
    int result= sqlite3_prepare_v2(sqlite, [sql UTF8String], -1, &stmt, NULL);

    NSMutableArray *array = [NSMutableArray array];
    if(result == SQLITE_OK){
        //   遍历结果集
        while (sqlite3_step(stmt) == SQLITE_ROW) {
            // 参数为结果集和查询结果集的第几列;且返回的结果为c语言的string
            const char *cPhone= (const char*) sqlite3_column_text(stmt, 0);
            const char *cAddress=   (const char*) sqlite3_column_text(stmt, 1);
            // 要记得将c语言的string 改成NSString
            Person *person = [[Person alloc] initWithName:personName andPhone:[NSString stringWithUTF8String:cPhone] andAddress:[NSString stringWithUTF8String:cAddress]];
            [array addObject:person];

        }
    }else{
        NSLog(@"查询失败");
    }

    [self closeDB];

    return array;


}

@end
# (3) 调用增删改查
//
//  ViewController.m
//  SQLite数据库操作

#import "ViewController.h"
#import "DBTools.h"
@interface ViewController ()
- (IBAction)createDB:(id)sender;
- (IBAction)createTable:(id)sender;
- (IBAction)insert:(id)sender;
- (IBAction)deleteData:(id)sender;
- (IBAction)updateData:(id)sender;
- (IBAction)queryData:(id)sender;
@property(nonatomic,strong) DBTools *dbTools;
@end

@implementation ViewController

- (void)viewDidLoad {
    [super viewDidLoad];
    // Do any additional setup after loading the view.
    self.dbTools = [[DBTools alloc] init];
    self.dbTools.dbName = @"person";
}

// 创建数据库
- (IBAction)createDB:(id)sender {
    [self.dbTools createDB];
}
// 创建表格
- (IBAction)createTable:(id)sender {
    [self.dbTools createTable:@"person"];
}
// 插入数据
- (IBAction)insert:(id)sender {
    Person *person = [[Person alloc] initWithName:@"mrgaogang" andPhone:@"12345678900" andAddress:@"中国-广东深圳"];
    [self.dbTools insertPerson:person];
}
// 删除数据
- (IBAction)deleteData:(id)sender {
    [self.dbTools deletePerson: @"mrgaogang"];
}
// 更新数据
- (IBAction)updateData:(id)sender {
    NSArray *array = [self.dbTools queryPersonByName:@"mrgaogang"];
    if(array.count > 0){
        Person *person = [array firstObject];
        [self.dbTools updatePerson:person ];
    }
}
// 查询数据
- (IBAction)queryData:(id)sender {
    NSArray *array = [self.dbTools queryPersonByName:@"mrgaogang"];
    if(array.count > 0){
        for (Person *p in array) {
            NSLog(@"%@",p);
        }
    }

}
@end
# 六、 FMDB 的使用
FMDB 是什么?
- FMDB 是 iOS 平台的 SQLite 数据库框架
- FMDB 以 OC 的方式封装了 SQLite 的 C 语言 API
FMDB 的优点
- 使用起来更加面向对象,省去了很多麻烦、冗余的 C 语言代码
- 对比苹果自带的 Core Data 框架,更加轻量级和灵活
- 提供了多线程安全的数据库操作方法,有效地防止数据混乱
# 1. FMDB 的安装
此处使用 cocospods 的方式安装,当然你也可以将源代码下面的 fmdb 拷贝下来,放在工程内部。如果不知道如何使用 cocospods的同学可以参考此文章:cocospods的使用 (opens new window)
pod init
然后编辑Podfile并新增 FMDB:
# Uncomment the next line to define a global platform for your project
# platform :ios, '9.0'

target 'FMDB的使用' do
    # Comment the next line if you're not using Swift and don't want to use dynamic frameworks
    use_frameworks!

    # Pods for MyApp2

    pod 'FMDB'
    # pod 'FMDB/FTS'   # FMDB with FTS
    # pod 'FMDB/standalone'   # FMDB with latest SQLite amalgamation source
    # pod 'FMDB/standalone/FTS'   # FMDB with latest SQLite amalgamation source and FTS
    # pod 'FMDB/SQLCipher'   # FMDB with SQLCipher
end
pod install
安装之后打开: FMDB的使用.xcworkspace 记住 是 : FMDB的使用.xcworkspace而不是 FMDB的使用.xcodeproj.
如果编译有如下报错

解决办法:删除Pods.frameworks,剩余有Pods_.framework 
# 2. Model的建立
Model和之前的Person几乎类似。 声明Model的属性及构造函数
//
//  Student.h
//  FMDB的使用
#import <Foundation/Foundation.h>

NS_ASSUME_NONNULL_BEGIN

@interface Student : NSObject

@property(nonatomic,copy) NSString *name;
@property(nonatomic,assign) int age;
@property (nonatomic,copy) NSString *sex;

- (instancetype)initWithName:(NSString *) name andAge:(int) age andSex:(NSString *) sex;

@end

NS_ASSUME_NONNULL_END
实现Model的构造函数和description方法
//
//  Student.h
//  FMDB的使用

#import <Foundation/Foundation.h>

NS_ASSUME_NONNULL_BEGIN

@interface Student : NSObject

@property(nonatomic,copy) NSString *name;
@property(nonatomic,assign) int age;
@property (nonatomic,copy) NSString *sex;

- (instancetype)initWithName:(NSString *) name andAge:(int) age andSex:(NSString *) sex;

@end

NS_ASSUME_NONNULL_END
# 3. 数据库的增删改查
其实整体的流程和纯操作sqlite3是类似的,主要有如下几个变化:
创建库成功之后使用
FMDatabase存储不再直接操作sqlite3_exec而是使用
executeUpdate执行增加,删除和修改;使用
executeUpdate的时候,不再使用字符串拼接的方式,而是使用占位符?,且executeUpdate第一个参数为sql,后面为可变参数,参数的个数和?的个数一致;使用
executeUpdate的时候,注意传入的都必须是对象,对于int等基础类型,需要使用@()包裹传递参数。查询操作直接使用
executeQuery,且使用更加直观的FMResultSet存储结果集从结果集中获取数据也使用更加直观的:
stringForColumn,intForColumn等 获取
#import "DBTools.h"
#import "FMDB.h"

@interface DBTools ()

@property (strong,nonatomic) FMDatabase *fmdb;

@end
@implementation DBTools

- (void) createDB{
    //    1. 找到沙盒路径
    NSString *docPath = [NSSearchPathForDirectoriesInDomains(NSDocumentDirectory, NSUserDomainMask, YES) firstObject];
    //   2. 找到db文件
    NSString *fileName =  [docPath stringByAppendingPathComponent: @"student.db"];

    self.fmdb = [FMDatabase databaseWithPath:fileName];

    BOOL success = [self.fmdb open];

    if(success){
        NSLog(@"打开数据库成功");
    }else{
        NSLog(@"打开数据库失败");

    }

}


- (void) createTable{
    //用之前一定要打开数据库
    [self createDB];

    NSString *sql = @"create table t_stu(id integer primary key autoincrement, name text,  age integer, sex text)";

    BOOL isSuccess = [self.fmdb executeUpdate:sql];

    if(isSuccess){
        NSLog(@"创建表成功");
    }
    else{
        NSLog(@"创建表失败");
    }

    //用完关闭数据库
    [self.fmdb close];

}
- (void) insertStudent:(Student *) student{

    [self createDB];

    NSString *sql = @"insert into t_stu(name,age,sex) values (?,?,?)";
    // 注意FMDB操作数据必须使用对象,age是int类型,不符合,所以需要转换成对象的方式
    BOOL isSuccess = [self.fmdb executeUpdate:sql,student.name,@(student.age),student.sex];

    if(isSuccess){
        NSLog(@"插入成功");
    }
    else{
        NSLog(@"插入失败");
    }

    //用完关闭数据库
    [self.fmdb close];


}
- (void) deleteStudent:(NSString *) stuName{

    [self createDB];

    NSString *sql = @"delete from t_stu where name=?";

    BOOL isSuccess = [self.fmdb executeUpdate:sql,stuName];

    if(isSuccess){
        NSLog(@"删除成功");
    }
    else{
        NSLog(@"删除失败");
    }

    //用完关闭数据库
    [self.fmdb close];

}
- (void) updateStudent:(Student *) student{
    [self createDB];

    NSString *sql = @"update t_stu set age=? , sex=? where name=?";

    BOOL isSuccess = [self.fmdb executeUpdate:sql,@(student.age),student.sex,student.name];

    if(isSuccess){
        NSLog(@"更新成功");
    }
    else{
        NSLog(@"更新失败");
    }

    //用完关闭数据库
    [self.fmdb close];

}
- (NSArray<Student *>*) queryStudentByName:(NSString *) stuName{
    [self createDB];

    NSString *sql = @"select name,age,sex from  t_stu  where name=?";

    FMResultSet *resultSet=[self.fmdb executeQuery:sql,stuName];

    NSMutableArray *array = [NSMutableArray array];
    while ([resultSet next]) {
        NSString *name = [resultSet stringForColumn:@"name"];
        int age = [resultSet intForColumn:@"age"];
        NSString *sex = [resultSet stringForColumn:@"sex"];
        Student *stu = [[Student alloc] initWithName:name andAge:age andSex:sex];
        [array addObject:stu];
    }

    //用完关闭数据库
    [self.fmdb close];
    return array;
}

@end
# 4. 事务的操作
- (void)insertStudents:(NSArray<Student *> *)students{
    [self createDB];
    //    开启事务
    [self.fmdb beginTransaction];

    @try {
        for (Student *student in students) {
            NSString *sql = @"insert into t_stu(name,age,sex) values (?,?,?)";
            // 注意FMDB操作数据必须使用对象,age是int类型,不符合,所以需要转换成对象的方式
            BOOL isSuccess = [self.fmdb executeUpdate:sql,student.name,@(student.age),student.sex];

            if(isSuccess){
                NSLog(@"插入成功");
            }
            else{
                NSLog(@"插入失败");
            }
        }
    } @catch (NSException *exception) {
        //   回滚数据
        [self.fmdb rollback];
    } @finally {
        //   提交数据
        [self.fmdb commit];
    }

    //用完关闭数据库
    [self.fmdb close];
}
测试:
    NSMutableArray *array = [NSMutableArray array];
    for (int i=0; i<1000; i++) {
         Student *stu = [[Student alloc] initWithName:@"mrgaogang" andAge:i andSex:@"male"];
        [array addObject:stu];
    }
    [self.dbTools insertStudents: array];
参考
- 本文链接: https://mrgaogang.github.io/ios/data/IOS%E7%9A%84%E6%95%B0%E6%8D%AE%E5%AD%98%E5%8F%96.html
- 版权声明: 本博客所有文章除特别声明外,均采用 CC BY-SA 4.0 许可协议。转载请注明出处!