

导语: 日常使用手机 APP,你会发现大量的 APP 都会给你推送各种各样的通知,用来吸引用户点击进入 App。
通知通常分为本地通知和远程通知。远程通知是需要网络的,本地通知通常指的是 App 本地在某个时间给用户提醒。本文主要讲解本地通知如何实现。
针对 iOS10 及以上的版本,创建本地通知有如下几个步骤:
AppDelegate 注册通知
- 请求获取通知权限(角标,声音,弹框)
- 设置通知代理
- 设置前台可展示通知
新建通知内容对象并设置通知内容
通知触发机制。(重复提醒,时间间隔要大于 60s) 本地通知与远程通知的触发器不一样
创建 UNNotificationRequest 通知请求对象
将通知加到通知中心
下面我们就具体讲解一下每个步骤具体的代码如何写的。本文将以一个点击屏幕5s后发送一个 可交互(可以输入内容,点击进入app,取消)的通知为例
# 一、 通知注册和权限申请
iOS 默认的情况是当 APP 在前台运行的时候不会显示通知信息,只会当 APP 处于后台情况才能展示;如果想要 APP 处于前台的情况也需要扎实通知信息,则需要对通知设置代理方法,并实现userNotificationCenter

- (BOOL)application:(UIApplication *)application didFinishLaunchingWithOptions:(NSDictionary *)launchOptions {
    // 设置角标,也可以不设置
    application.applicationIconBadgeNumber = 0;


    //第一步:AppDelegate注册通知
    UNUserNotificationCenter *center = [UNUserNotificationCenter currentNotificationCenter];
    //请求获取通知权限(角标,声音,弹框)
    [center requestAuthorizationWithOptions:(UNAuthorizationOptionBadge | UNAuthorizationOptionSound | UNAuthorizationOptionAlert) completionHandler:^(BOOL granted, NSError * _Nullable error) {

        //如果用户点击允许通知,那么granted就为YES
        if (granted) {
            //获取用户是否同意开启通知
            NSLog(@"用户允许发送通知");
        }

    }];


    //设置代理,后面有两个代理方法需要使用
    center.delegate = self;

    //如果程序被杀死了 会调用该方法
    if (launchOptions[UIApplicationLaunchOptionsLocalNotificationKey]) { // 如果这个key有值,代表是杀死的程序接收到本地通知跳转

        // 根据这种方式查看launchOptions的内容
        UILabel *infoLabel = [[UILabel alloc] init];
        infoLabel.frame = CGRectMake(0, 0, 300, 200);
        infoLabel.backgroundColor = [UIColor yellowColor];
        infoLabel.text = [NSString stringWithFormat:@"%@",launchOptions];
        [self.window.rootViewController.view addSubview:infoLabel];


        NSLog(@"跳转到指定页面");
    }


    return YES;
}


//接收到通知,如果处于后台,该方法不会调用(默认情况下,App处于前台,收到通知不会有任何提醒,必须在completionHandler中设置提醒的方式)
- (void)userNotificationCenter:(UNUserNotificationCenter *)center willPresentNotification:(UNNotification *)notification withCompletionHandler:(void (^)(UNNotificationPresentationOptions options))completionHandler{

    NSLog(@"%s 收到通知",__func__);

    UNNotificationContent *content = notification.request.content; // 收到推送的消息内容
    NSNumber *badge = content.badge;  // 推送消息的角标
    NSString *body = content.body;    // 推送消息体
    UNNotificationSound *sound = content.sound;  // 推送消息的声音
    NSString *subtitle = content.subtitle;  // 推送消息的副标题
    NSString *title = content.title;  // 推送消息的标题

    NSLog(@"iOS10 收到本地通知:{%s, body:%@, title:%@, subtitle:%@, badge:%@,sound:%@}",__func__,body,title,subtitle,badge,sound);

    completionHandler(UNNotificationPresentationOptionBadge|UNNotificationPresentationOptionSound|UNNotificationPresentationOptionAlert); // 需要执行这个方法,选择是否提醒用户,有Badge、Sound、Alert三种类型可以设置

}
然后就可以创建通知对象并发送通知
# 二、创建通知对象,并设置通知内容
//第一步:AppDelegate注册通知
//第二步:新建通知内容对象
UNMutableNotificationContent *content = [[UNMutableNotificationContent alloc] init];
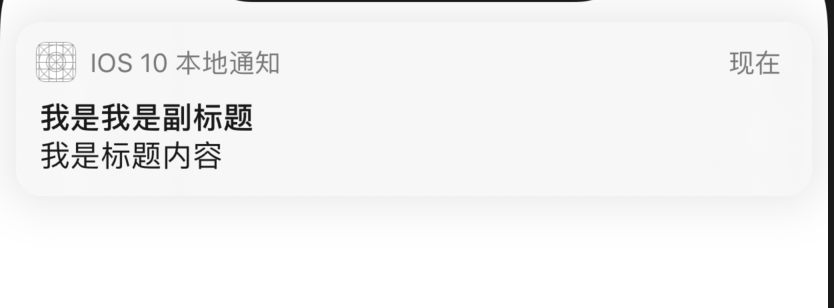
content.title = @"我是我是副标题"; // 设置副标题
content.body = @"我是标题内容"; // 设置通知内容
content.badge = @99; // 设置通知角标
UNNotificationSound *sound = [UNNotificationSound soundNamed:@"feiji.wav"];
content.sound = sound; // 可以自己设置通知声音,也可以不设置使用默认的iOS声音
# 三、通知触发
//第三步:通知触发机制。(重复提醒,时间间隔要大于60s) 本地通知与远程通知的触发器不一样;触发器有很多类型的
UNTimeIntervalNotificationTrigger *trigger1 = [UNTimeIntervalNotificationTrigger triggerWithTimeInterval:5 repeats:NO];
其他常用的触发器有:
UNTimeIntervalNotificationTrigger: 时间间隔触发器
//2分钟后提醒  UNTimeIntervalNotificationTrigger
UNTimeIntervalNotificationTrigger *trigger = [UNTimeIntervalNotificationTrigger triggerWithTimeInterval:120 repeats:NO];

//每小时重复1次  UNTimeIntervalNotificationTrigger
UNTimeIntervalNotificationTrigger *trigger2 = [UNTimeIntervalNotificationTrigger triggerWithTimeInterval:3600 repeats:YES];
UNCalendarNotificationTrigger: 日历触发器,到达某年某月某日就触发
//每周一早上8:00触发  UNCalendarNotificationTrigger

NSDateComponents *components = [[NSDateComponents alloc] init];

components.weekday = 2;

components.hour = 8;

UNCalendarNotificationTrigger *trigger = [UNCalendarNotificationTrigger triggerWithDateMatchingComponents:components repeats:YES];
UNLocationNotificationTrigger: 位置触发器,比如到某个位置触发
//到达某个位置触发  UNLocationNotificationTrigger

CLRegion *region = [[CLRegion alloc] init];

UNLocationNotificationTrigger *trigger4 = [UNLocationNotificationTrigger triggerWithRegion:region repeats:NO];
# 四、创建 UNNotificationRequest 通知请求对象
 NSString *requertIdentifier = @"RequestIdentifier";
UNNotificationRequest *request = [UNNotificationRequest requestWithIdentifier:requertIdentifier content:content trigger:trigger1];
# 五、将通知加到通知中心
[[UNUserNotificationCenter currentNotificationCenter] addNotificationRequest:request withCompletionHandler:^(NSError * _Nullable error) {

        if (!error) {
            NSLog(@"发送成功");
        }
}];
# 六、给通知添加交互
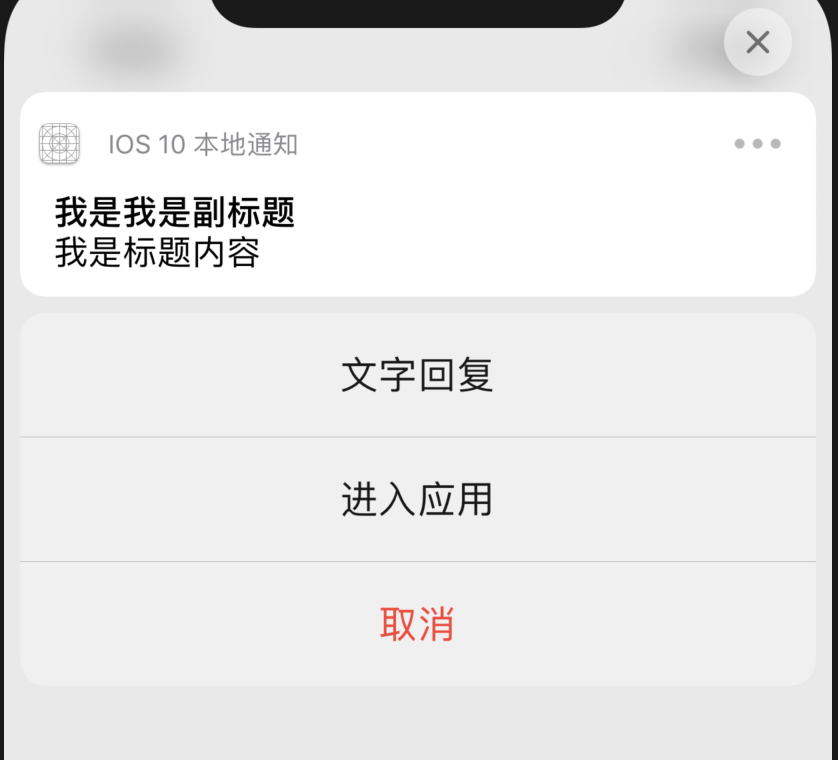
一般情况我们在发送通知后需要用户点击后进入 APP;以达到吸引用户消费的目的;在上面的创建 UINNotificationRequest通知请求对象的设置参数有一个 content 选项,我们可以定义通知的逻辑和交互. 一个简单的例子点击通知进入 APP:
第一步:设置交互内容
    //添加交互
    // 文字action UNNotificationActionOptionNone
    UNTextInputNotificationAction *action1 = [UNTextInputNotificationAction actionWithIdentifier:@"replyAction" title:@"文字回复" options:UNNotificationActionOptionNone];
    // 进入应用action UNNotificationActionOptionForeground
    UNNotificationAction *action2 = [UNNotificationAction actionWithIdentifier:@"enterAction" title:@"进入应用" options:UNNotificationActionOptionForeground];
    // 取消action UNNotificationActionOptionDestructive
    UNNotificationAction *action3 = [UNNotificationAction actionWithIdentifier:@"cancelAction" title:@"取消" options:UNNotificationActionOptionDestructive];

    UNNotificationCategory *category = [UNNotificationCategory categoryWithIdentifier:@"Categroy" actions:@[action1, action2, action3] intentIdentifiers:@[] options:UNNotificationCategoryOptionCustomDismissAction];

    [[UNUserNotificationCenter currentNotificationCenter] setNotificationCategories:[NSSet setWithObject:category]];

    content.categoryIdentifier = @"Categroy";
第二步:设置点击事件
要能响应点击事件,需要在 AppDelegate.m 中实现userNotificationCenter didReceiveNotificationResponse方法
// AppDelegate.m

//通知的点击事件,前后台都会调用该方法
- (void)userNotificationCenter:(UNUserNotificationCenter *)center didReceiveNotificationResponse:(UNNotificationResponse *)response withCompletionHandler:(void(^)(void))completionHandler{


    NSLog(@"%s 点击通知",__func__);

    UNNotificationContent *content = response.notification.request.content; // 收到推送的消息内容
    NSNumber *badge = content.badge;  // 推送消息的角标
    NSString *body = content.body;    // 推送消息体
    UNNotificationSound *sound = content.sound;  // 推送消息的声音
    NSString *subtitle = content.subtitle;  // 推送消息的副标题
    NSString *title = content.title;  // 推送消息的标题

    NSLog(@"iOS10 收到本地通知:{%s, body:%@, title:%@, subtitle:%@, badge:%@,sound:%@}",__func__,body,title,subtitle,badge,sound);


    //处理交互
    NSString *categoryIdentifier = response.notification.request.content.categoryIdentifier;

    if ([categoryIdentifier isEqualToString:@"Categroy"]) {
        if ([response.actionIdentifier isEqualToString:@"replyAction"]) {
            UNTextInputNotificationResponse *textResponse = (UNTextInputNotificationResponse*)response;

            NSString *userText = textResponse.userText;

            NSLog(@"您输入的内容:%@", userText);

        } else if ([response.actionIdentifier isEqualToString:@"enterAction"]) {
            NSLog(@"点击进入了应用");
        } else {
            NSLog(@"点击了取消");
        }
    }


    // Warning: UNUserNotificationCenter delegate received call to -userNotificationCenter:didReceiveNotificationResponse:withCompletionHandler: but the completion handler was never called.
    completionHandler();  // 系统要求执行这个方法


}
- 本文链接: https://mrgaogang.github.io/ios/notification/
- 版权声明: 本博客所有文章除特别声明外,均采用 CC BY-SA 4.0 许可协议。转载请注明出处!
← /ios/net/ /ios/phone/ →