


# TableView的使用
IOS 的 TableView 的主要作用是做列表或者表格的,其功能类似于 Android 的 RecyclerView;
# 一、TableView 的基础知识
# 1. TableView 简介
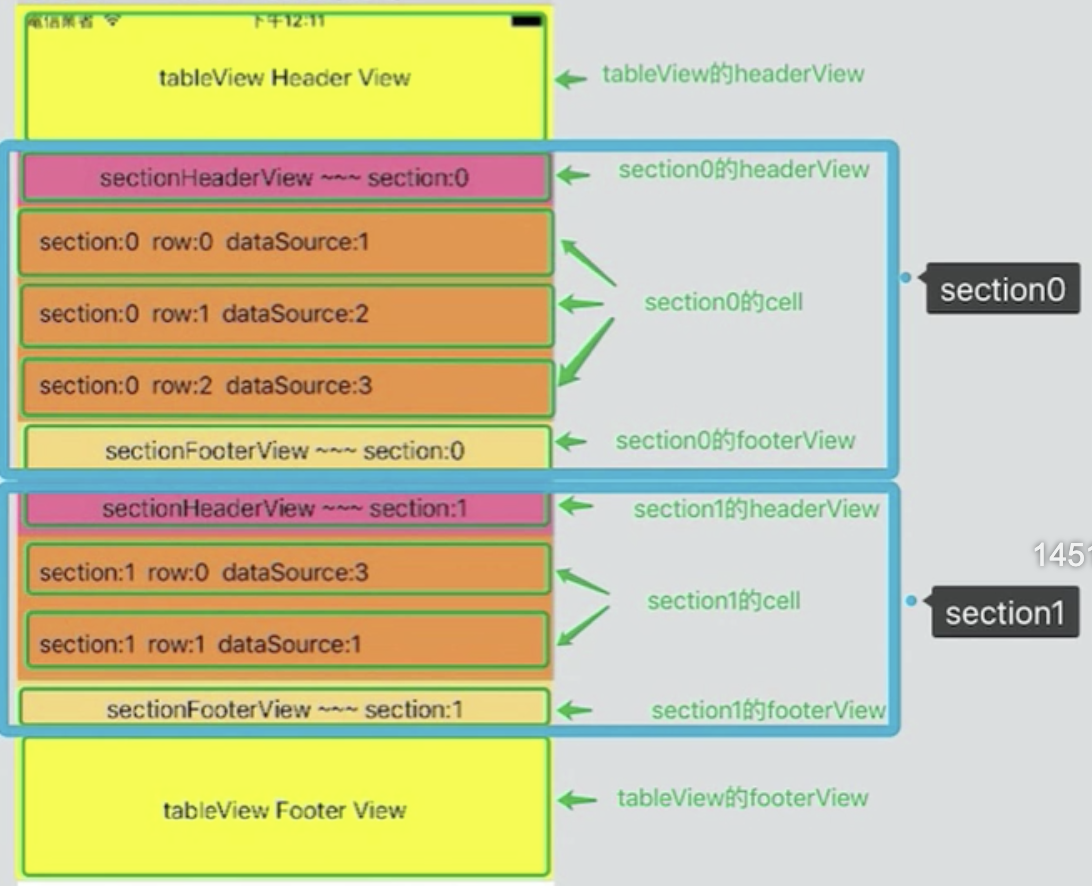 UITableView 主要包括如下几个部分:
- 头部视图:Header View
- 底部视图:Footer View
- 多个 Section
- 每一个 Section 包含多个 Cell
- 包含 Section 头部
- 包含 Section 底部
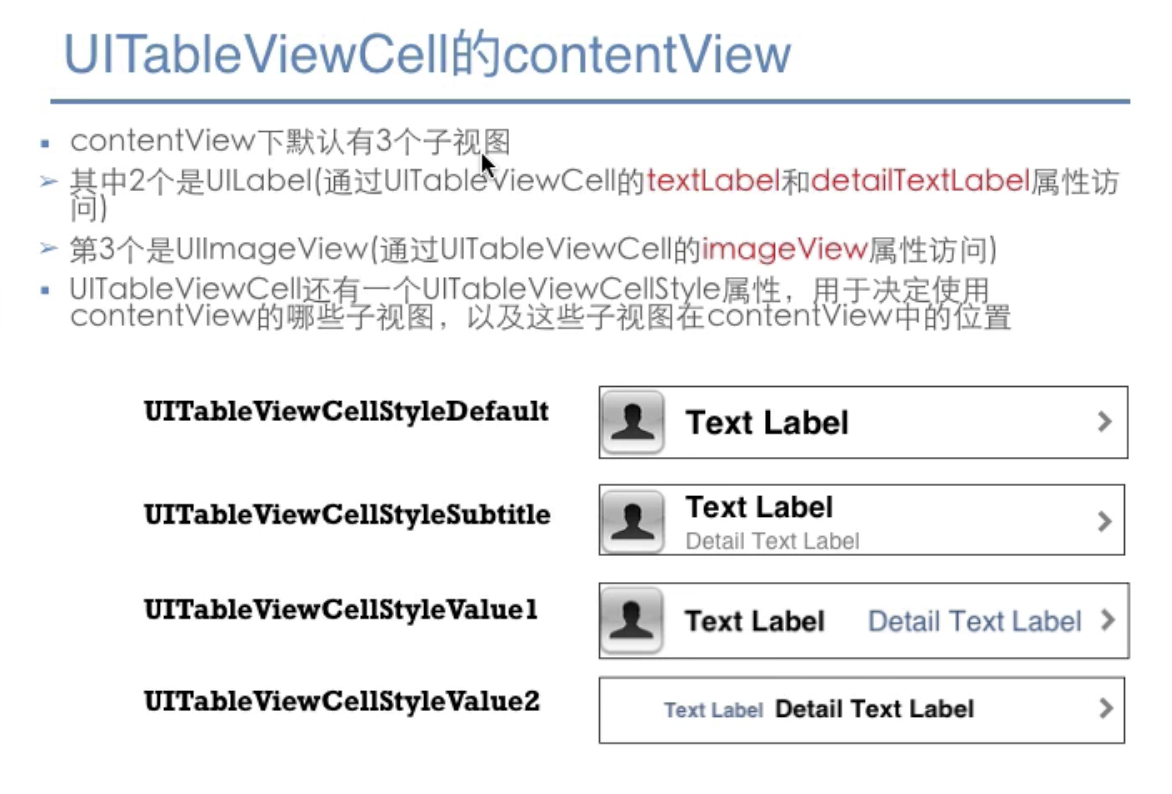
# 3. UITableViewCell 的四种样式
# 2. UITableViewCell 重用原理
Cell 的重用原理
IOS 设备的内存有限.如果用 UITobleView 显示成千上万条数裾,就需要成千上万个 UITableViewCell 对 ft 的话,将会耗尽 iOS 设条的内存•要解决该问题,需要靈用 UITobleViewCell 对象
重用原理
当滚动列表时,部分 UITableViewCell 会移出窗口, UITableView 会将窗口
外的 UITableViewCell 放入一个对象池中; 等待重用,当 UITableView 要求 dataSource
返回 UITabteViewCell 时; dataSource 会先蛮看这个对象地,如果池中有未使用的
UITableViewCell, dataSource 会用新的数据配置这个 UITableViewCell,然后返回铪
UITableView,重新显示到窗口中,从而邂免创建新对象。
还有一个非常重要的问题:有时候需要自定义 UITableViewCel(用一个子类继承,UITableViewCel),而且每一行用的不一定是同一种 UITableViewCell,"所以一个 UITableView 可能拥有不同类型的 UlTableViewCell,对象池中也会有很多不同类型的 UITableViewCell,,那么 UlTableView 在重用 UITableViewCell 时可能会得到错误类型的 UITableViewCell
解决方案:
UIITableViewCell有 个NSStringreuseldentifier属性,可以在初始化UITableViewCell的时候传入一个特定的字符串标识来设置reuseldentifier(一般用UITableViewCel的类名)。当 UTableView 要求dataSource返回UITableViewCell时,先通过一个字符串标识到对象池中查找对应类型的UITableViewCell对象,如果有,就重用,如果没有,就传入这个字符串标识来初始化一个UITableViewCell对象
# 二、TableView 的基础使用
要想TableView展示数据,首先必须的实现TableView的数据源方法,且实现 UITableViewDataSource;
@interface ViewController ()<UITableViewDataSource,UITableViewDelegate>
- (IBAction)addDataBtn:(id)sender;
@property (weak, nonatomic) IBOutlet UITableView *tabelView;
@property (strong, nonatomic) NSMutableArray *data;
@end
由于本例子想要展示一个列表,所以需要给TableView提供一个数组的数据源:
- (void)viewDidLoad {
    [super viewDidLoad];
    // Do any additional setup after loading the view.
    // 一定要记得给tableView设置数据源
    self.tabelView.dataSource=self;
    // mock 列表数据
    NSArray *array=@[@"iphone-1",@"iphone-2",@"iphone-3",@"iphone-4",@"iphone-5",@"iphone-6",@"iphone-7",@"iphone-8",@"iphone-9",@"iphone-10",@"iphone-11",@"iphone-12",@"iphone-13",@"iphone-14",@"iphone-15",@"iphone-16"];
    // 设置可变数组
    self.data= [NSMutableArray arrayWithArray: array];
}
# 1. 设置每行展示及行数
要想TableView展示数据,必须要实现的几个方法:
numberOfSectionsInTableView设置TableView展示多少组;前面基础知识已经讲到一个TableView是包含多组,一组又包含多行的;此处由于案例是展示一个列表,所以下方的代码返回的是 1;numberOfRowsInSection设置TableView展示多少行cellForRowAtIndexPath设置每一行展示的内容是什么,每一行展示的内容其实包裹在 TableViewCell 中的 ContentView 中
针对 TableView 中的每一行数据
// 每行显示的内容是什么
- (nonnull UITableViewCell *)tableView:(nonnull UITableView *)tableView cellForRowAtIndexPath:(nonnull NSIndexPath *)indexPath {
// 从重用池中查找对应的cell
UITableViewCell *cell = [tableView dequeueReusableCellWithIdentifier: @"ABC"];
if(cell == nil){
cell = [[UITableViewCell alloc] initWithStyle:UITableViewCellStyleSubtitle reuseIdentifier:@"ABC"];
}
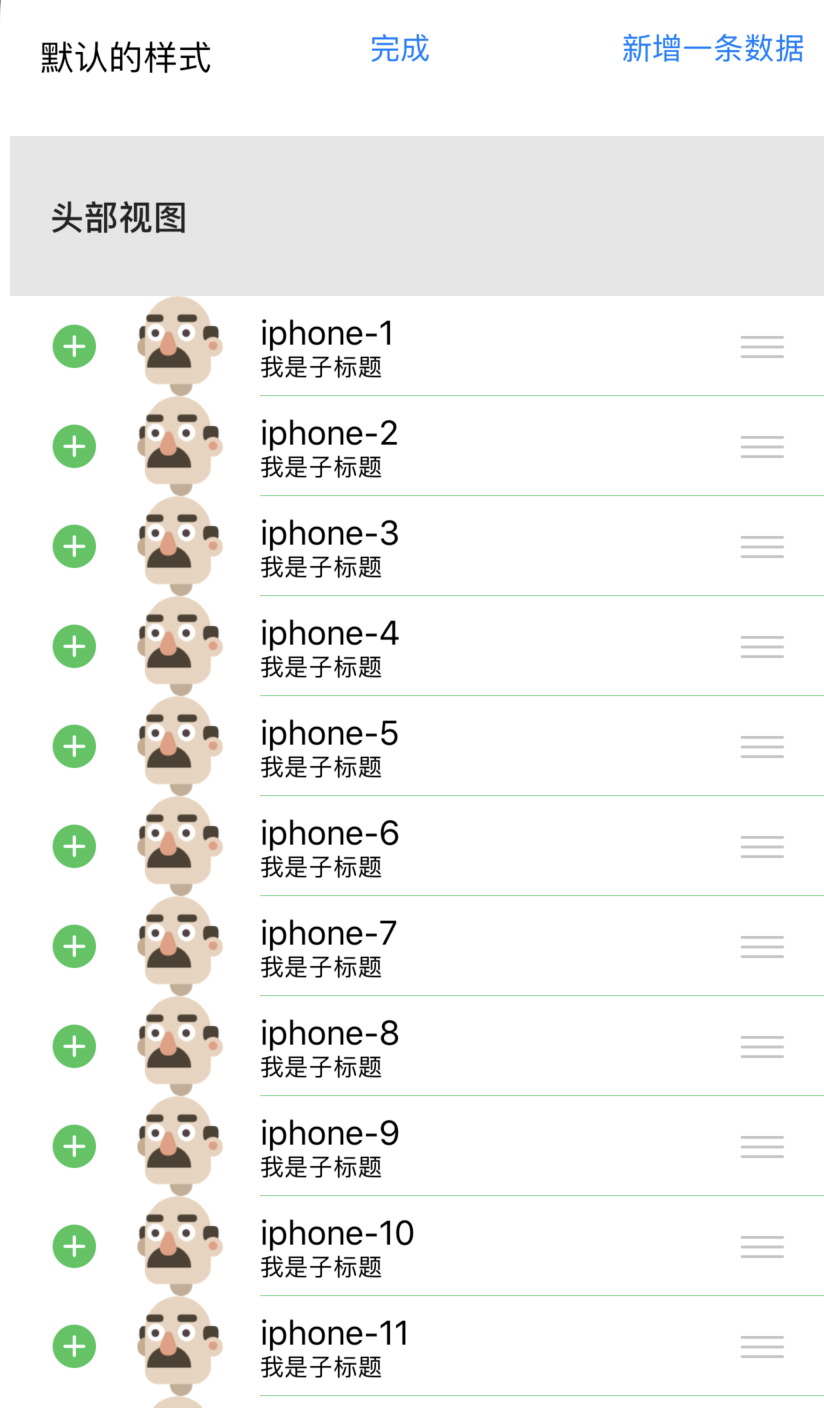
cell.textLabel.text=self.data[indexPath.row];
cell.imageView.image =[UIImage imageNamed: @"iconHeader.png"];
cell.detailTextLabel.text=@"我是子标题";
cell.accessoryType = UITableViewCellAccessoryDisclosureIndicator;
return cell;
}
// 一组中有多少行
- (NSInteger)tableView:(nonnull UITableView *)tableView numberOfRowsInSection:(NSInteger)section {
return self.data.count;
}
// 有多少组
- (NSInteger)numberOfSectionsInTableView:(UITableView *)tableView{
return 1;
}
# 2. 处理列表的点击事件
想要处理列表的点击实现,首先必须的继承自 tableview 的代理 UITableViewDelegate:
@interface ViewController ()<UITableViewDataSource,UITableViewDelegate>

@end
并在初始化的时候设置 tableview 的代理:
- (void)viewDidLoad {
    [super viewDidLoad];
    // Do any additional setup after loading the view.
    self.tabelView.delegate =self;
}
设置完成代理之后即可实现代理中的方法:
didSelectRowAtIndexPath就是每行点击将会触发的方法
// 代理方法,最常用的,处理点击事件
- (void)tableView:(UITableView *)tableView didSelectRowAtIndexPath:(NSIndexPath *)indexPath{
    NSString *str= self.data[indexPath.row];
    NSLog(@"%@",str);
}
# 3. 左滑删除某一行的数据
要想删除某一行的数据,必须的实现如下几个代理方法:(如何设置并实现代理请见处理列表的点击事件)
canEditRowAtIndexPath设置改行能不能编辑commitEditingStyle设置数据更改之后需要提交,仅仅实现了此方法就可以展示出删除按钮了titleForDeleteConfirmationButtonForRowAtIndexPath设置删除按钮的文字
// 左滑删除操作的需要实现的几个方法

// 1. 该行能不能编辑
- (BOOL)tableView:(UITableView *)tableView canEditRowAtIndexPath:(NSIndexPath *)indexPath{
    return YES;
}

// 2. 提交编辑,仅仅实现了此方法就可以展示出删除按钮了

- (void)tableView:(UITableView *)tableView commitEditingStyle:(UITableViewCellEditingStyle)editingStyle forRowAtIndexPath:(NSIndexPath *)indexPath{
    // 一定要记得判断编辑的类型,如果编辑的类型为删除,则删除数据源和对应的列
    if(editingStyle == UITableViewCellEditingStyleDelete){
        //    以下两个语句不能换顺序,必须先删除数据源中的数据,再删除本行的数据
        //    删除对应数据源中的方法
        [self.data removeObjectAtIndex: indexPath.row];

        //    删除界面上的,对应一行
        [tableView deleteRowsAtIndexPaths: @[indexPath] withRowAnimation:UITableViewRowAnimationFade];
    }

}

// 3. 设置删除按钮的文字

- (NSString *)tableView:(UITableView *)tableView titleForDeleteConfirmationButtonForRowAtIndexPath:(NSIndexPath *)indexPath{
    return @"删除";
}
# 4. 新增数据
新增一条数据和删除一条数据的整体思路是类似的:
- 也必须实现
canEditRowAtIndexPath且返回 YES,表示该行可以被编辑 - 必须让
tableview处于编辑状态 - 必须设置
tableview编辑状态的风格 - 更改
commitEditingStyle方法,如果是编辑状态则编辑
// 新增操作,按钮点击
- (IBAction)addDataBtn:(id)sender {
    // 2. 必须让tableview处于编辑状态
    [self.tabelView setEditing:YES];
}
// 新增操作也需要实现几个方法
// 1. 也必须实现 canEditRowAtIndexPath 且返回YES
- (BOOL)tableView:(UITableView *)tableView canEditRowAtIndexPath:(NSIndexPath *)indexPath{
    return YES;
}
// 3. 必须设置tableview编辑状态的风格

- (UITableViewCellEditingStyle)tableView:(UITableView *)tableView editingStyleForRowAtIndexPath:(NSIndexPath *)indexPath{
    //    默认情况下,是删除,如果是编辑则需要返回UITableViewCellEditingStyleInsert
    return  UITableViewCellEditingStyleInsert;
}

// 4. 更改commitEditingStyle方法,如果是编辑状态则编辑(此处综合了删除的情况)

- (void)tableView:(UITableView *)tableView commitEditingStyle:(UITableViewCellEditingStyle)editingStyle forRowAtIndexPath:(NSIndexPath *)indexPath{

    if (editingStyle == UITableViewCellEditingStyleInsert) {
        // 1. 数据源中加
        [self.data insertObject:@"新增加的" atIndex:indexPath.row];
        // 2. 视图中需要更新 reloadData是刷新整个表格,但是reloadData的性能不好,会全部重新刷新。
        // [self.tabelView reloadData];
        // 如果只是删除和增加一行,tableview有对应的方法
        [tableView insertRowsAtIndexPaths:@[indexPath ] withRowAnimation:UITableViewRowAnimationFade];
    }else if(editingStyle == UITableViewCellEditingStyleDelete){
        //    以下两个语句不能换顺序,必须先删除数据源中的数据,再删除本行的数据
        //    删除对应数据源中的方法
        [self.data removeObjectAtIndex: indexPath.row];
        //    删除界面上的,对应一行
        [tableView deleteRowsAtIndexPaths: @[indexPath] withRowAnimation:UITableViewRowAnimationFade];
    }

}
# 5. 表格移动
要想表格可以被移动,需要实现如下方法:
- 也必须实现
canEditRowAtIndexPath且返回 YES,表示该行可以被编辑 - 设置
canMoveRowAtIndexPath可移动 - 更新移动之后的数据源
moveRowAtIndexPath和toIndexPath
// 移动功能

// 1. 让列表处于可编辑状态, canEditRowAtIndexPath 且返回YES

// 2. 设置可以移动

- (BOOL)tableView:(UITableView *)tableView canMoveRowAtIndexPath:(NSIndexPath *)indexPath{
    return YES;
}

// 3. 设置移动index和目标Index;并更改数据源的index数据

- (void)tableView:(UITableView *)tableView moveRowAtIndexPath:(NSIndexPath *)sourceIndexPath toIndexPath:(NSIndexPath *)destinationIndexPath{
    // 移除需要移动的Cell
    NSString *cell = self.data[sourceIndexPath.row];

    [self.data removeObjectAtIndex:sourceIndexPath.row];

    // 将数据添加到指定位置
    [self.data insertObject:cell atIndex:destinationIndexPath.row];
}
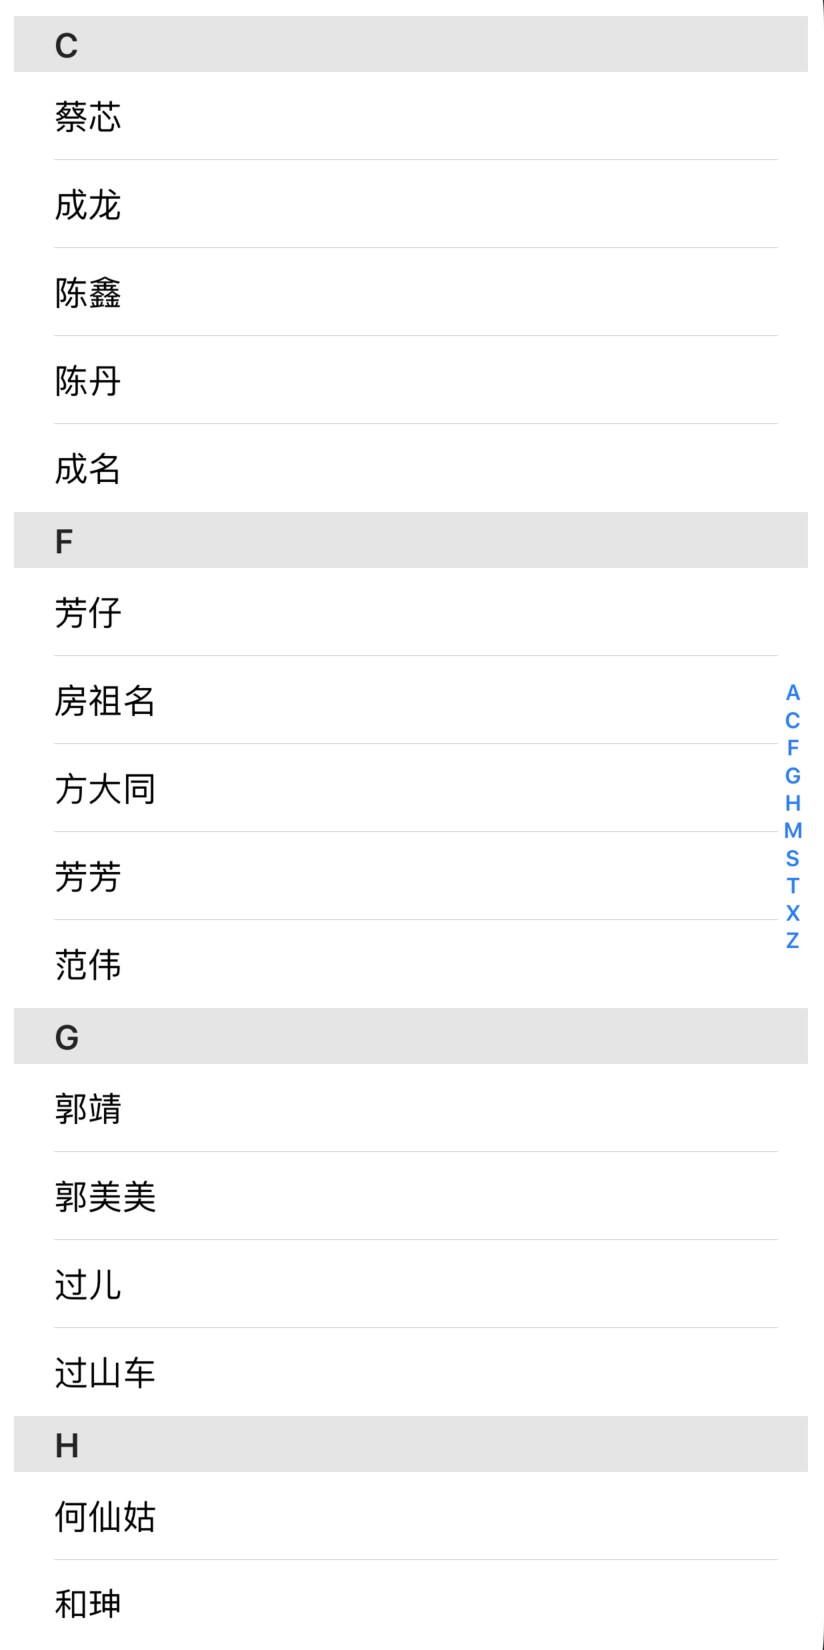
# 6. TableView 分组索引展示
要实现分类+索引展示,需要在原有基础展示的情况下实现如下几个方法:
numberOfSectionsInTableView设置TableView展示多少组;前面基础知识已经讲到一个TableView是包含多组,一组又包含多行的;此处由于案例是展示一个列表,所以下方的代码返回的是 1;numberOfRowsInSection设置TableView展示多少行cellForRowAtIndexPath设置每一行展示的内容是什么,每一行展示的内容其实包裹在 TableViewCell 中的 ContentView 中titleForHeaderInSection设置每一分类的内容sectionIndexTitlesForTableView设置右侧索引内容
#import "ViewController.h"

@interface ViewController ()<UITableViewDelegate,UITableViewDataSource>
// 所有分类的数组
@property (strong,nonatomic) NSArray *_sectionTitles;
// 内容数组
@property (strong,nonatomic) NSArray<NSArray *> *contentArray;
@end

@implementation ViewController

- (void)viewDidLoad {
    [super viewDidLoad];
    // Do any additional setup after loading the view.
    //    初始化分类数组的数据
    self._sectionTitles  = [[NSArray alloc] initWithObjects:
                            @"A",@"C",@"F",@"G",@"H",@"M",@"S",@"T",@"X",@"Z", nil];
    //    初始化具体内容的数据
    self.contentArray  = [[NSArray alloc] initWithObjects:
                          @[@"阿伟",@"阿姨",@"阿三"],
                          @[@"蔡芯",@"成龙",@"陈鑫",@"陈丹",@"成名"],
                          @[@"芳仔",@"房祖名",@"方大同",@"芳芳",@"范伟"],
                          @[@"郭靖",@"郭美美",@"过儿",@"过山车"],
                          @[@"何仙姑",@"和珅",@"郝歌",@"好人"],
                          @[@"妈妈",@"毛不易"],
                          @[@"孙周",@"沈冰",@"婶婶"],
                          @[@"涛涛",@"淘宝",@"套娃"],
                          @[@"小二",@"夏紫薇",@"许巍",@"许晴"],
                          @[@"周扒皮",@"周杰伦",@"张柏芝",@"张大仙"],nil];
}

// 设置一共有多少哥分组
- (NSInteger)numberOfSectionsInTableView:(UITableView *)tableView{
    return self._sectionTitles.count;
}
// 设置每一个分组对应有多少行
- (NSInteger)tableView:(UITableView *)tableView numberOfRowsInSection:(NSInteger)section{
    return self.contentArray[section].count;
}
// 返回每一行的数据
- (UITableViewCell *)tableView:(UITableView *)tableView cellForRowAtIndexPath:(NSIndexPath *)indexPath{
    UITableViewCell *cell = [tableView dequeueReusableCellWithIdentifier:@"abc"];
    cell.textLabel.text=self.contentArray[indexPath.section][indexPath.row];
    return cell;
}
// 返回每一个分类的具体内容
- (NSString *)tableView:(UITableView *)tableView titleForHeaderInSection:(NSInteger)section{
    return  self._sectionTitles[section];
}
// 设置右侧索引
- (NSArray<NSString *> *)sectionIndexTitlesForTableView:(UITableView *)tableView{
    return self._sectionTitles;
}
// 右侧索引的点击事件
- (NSInteger)tableView:(UITableView *)tableView sectionForSectionIndexTitle:(NSString *)title atIndex:(NSInteger)index{
    NSLog(@"您点击的索引是: %@",title);
    //    一定要返回Index,不然不会自动滑动到指定位置
    return index;
}

@end
# 三、TableView 高级属性
# 1. 自定义每行 Cell
之前介绍的 UITabelView 都是基于其自带的样式进行展示,真实的情况下,列表的展示其实是复杂的;下面我们就逐个来实现如何自定义 Cell;
先查看效果图: 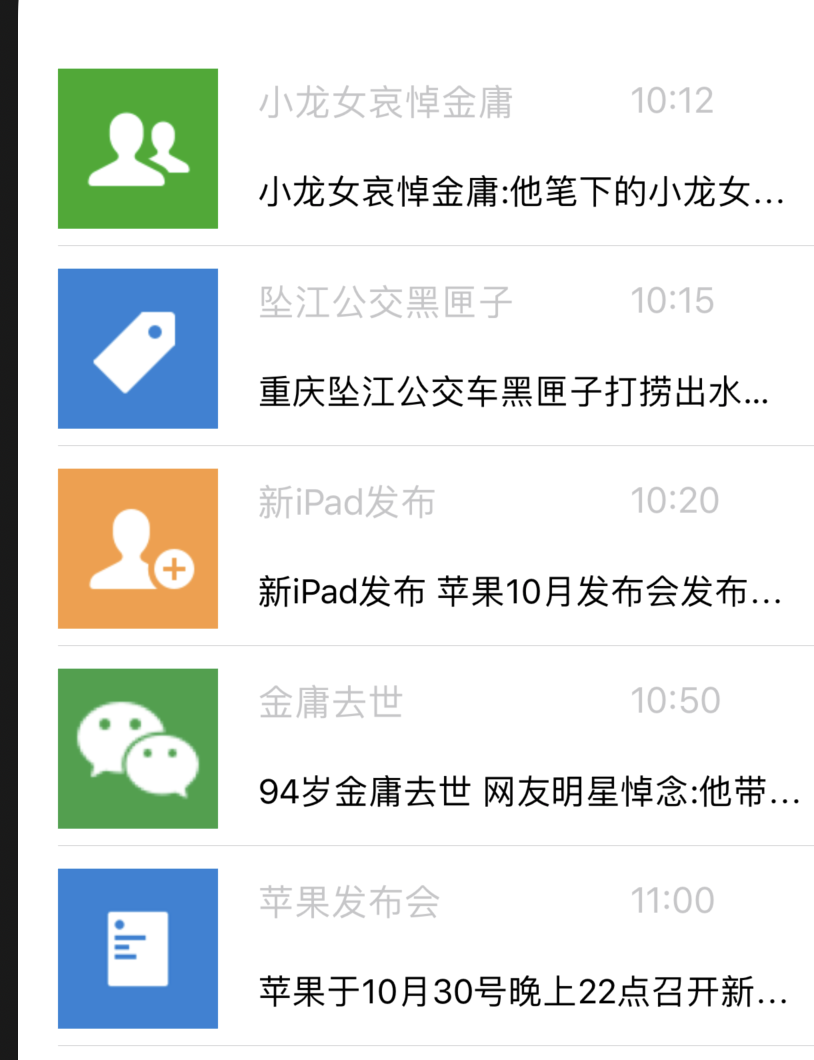
其实自定义 Cell 的步骤和普通展示的情况是一样的,只是在实现每一行 Cell 具体展示的内容需要我们自定义。
numberOfSectionsInTableView设置TableView展示多少组;前面基础知识已经讲到一个TableView是包含多组,一组又包含多行的;此处由于案例是展示一个列表,所以下方的代码返回的是 1;numberOfRowsInSection设置TableView展示多少行cellForRowAtIndexPath设置每一行展示的内容是什么,每一行展示的内容其实包裹在 TableViewCell 中的 ContentView 中;此处我们将自定义 Cell。
第一步:创建每一行内容
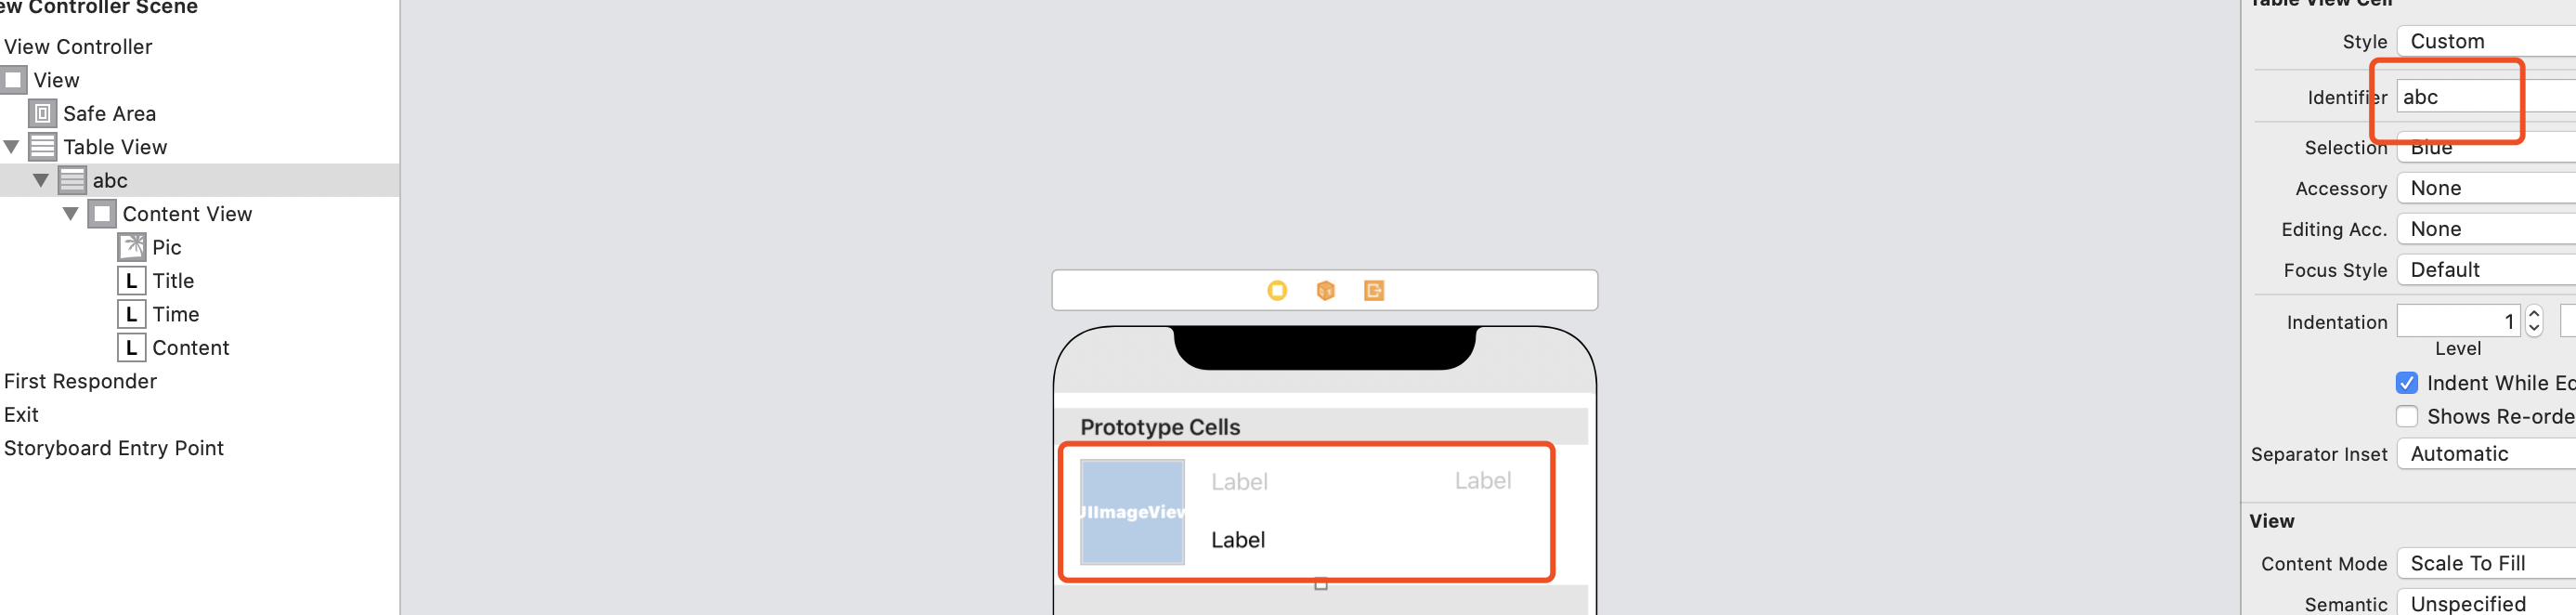
- 在 storyboard 中拖拽一个 Tableview 并设置其 Content 为 Dynamic Prototypes;
- 为了能及时查看出效果,将下面的 Prototypes Cell 设置为 1;
- 拖动一个 ImageView 和多个 Label 布局好 Cell;
- 设置每一个 Cell 的 Identifier 为 abc;
第二步:创建自定义 Cell
- 右键创建一个新的
Cocoa Touch Class并命名为WechatTableViewCell - 将 StoryBoard 中的 UIImageView 和多个 Label 分别拖动到
WechatTableViewCell.h文件中
为什么要放在.h 文件中?属性在.h 文件中和在.m 中声明是有区别的。区别就是:在.h 文件中声明的属性,外部类可以通过“类实例。属性”来调用,但在.m 中声明的则不可以,获取和设置的方法,只能是通过 setValue:forKey 和 valueForKey 来实现
补充:写在.m 文件中时,相当于是@private 权限,子类无法访问;而写在.h 文件中,默认是@protected 权限,子类可以访问,可以做权限修改
#import <UIKit/UIKit.h>
NS_ASSUME_NONNULL_BEGIN
@interface WechatTableViewCell : UITableViewCell
@property (weak, nonatomic) IBOutlet UILabel *title;
@property (weak, nonatomic) IBOutlet UILabel *time;
@property (weak, nonatomic) IBOutlet UILabel *content;
@property (weak, nonatomic) IBOutlet UIImageView *pic;
@end

NS_ASSUME_NONNULL_END
第三步:编写自定义 Cell
#import "ViewController.h"
#import "WeChatTableViewCell.h"

@interface ViewController ()<UITableViewDataSource, UITableViewDelegate>


@property(nonatomic, strong) NSArray *pics;
@property(nonatomic, strong) NSArray *titles;
@property(nonatomic, strong) NSArray *times;
@property(nonatomic, strong) NSArray *contents;
@property (weak, nonatomic) IBOutlet UITableView *tableView;
@end

@implementation ViewController
// 以下的数据定义为懒加载模式,详情可见TableView其他知识中的数据懒加载

- (NSArray *)pics{
    if(_pics == nil){
        _pics=@[@"add_friend_icon_addgroup_36x36_",@"Contact_icon_ContactTag_36x36_",@"plugins_FriendNotify_36x36_",@"Plugins_WeSport_36x36_",@"ReadVerified_icon_36x36_"];
    }
    return _pics;
}

- (NSArray *)titles{
    if(_titles ==nil){
        _titles=@[@"小龙女哀悼金庸", @"坠江公交黑匣子",@"新iPad发布",@"金庸去世", @"苹果发布会"];
    }
    return _titles;
}

- (NSArray *)times{
    if(_times == nil){
        _times=@[@"10:12", @"10:15", @"10:20", @"10:50", @"11:00"];
    }
    return _times;
}

- (NSArray *)contents{
    if(_contents ==nil){
        _contents=@[@"小龙女哀悼金庸:他笔下的小龙女给予我一切一切", @"重庆坠江公交车黑匣子打捞出水 已交公安部门", @"新iPad发布 苹果10月发布会发布三款新品", @"94岁金庸去世 网友明星悼念:他带着武侠梦睡着了", @"苹果于10月30号晚上22点召开新品发布会"];
    }
    return  _contents;
}

- (void)viewDidLoad {
    [super viewDidLoad];
    // Do any additional setup after loading the view, typically from a nib.

    self.tableView.delegate=self;
    self.tableView.dataSource=self;
}

// 这里的demo只有一行
-(NSInteger)numberOfSectionsInTableView:(UITableView *)tableView{
    return 1;
}

// 每一个分类下有多少行
-(NSInteger)tableView:(UITableView *)tableView numberOfRowsInSection:(NSInteger)section{
    return self.titles.count;
}
// 每一行具体的内容
-(UITableViewCell *)tableView:(UITableView *)tableView cellForRowAtIndexPath:(NSIndexPath *)indexPath{
    // 为每一行填充内容
    WechatTableViewCell *cell = [tableView dequeueReusableCellWithIdentifier:@"abc"];
    cell.pic.image=[UIImage imageNamed: [self.pics objectAtIndex:indexPath.row]];
    cell.time.text= self.times[indexPath.row];
    cell.content.text=self.contents[indexPath.row];
    cell.title.text=self.titles[indexPath.row];

    return cell;
}
// 记得设置每一行的高度
- (CGFloat)tableView:(UITableView *)tableView heightForRowAtIndexPath:(NSIndexPath *)indexPath{
    return 100;
}
@end
# 2. 使用 MVC 设计模式改造自定义 Cell
众所周知,MVC 设计模式中的:
- M(Model): 主要负责数据的存储以及如何操作数据;
- V(View): 主要负责视图的展示
- C(Controller): 是 Model 对象与 View 对象的中间人,负责传递数据,监听各种事件,管理其他对象的生命周期等。
上面自定义 Cell 中大量的数据冗余在 Controller 中,我们需要按照其不同的职责去分别处理不同的工作。
第一步:设计 Model
列表中的每一行对应的数据可以抽象成一个 Model: WeChatModel;分别拥有如下属性;并且我们提供了 一个方法让外界可以通过 getModels 的方式获取到所有的 Model。(tips: .h 文件中定义的属性和方法外界才能访问)
//
//  WeChatModel.h
//  TableView自定义
//
#import <Foundation/Foundation.h>

NS_ASSUME_NONNULL_BEGIN

@interface WeChatModel : NSObject

@property(nonatomic,copy) NSString *picName;
@property(nonatomic,copy) NSString *titleText;
@property(nonatomic,copy) NSString *timeText;
@property(nonatomic,copy) NSString *contentText;

- (NSMutableArray *) getModels;
@end

NS_ASSUME_NONNULL_END
上面已经讲到 Model 的功能是输出的存储和如何操作数据,所有我们把之前放在 ViewController 中的数据,放在WeChatModel.m文件中去实现,且不让外界可以访问得到;
其次我们需要初始化一个 model 数组,以供外界通过.h 文件中的 getModels 可以访问到。
//
//  WeChatModel.m
//  TableView自定义
#import "WeChatModel.h"

@interface WeChatModel()
@property(nonatomic, strong) NSArray *pics;
@property(nonatomic, strong) NSArray *titles;
@property(nonatomic, strong) NSArray *times;
@property(nonatomic, strong) NSArray *contents;
// 一个WeChatModel数组,存储列表的数据源
@property (nonatomic,strong) NSMutableArray<WeChatModel *> *wechats;

@end

@implementation WeChatModel
// 实现getModels,将所有的模型数据返回
- (NSMutableArray *)getModels{
    return self.wechats;
}

- (NSArray<WeChatModel *> *)wechats{
    if(_wechats == nil){
        // 如果为空,则构造一个空的可变数组,并依次添加数据
        _wechats = [NSMutableArray array];
        for (int i=0; i<self.titles.count; i++) {
            WeChatModel *model = [[WeChatModel alloc] init];
            model.picName=self.pics[i];
            model.contentText=self.contents[i];
            model.timeText=self.times[i];
            model.titleText=self.titles[i];
            [_wechats addObject:model];
        }
    }
    return _wechats;
}

- (NSArray *)pics{
    if(_pics == nil){
        _pics=@[@"add_friend_icon_addgroup_36x36_",@"Contact_icon_ContactTag_36x36_",@"plugins_FriendNotify_36x36_",@"Plugins_WeSport_36x36_",@"ReadVerified_icon_36x36_"];
    }
    return _pics;
}

- (NSArray *)titles{
    if(_titles ==nil){
        _titles=@[@"小龙女哀悼金庸", @"坠江公交黑匣子",@"新iPad发布",@"金庸去世", @"苹果发布会"];
    }
    return _titles;
}

- (NSArray *)times{
    if(_times == nil){
        _times=@[@"10:12", @"10:15", @"10:20", @"10:50", @"11:00"];
    }
    return _times;
}

- (NSArray *)contents{
    if(_contents ==nil){
        _contents=@[@"小龙女哀悼金庸:他笔下的小龙女给予我一切一切", @"重庆坠江公交车黑匣子打捞出水 已交公安部门", @"新iPad发布 苹果10月发布会发布三款新品", @"94岁金庸去世 网友明星悼念:他带着武侠梦睡着了", @"苹果于10月30号晚上22点召开新品发布会"];
    }
    return  _contents;
}

@end
第二步:给自定义的 WechatTableViewCell,提供数据
之前展示的方式是在 controller 中挨个编写,但是现在我们需要将 Cell 和对应的 Model 绑定;
- WechatTableViewCell 给外界提供一个设置数据源的方法
//  WechatTableViewCell.h
#import <UIKit/UIKit.h>
#import "WeChatModel.h"
NS_ASSUME_NONNULL_BEGIN

@interface WechatTableViewCell : UITableViewCell
@property (weak, nonatomic) IBOutlet UILabel *title;
@property (weak, nonatomic) IBOutlet UILabel *time;
@property (weak, nonatomic) IBOutlet UILabel *content;
@property (weak, nonatomic) IBOutlet UIImageView *pic;

- (void)configCell: (WeChatModel *) wechat;

@end

NS_ASSUME_NONNULL_END
- 将组件和数据的绑定放在 Cell 中
//
//  WechatTableViewCell.m
//

#import "WechatTableViewCell.h"
#import "WeChatModel.h"
@implementation WechatTableViewCell
// 数据的绑定,放在Cell中
- (void)configCell:(WeChatModel *)wechat{

    self.pic.image=[UIImage imageNamed: wechat.picName];
    self.time.text= wechat.timeText;
    self.content.text=wechat.contentText;
    self.title.text=wechat.titleText;
}

- (void)awakeFromNib {
    [super awakeFromNib];
    // Initialization code
}

- (void)setSelected:(BOOL)selected animated:(BOOL)animated {
    [super setSelected:selected animated:animated];

    // Configure the view for the selected state
}

@end
ViewController负责处理各种TableView的事件;并渲染列表
// ViewController.m

#import "ViewController.h"
#import "WeChatTableViewCell.h"
#import "WeChatModel.h"
@interface ViewController ()<UITableViewDataSource, UITableViewDelegate>
@property (nonatomic,strong) NSMutableArray<WeChatModel *> *wechats;
@property (weak, nonatomic) IBOutlet UITableView *tableView;
@end

@implementation ViewController

- (void)viewDidLoad {
    [super viewDidLoad];
    // Do any additional setup after loading the view, typically from a nib.

    self.tableView.delegate=self;
    self.tableView.dataSource=self;
    // 获取所有的模型数据
    self.wechats= [[[WeChatModel alloc]init] getModels];
}

// 这里的demo只有一行
-(NSInteger)numberOfSectionsInTableView:(UITableView *)tableView{

    return 1;
}

// 每一哥分类下有多少行
-(NSInteger)tableView:(UITableView *)tableView numberOfRowsInSection:(NSInteger)section{


    return self.wechats.count;

}
// 每一行具体的内容
-(UITableViewCell *)tableView:(UITableView *)tableView cellForRowAtIndexPath:(NSIndexPath *)indexPath{

    WechatTableViewCell *cell = [tableView dequeueReusableCellWithIdentifier:@"abc"];
    // 给每一个Cell设置模型数据即可
    [cell configCell: self.wechats[indexPath.row]];
    return cell;
}

- (CGFloat)tableView:(UITableView *)tableView heightForRowAtIndexPath:(NSIndexPath *)indexPath{
    return 100;
}
// 移除多余的空白行
- (UIView *)tableView:(UITableView *)tableView viewForFooterInSection:(NSInteger)section{
    return [[UIView alloc]init];
}
@end
效果图和原来一致:
# 3. 自定义 Cell-XIB 方式
前面第三章第一节已经讲到如何自定义 Cell; 之前的使用方式是直接在 storyboard 中的 tableview 创建一个 cell,这种方式 cell 和 tableview 进行了直接关联;本次我们将使用 XIB 的方式,单独创建一个 Cell。
第一步:创建 XIB 文件并构造对应 Cell 视图 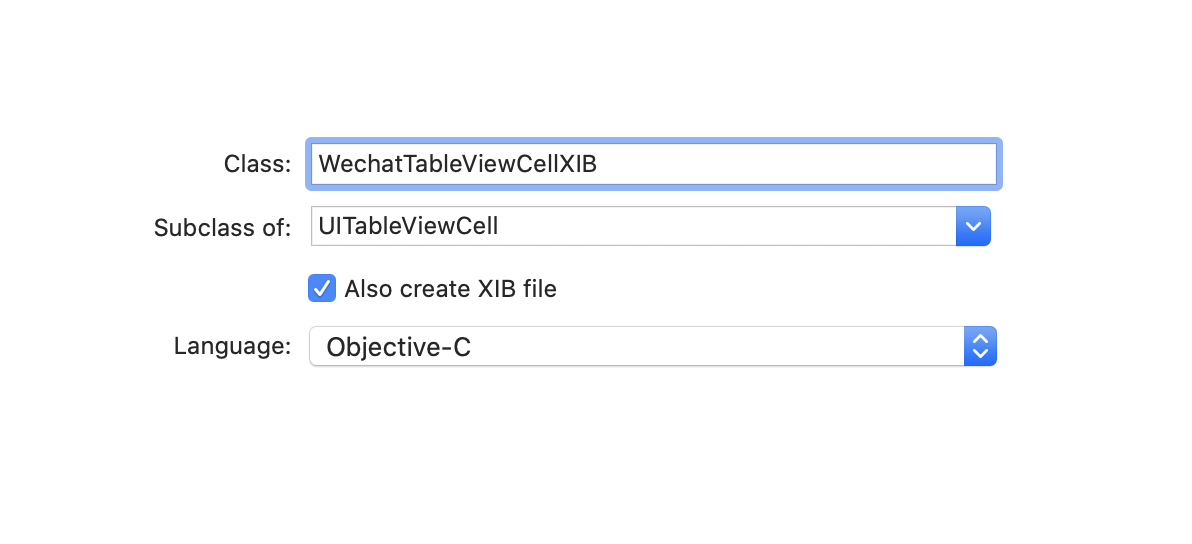
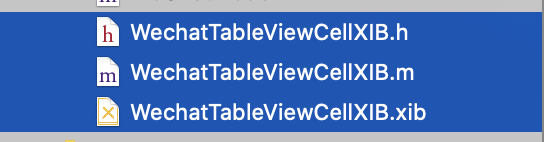
创建完成之后会在目录下创建三个文件;其中比较特殊的是 xib 文件,我们可以在里面拖动类似于之前 storyboard 中的视图;
并设置 indentifer;我们会发现整个 xib 其实就是一个 TableViewCell。

第二步:准备 Model 数据
此处和第三章,第二节使用 MVC 设计模式重构 Cell 中的.m 和.h 文件一样;
//
//  WechatTableViewCellXIB.h
//  TableView自定义

#import <UIKit/UIKit.h>
#import "WeChatModel.h"
NS_ASSUME_NONNULL_BEGIN

@interface WechatTableViewCellXIB : UITableViewCell
@property (weak, nonatomic) IBOutlet UILabel *title;
@property (weak, nonatomic) IBOutlet UILabel *time;
@property (weak, nonatomic) IBOutlet UILabel *content;
@property (weak, nonatomic) IBOutlet UIImageView *pic;

- (void)configCell: (WeChatModel *) wechat;
@end

NS_ASSUME_NONNULL_END
//
//  WechatTableViewCellXIB.m
//  TableView自定义

#import "WechatTableViewCellXIB.h"
#import "WeChatModel.h"
@implementation WechatTableViewCellXIB

- (void)configCell:(WeChatModel *)wechat{

    self.pic.image=[UIImage imageNamed: wechat.picName];
    self.time.text= wechat.timeText;
    self.content.text=wechat.contentText;
    self.title.text=wechat.titleText;
}

- (void)awakeFromNib {
    [super awakeFromNib];
    // Initialization code
}

- (void)setSelected:(BOOL)selected animated:(BOOL)animated {
    [super setSelected:selected animated:animated];

    // Configure the view for the selected state
}

@end
第三步:改写 ViewController
主要变化的点:
- 导入的文件变成了
WechatTableViewCellXIB.h - 没一行的 Cell 变成了
WechatTableViewCellXIB - 需要手动注册 Cell 到 TableView
#import "ViewController.h"
// 变化点①
#import "WechatTableViewCellXIB.h"
#import "WeChatModel.h"
@interface ViewController ()<UITableViewDataSource, UITableViewDelegate>
@property (nonatomic,strong) NSMutableArray<WeChatModel *> *wechats;
@property (weak, nonatomic) IBOutlet UITableView *tableView;
@end

@implementation ViewController

- (void)viewDidLoad {
    [super viewDidLoad];
    // Do any additional setup after loading the view, typically from a nib.

    self.tableView.delegate=self;
    self.tableView.dataSource=self;

    self.wechats= [[[WeChatModel alloc]init] getModels];

    //注册cell,// 变化点③
    //在当前的工程目录下通过名字找到xib
    UINib *nib = [UINib nibWithNibName:@"WechatTableViewCellXIB" bundle:nil];
    [self.tableView registerNib:nib forCellReuseIdentifier:@"abc"];
}

// 这里的demo只有一行
-(NSInteger)numberOfSectionsInTableView:(UITableView *)tableView{

    return 1;
}

// 每一哥分类下有多少行
-(NSInteger)tableView:(UITableView *)tableView numberOfRowsInSection:(NSInteger)section{


    return self.wechats.count;

}
// 每一行具体的内容
-(UITableViewCell *)tableView:(UITableView *)tableView cellForRowAtIndexPath:(NSIndexPath *)indexPath{
    // 变化点②
    WechatTableViewCellXIB *cell = [tableView dequeueReusableCellWithIdentifier:@"abc"];

    [cell configCell: self.wechats[indexPath.row]];
    return cell;
}

- (CGFloat)tableView:(UITableView *)tableView heightForRowAtIndexPath:(NSIndexPath *)indexPath{
    return 100;
}
// 移除多余的空白行
- (UIView *)tableView:(UITableView *)tableView viewForFooterInSection:(NSInteger)section{
    return [[UIView alloc]init];
}
@end
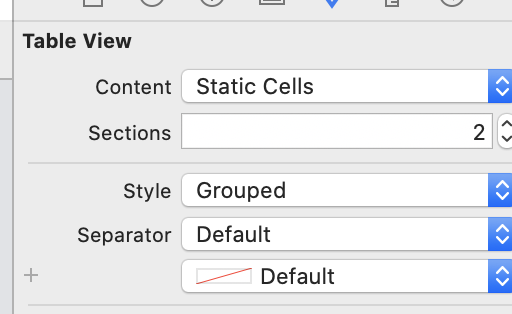
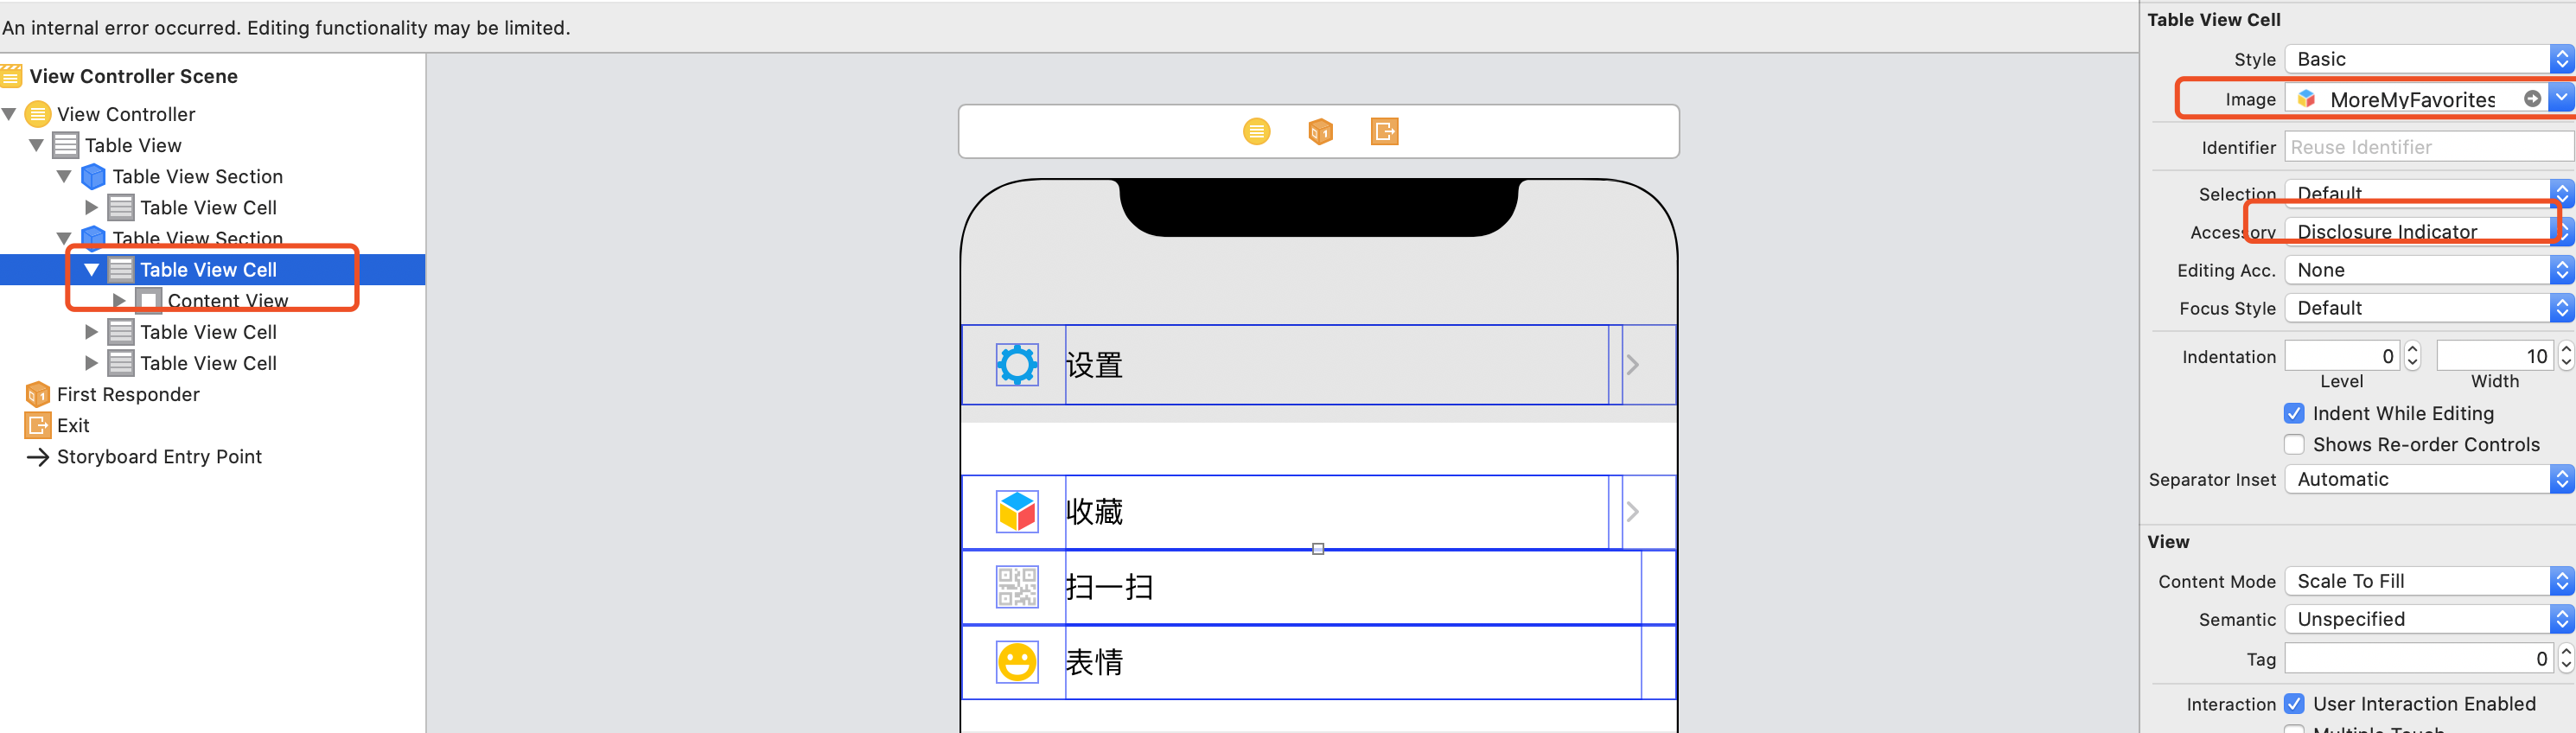
# 4. TableView 静态单元格
当数据不是经常发生变化的时候,我们应该使用静态单元格;常用的地方包括设置等页面。
使用静态表格展示,需要使用到 UITableViewController;可以在 storyboard 中拖动一个 UITableViewController,需要注意的是 UITableViewController 将会占用整个 UIView;
第一步:改写 ViewController
将原本继承自 UIViewController 改造成继承自 UITableViewController;使用了 UITableViewController 之后无需再次在.m 文件中实现<UITableViewDataSource 和 UITableViewDelegete>,因为已经默认实现了
#import <UIKit/UIKit.h>

@interface ViewController : UITableViewController

@end
第二步:使用 UITableViewController
拖动一个 UITableViewController,并删除原有 storyboard 中的 ViewController
选择 Class 为 ViewControll

- 设置 TableView 的 type 为 static,style 为 grouped
- 设置多个分组,并给每一个分组设置多个 Cell,并给每一个 Cell 设置图片和标题
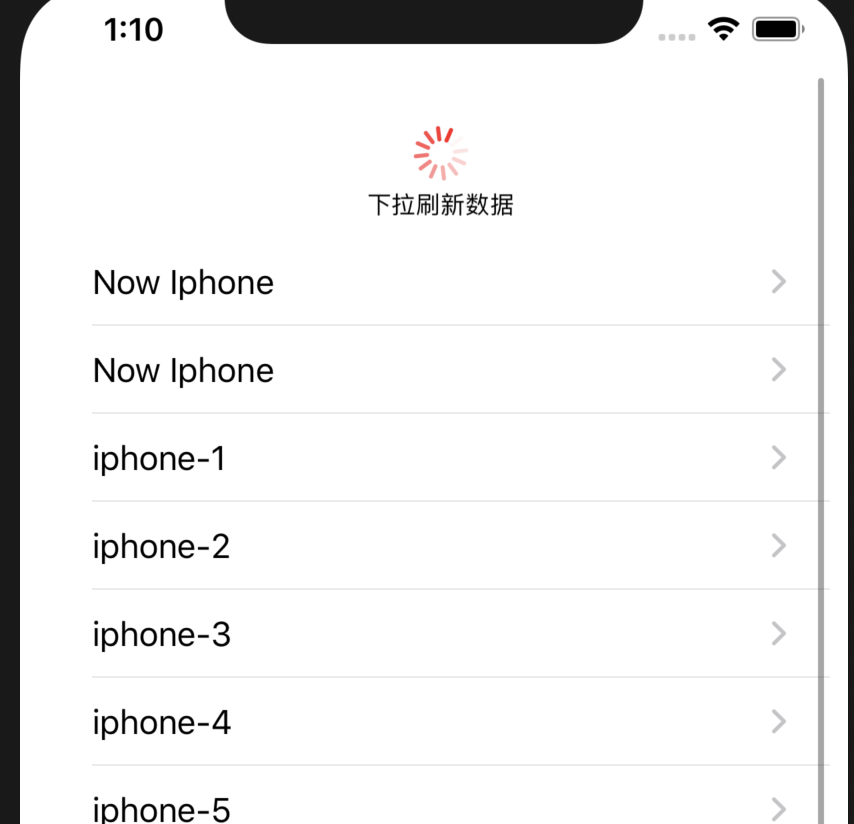
# 5. TableView 使用 UIRefreshControl 下拉刷新
在 IOS 中 UIRefreshControl 可以在ScrollView中使用,由于TableView 是ScrollView的子类,那么也是可以使用的;
UIRefreshControl 不可以直接在storyboard中使用,需要在代码中手动设置。
设置下拉刷新的主要步骤如下:
- 初始化TableView的数据及代理方法
- 实例化UIRefreshControl并注册到TableView
- 监听下拉刷新事件
- 更新数据,完成之后关闭下拉刷新
#import "ViewController.h"

@interface ViewController ()<UITableViewDataSource,UITableViewDelegate>
- (IBAction)addDataBtn:(id)sender;
- (IBAction)finish:(id)sender;
@property (weak, nonatomic) IBOutlet UITableView *tabelView;
@property (strong, nonatomic) NSMutableArray *data;
@end

@implementation ViewController

- (void)viewDidLoad {
    [super viewDidLoad];
    // Do any additional setup after loading the view.
    self.tabelView.dataSource=self;
    self.tabelView.delegate =self;
    NSArray *array=@[@"iphone-1",@"iphone-2",@"iphone-3",@"iphone-4",@"iphone-5",@"iphone-6",@"iphone-7",@"iphone-8",@"iphone-9",@"iphone-10",@"iphone-11",@"iphone-12",@"iphone-13",@"iphone-14",@"iphone-15",@"iphone-16"];
    self.data= [NSMutableArray arrayWithArray: array];

    UIRefreshControl *controll = [[UIRefreshControl alloc] init];
    //    设置下拉刷新的文本
    controll.attributedTitle = [[NSAttributedString alloc] initWithString:@"下拉刷新数据"];
    //    设置圈圈的颜色
    controll.tintColor = UIColor.redColor;

    // 监听下拉刷新事件
    [controll addTarget:self action:@selector(refreshTableView) forControlEvents:UIControlEventValueChanged];
    self.tabelView.refreshControl=controll;
}

- (void)refreshTableView{
//    模拟,延迟两秒刷新数据
    dispatch_after(dispatch_time(DISPATCH_TIME_NOW, (int64_t)(2 * NSEC_PER_SEC)), dispatch_get_main_queue(), ^{
        // 更新数据
        [self.data insertObject:@"Now Iphone" atIndex:0];
        [self.tabelView reloadData];
        // 如果正在刷新则关闭刷新
        if([self.tabelView.refreshControl isRefreshing]){
            [self.tabelView.refreshControl endRefreshing];
        }
    });
}
// 每行显示的内容是什么
- (nonnull UITableViewCell *)tableView:(nonnull UITableView *)tableView cellForRowAtIndexPath:(nonnull NSIndexPath *)indexPath {
    // 从重用池中查找对应的cell
    UITableViewCell *cell = [tableView dequeueReusableCellWithIdentifier: @"abc"];
    if(cell == nil){
        cell = [[UITableViewCell alloc] initWithStyle:UITableViewCellStyleDefault reuseIdentifier:@"abc"];
    }

    cell.textLabel.text=self.data[indexPath.row];

    cell.accessoryType = UITableViewCellAccessoryDisclosureIndicator;
    return cell;
}

// 一组中有多少行
- (NSInteger)tableView:(nonnull UITableView *)tableView numberOfRowsInSection:(NSInteger)section {
    return self.data.count;
}

// 有多少组
- (NSInteger)numberOfSectionsInTableView:(UITableView *)tableView{
    return 1;
}
@end
# 四、TableView 其他知识
# 1. 数据懒加载
以上的例子数据都是在 viewDidLoad 中直接同步创建的;如果数据很大难以避免会耗时比较长,此时就需要使用到数据的懒加载。
数据的懒加载其实就是实现属性的 get 方法。
举个例子,按照上面的索引实现中的contentArray之前是在 viewDidLoad 中设置的,现在@implementation中实现contentArray;表示在使用的时候才去初始化。
注意点
使用懒加载这种方式,在后续使用的时候请使用 self.contentArray 的方式,而不要使用下划线 _contentArray 的方式。
Tips: self.和下划线访问的区别
通过 self.xxx 的访问调用了方法:包含了 set 和 get 方法。而通过下划线的访问是获取自己的实例变量,不包含 set 和 get 的方法
@implementation ViewController

// 重新contentArray的get方法
- (NSArray<NSArray *> *)contentArray{
    if(_contentArray == nil){
        _contentArray=[[NSArray alloc] initWithObjects:
        @[@"阿伟",@"阿姨",@"阿三"],
        @[@"蔡芯",@"成龙",@"陈鑫",@"陈丹",@"成名"],
        @[@"芳仔",@"房祖名",@"方大同",@"芳芳",@"范伟"],
        @[@"郭靖",@"郭美美",@"过儿",@"过山车"],
        @[@"何仙姑",@"和珅",@"郝歌",@"好人"],
        @[@"妈妈",@"毛不易"],
        @[@"孙周",@"沈冰",@"婶婶"],
        @[@"涛涛",@"淘宝",@"套娃"],
        @[@"小二",@"夏紫薇",@"许巍",@"许晴"],
        @[@"周扒皮",@"周杰伦",@"张柏芝",@"张大仙"],nil];
    }
    return _contentArray;
}

- (NSArray *)_sectionTitles{
    if(__sectionTitles == nil){
        __sectionTitles=[[NSArray alloc] initWithObjects:
        @"A",@"C",@"F",@"G",@"H",@"M",@"S",@"T",@"X",@"Z", nil];
    }
    return __sectionTitles;
}

- (void)viewDidLoad {
    [super viewDidLoad];
    // Do any additional setup after loading the view.

}
// ....其他代码
@end
参考
- 本文链接: https://mrgaogang.github.io/ios/tableview/TableView%E7%9A%84%E4%BD%BF%E7%94%A8.html
- 版权声明: 本博客所有文章除特别声明外,均采用 CC BY-SA 4.0 许可协议。转载请注明出处!