


# ReactNative千人千面方案
导语: 越来越多的产品开始做 AB 实验,系统会根据不同人群展示不同的页面效果,以达到用户增长的目录。当前 h5 页面接入 AB Test 较多,而 RN 由于其特殊性接入 AB Test 较少;本文主要介绍一种在 RN 页面进行 AB 实验的方案。
# 一、前言
说到 AB 实验,不管是 H5 还是 RN,总会有一堆可行的方案:
方案 1. AB 实验
运行时代码逻辑进行拆分- 统一打包
- 拉取 cgi 获取实验配置
- 走代码逻辑,不同的实验加载不同的组件
方案 2. AB 实验
构建时进行代码逻辑拆分(一次构建)- 读取实验配置
- 构建所有实验可能性,进行拆包
- 加载时按照不同实验读取不同
jsbundle/js
方案 3. AB 实验
构建时进行代码逻辑拆分(多次构建)- 读取实验配置
- babel 替换 Module, 构建所有实验可能性,进行拆包
- 加载时按照不同实验读取不同
jsbundle/js
等等
回顾上面的两种方案,第一种方案有一些不足之处:
- 所有的实验都统一打包,势必会让整个
js/jsbundle体积变得巨大; - 在代码中进行逻辑拆分,其实更像是编写正常的页面,实验和宿主不能解耦
- 相比方案 3, 只需要一次构建即可生成多个
bundle
由于 RN 的特殊性(需要下载 jsbundle 在本地进行加载),我们力求下载的 jsbundle 体积更小,减少用户下载时间,从而优化页面首屏耗时。所以我们选择使用第二种方案进行RN的AB 实验。选择第二种方案的理由是:
- 用户可以按需加载
jsbundle/js,无需全量加载, 从而优化加载时间和 jsbundle 加载时间。 - AB 实验和宿主工程能够解耦;
# 二、RN AB 实验拆包方案
众所周知,rn 不像 H5 那般有 webpack 等构建工具,能够很好的自定义构建过程;特别是比较老的 RN 版本(例如:0.56) 想要干预或者自定义构建过程更是比较麻烦。
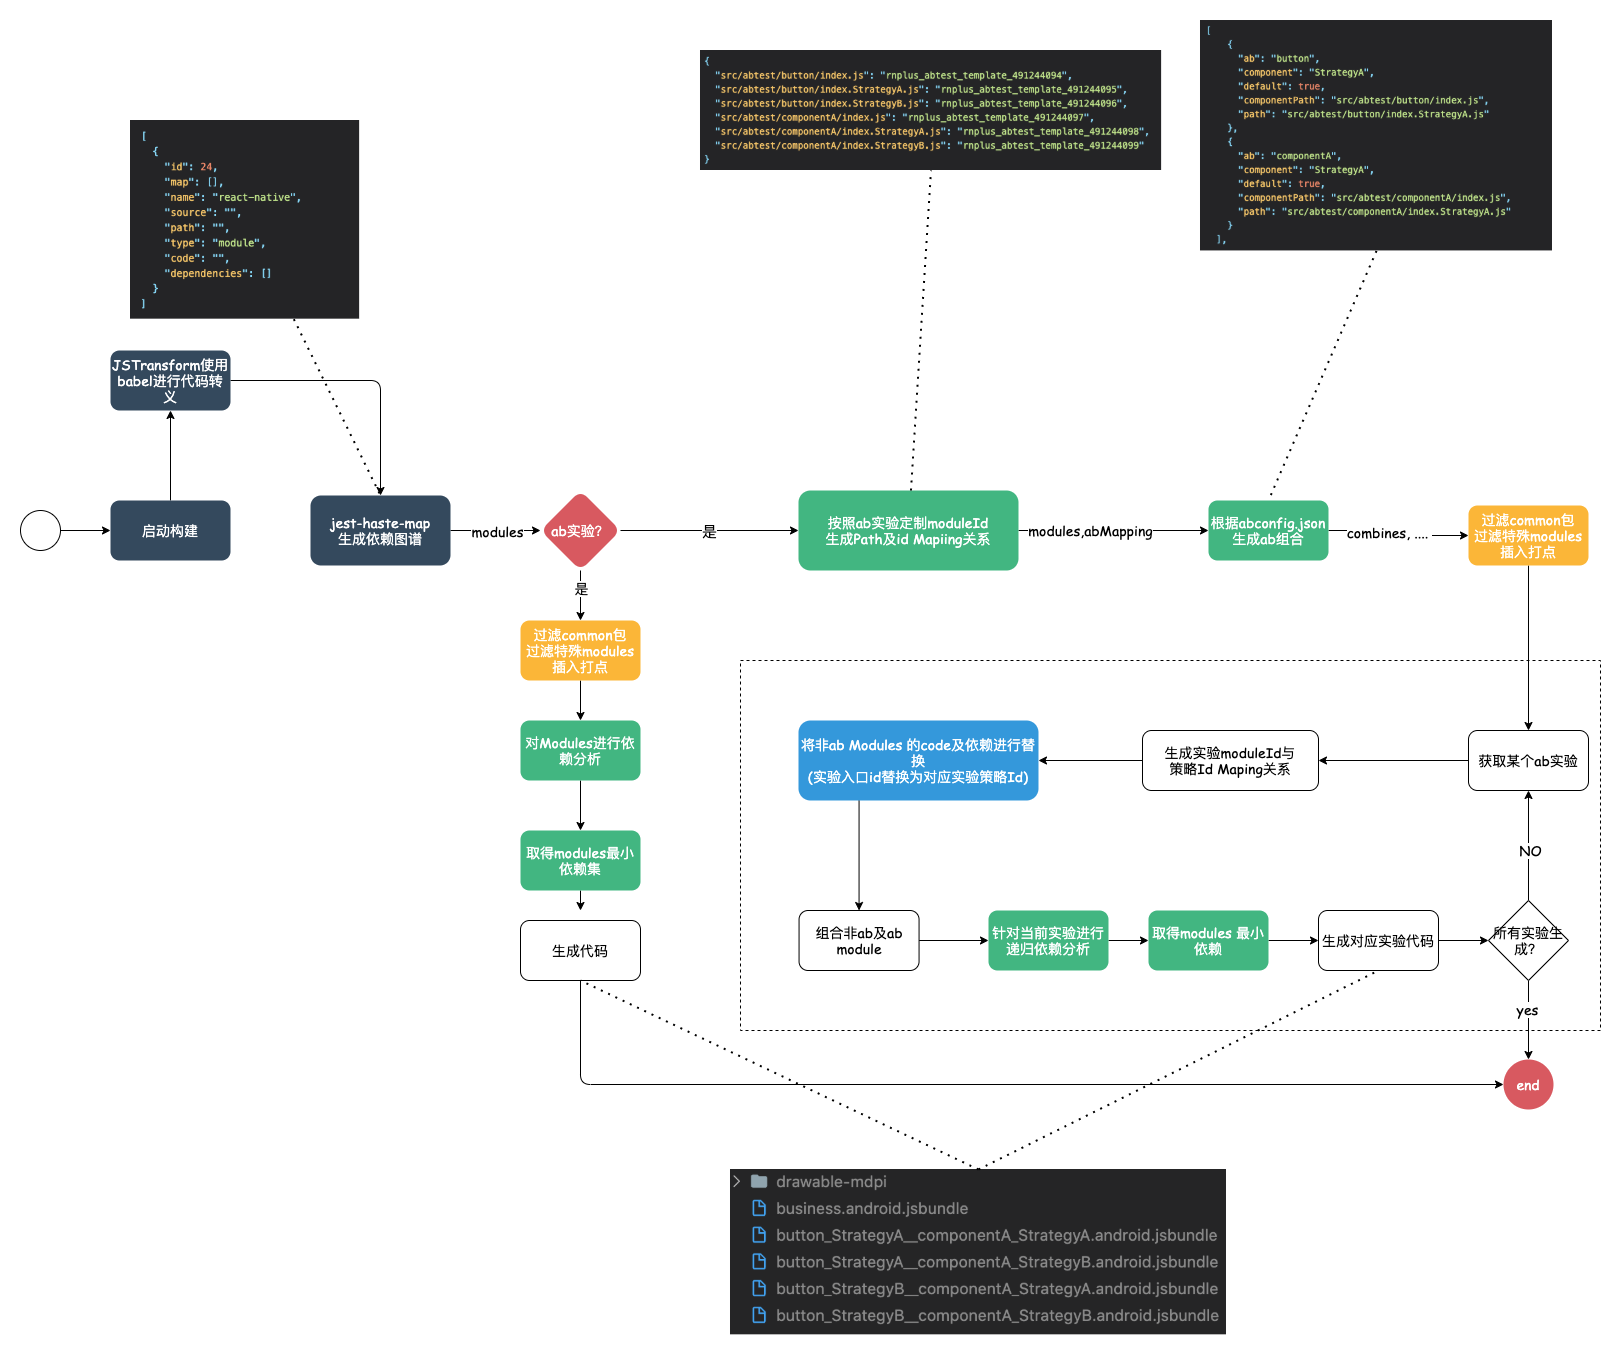
所以我们采用的策略是,自定义 cli,扩展react-native能力。而 RN 的整体拆包主要分为五大步骤:
- 利用
jest-haste-map生成module对应的依赖关系 - 读取
abconfig.json组合所有实验可能性 - 对
modules进行数据转换和过滤 - 针对指定的 AB 实验从入口进行全局最小依赖分析
- 组合
bundle生成
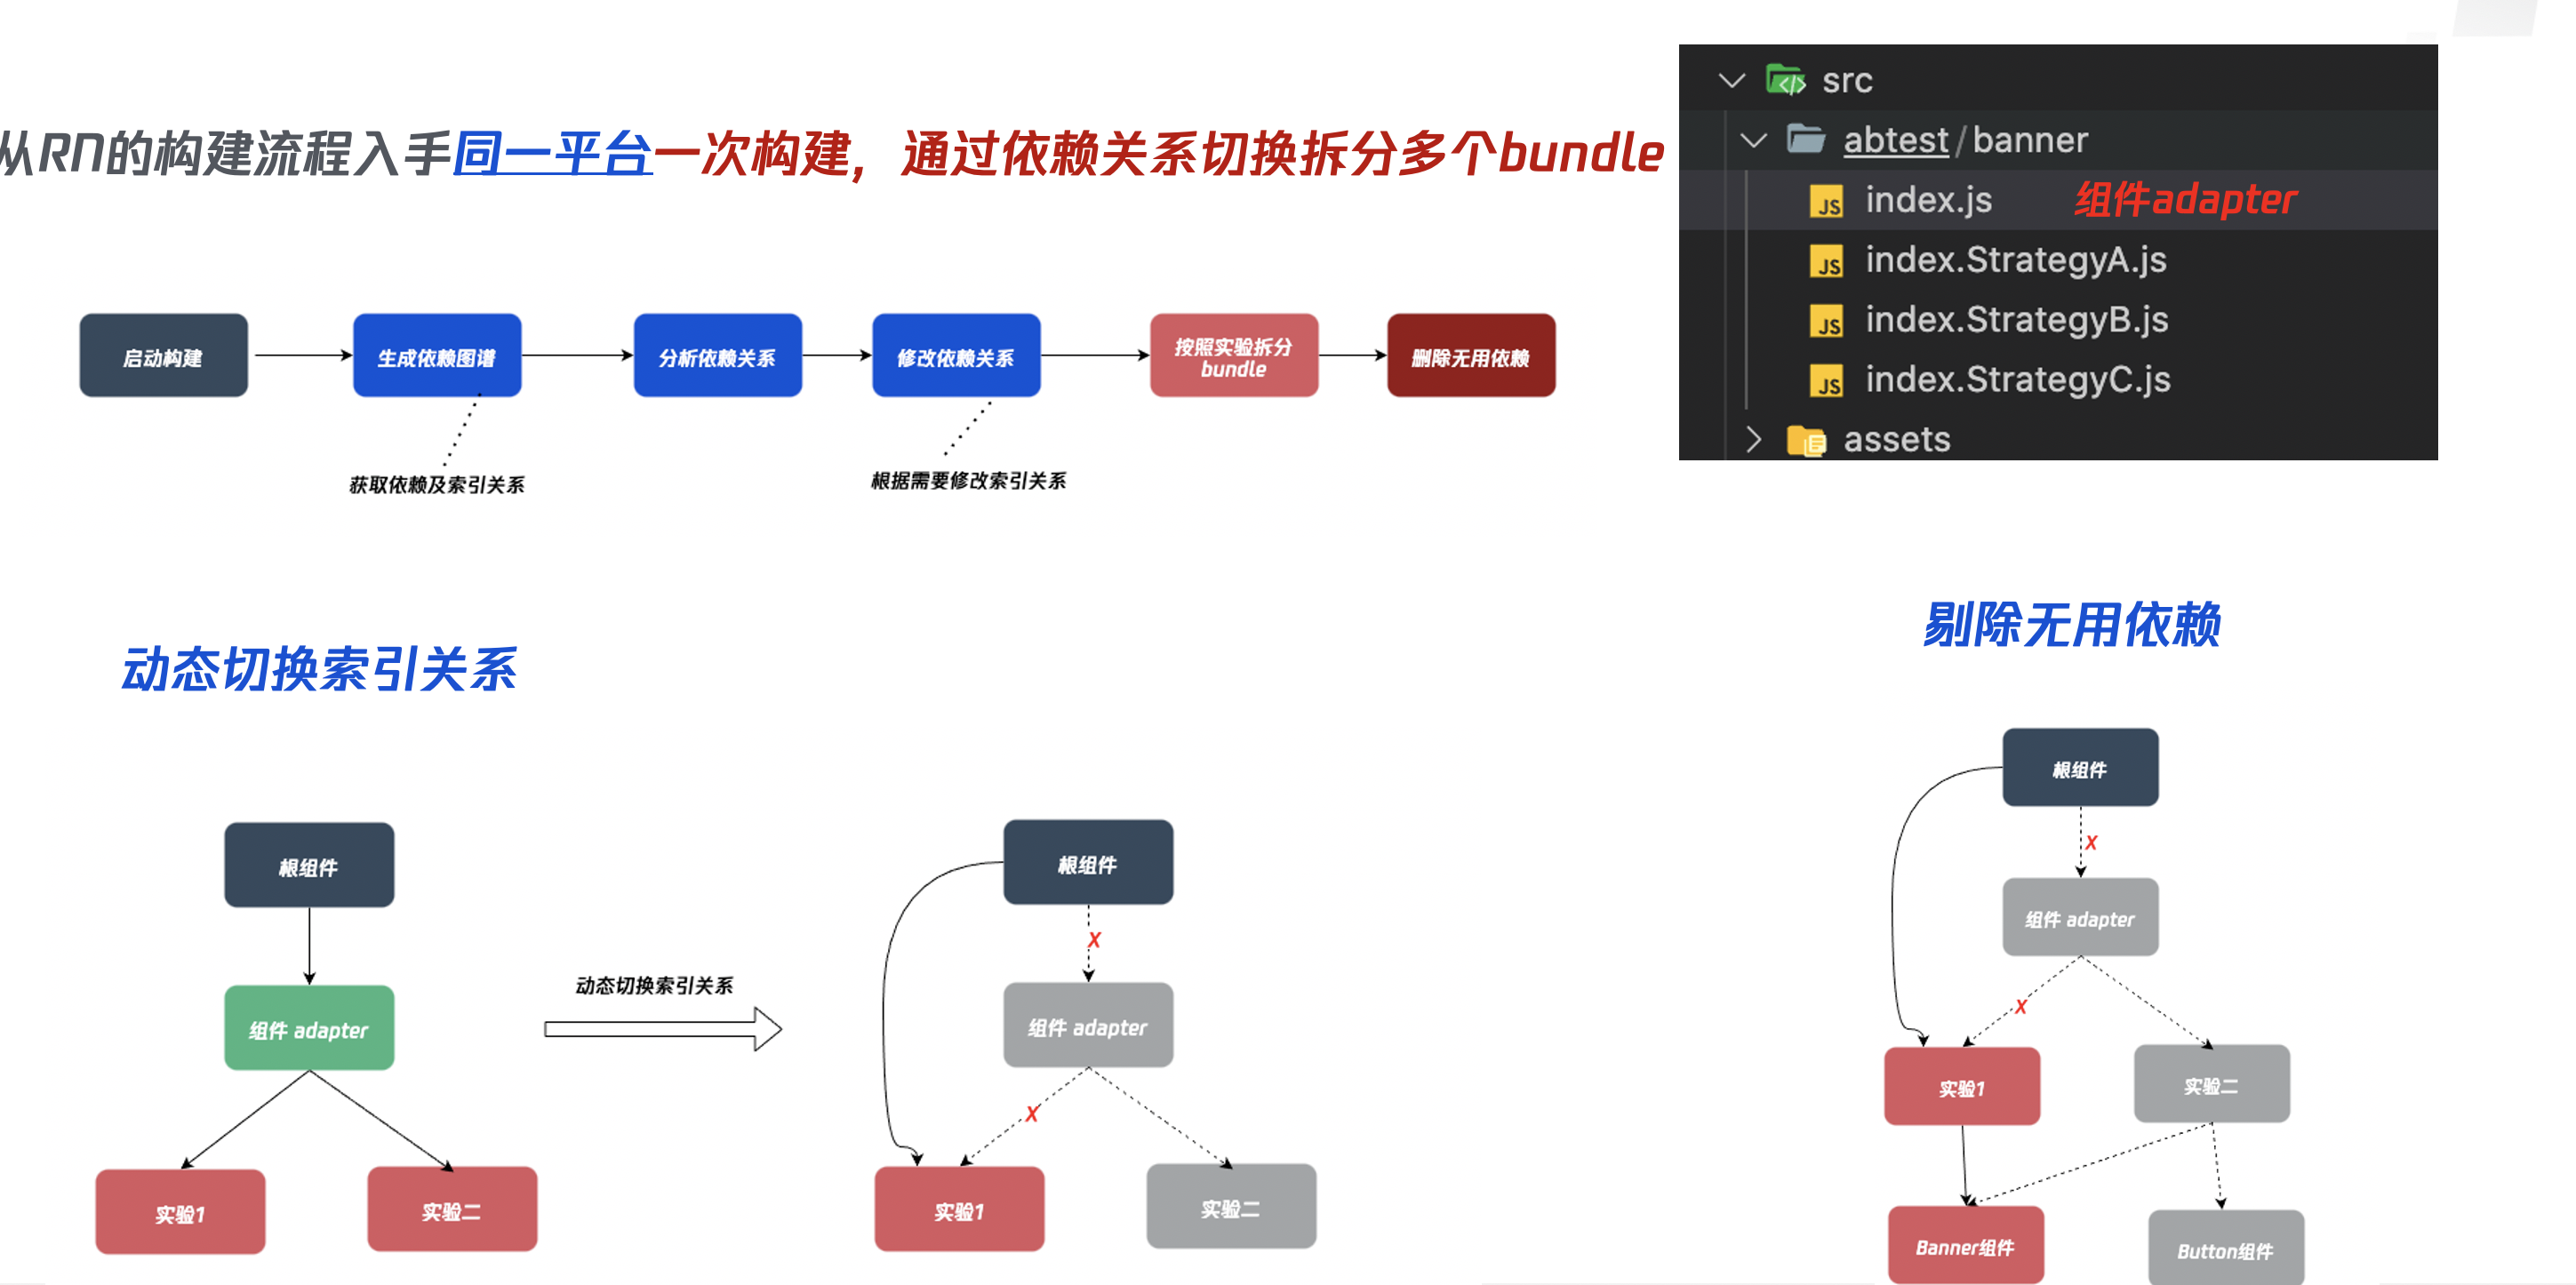
# 1. 利用 jest-haste-map 生成 module 对应的依赖关系
jsbundle 的依赖关系生成有如下几步:
- 使用
jest-haste-map进行module之间的依赖关系; - 利用
babel进行代码转义 - 于此同时自定义
createModuleIdFactory生成moduleId,针对 AB 实验的情况,自定义字符串以便后续进行区分。
其简略代码如下:
// 依赖获取
async function load(
  opts: Options,
  useWatchman?: boolean = true
): Promise<DependencyGraph> {
  const haste = DependencyGraph._createHaste(opts, useWatchman);
  const { hasteFS, moduleMap } = await haste.build();

  return new DependencyGraph({
    haste,
    initialHasteFS: hasteFS,
    initialModuleMap: moduleMap,
    opts,
  });
}

// moduleId生成
function createModuleIdFactory() {
  const fileToIdMap = new Map();
  let nextId = randomNum;
  let abNextId = randomNum;
  return (path) => {
    let id = fileToIdMap.get(path);
    const relPath = pathM.relative(base, path);
    if (relPath.indexOf("src/abtest") !== -1) {
      if (abNextId === randomNum) {
        abTestIdMaps.clearIds();
      }
      if (id && typeof id !== "number") {
        return id;
      }
      abNextId = abNextId + 1;
      const outputId = `rnplus_abtest_template_${abNextId}`;
      fileToIdMap.set(path, outputId);
      // 记录module路径和Id的关系
      abTestIdMaps.rnABTestIds(relPath, outputId);
      return outputId;
    }
    // .....

    return id;
  };
}
最后生成的 modules 格式如下:
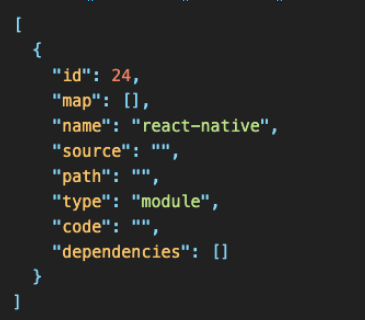
主要包括:
- 每个 module 的 id
- map 关系,模块相对路径
- 源代码
- 模块绝对路径
- 模块类型
- babel 转义后的代码
- 以及模块之间的依赖关系。
好啦,有了当前工程的所有 modules 的信息,可以着手进行 AB 实验了。
# 2. 读取 abconfig.json 组合所有实验可能性
先来看看abconfig.json是什么样子吧.
{
  "enable": true,
  "list": [
    {
      "name": "实验1",
      "abKey": "shiyan1",
      "component": "button",
      "path": "",
      "strategy": [
        {
          "name": "StrategyA",
          "default": true
        },
        {
          "name": "StrategyB"
        }
      ]
    },
    {
      "name": "实验2",
      "abKey": "shiyan2",
      "component": "componentA",
      "path": "",
      "strategy": [
        {
          "name": "StrategyA",
          "default": true
        },
        {
          "name": "StrategyB"
        }
      ]
    }
  ]
}
前面的代码我们会注意的,在自定义 moduleId 的时候createModuleIdFactory,我们会记录每一个模块路径和 id 的 mapping 关系。
获取所有实验策略的组合,本质上其实是求: [[a,b],[c,d],[e,f]] n 组策略的所有可能性。通过如下的函数我们即可求出策略所有可能性。
function combination(arr) {
  return arr.reduce(
    (pre, cur) => {
      const res = [];
      pre.forEach((_pre) => {
        cur.strategy.forEach((_cur) => {
          res.push(
            _pre.concat([
              {
                ab: cur.component,
                component: _cur.name,
                default: !!_cur.default,
                componentPath: cur.path
                  ? `${cur.path}/index.js`
                  : `src/abtest/${cur.component}/index.js`,
                path: cur.path
                  ? `${cur.path}/index.${_cur.name}.js`
                  : `src/abtest/${cur.component}/index.${_cur.name}.js`,
              },
            ])
          );
        });
      });
      return res;
    },
    [[]]
  );
}
# 3. 对 modules 进行数据转换和过滤
这块需要按照我们不同的业务进行 modules 的过滤,移除掉 jsbunlde common包的代码,以及自定义需要插入的 modules.
function modulesSplitCommonAndInsertPerformance(allNoABtestModules, platform) {
  const businessId = platform === "ios" ? 308 : 306;

  // 前面11行的代码为common,无需打包进入,poliyfills部分长度为11
  const modules = allNoABtestModules.slice(11).filter(function(ele) {
    if (typeof ele.id === "number") {
      return ele.id > businessId;
    }
    return true;
  });
  const speedTimePoint = `window["${app.appName}_StartTime"]=Date.now();`;

  modules.unshift({
    code: speedTimePoint,
    id: "performance_point",
    name: "performance_point",
    path: "",
    dependencies: [],
  });
  return modules;
}
# 4. 针对指定的 AB 实验从入口进行全局最小依赖分析
针对某个实验进行最小依赖分析,本质上是使用第一步获取的依赖,从 require 出发利用递归的方式取到所有没有被依赖的 module.
function findNotUseModules(moduleList) {
  const depMap = {};
  const requireList = [];
  moduleList.forEach((ele) => {
    if (ignoreModulesOptimiza.indexOf(ele.id) !== -1) {
      return;
    }
    if (ele.type === "module") {
      depMap[ele.id] = { deps: ele.dependencies || [], useful: false };
    }
    if (ele.type === "require") {
      requireList.push(ele.id);
    }
  });

  requireList.forEach((ele) => {
    // 递归遍历依赖树,判断哪些是需要的
    recursiveUseful(ele, depMap);
  });

  const notUsefulModules = [];
  Object.keys(depMap).forEach((key) => {
    if (!depMap[key].useful) {
      notUsefulModules.push(key);
    }
  });

  console.log("not use modules is", notUsefulModules.length);
  return notUsefulModules;
}
# 5. 组合 bundle 生成
代码的生成,应该是整个过程最简单的部分,其实就是 modules 中的 code 拼凑。
function writeItemABTestBundle(
  notABList,
  abList,
  numberRequire,
  itemTest,
  bundleOutput,
  encoding,
  componentIDAndModuleIdMaps,
  platform
) {
  let useList = replaceIndexIdsToABIds(notABList, componentIDAndModuleIdMaps);
  useList = useList.insertArray(useList.length - numberRequire, abList);

  const deleteModules = findNotUseModules(useList);

  // 忽略不需要的模块
  useList = useList.filter(function(e) {
    if (e.type === "module") {
      // 记得比对的是string
      return deleteModules.indexOf(`${e.id}`) === -1;
    }
    return true;
  });

  const fileName = itemTest
    .map(function(e) {
      return e.ab + "_" + e.component;
    })
    .join("__");
  const fileSavePath = bundleOutput
    ? bundleOutput.substring(0, bundleOutput.lastIndexOf("/"))
    : "./public/cdn/bundle";

  const code = useList.map(function(ele) {
    return ele.code;
  });
  const filePath = `${fileSavePath}/${fileName}.${platform}.jsbundle`;
  const writeBundle = writeFile(
    filePath,
    code.join("\n").replace("__version_code_placeholder__", String(Date.now())),
    encoding
  );
  writeBundle.then(function() {});
  return writeBundle;
}
至此整个简单的步骤,我们已经讲解完毕,现在我们一起来看一下最终的结果吧。
# 三、优化结果
优化前

优化后
分包,体积变成201KB 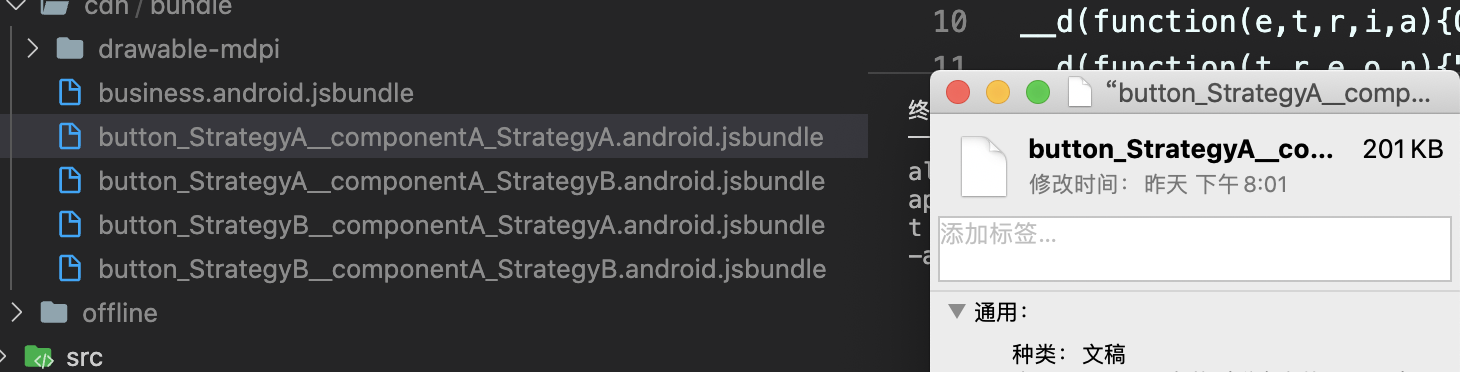
最后,来一波整体的流程图:
- 本文链接: https://mrgaogang.github.io/react/ReactNative%E5%8D%83%E4%BA%BA%E5%8D%83%E9%9D%A2%E6%96%B9%E6%A1%88.html
- 版权声明: 本博客所有文章除特别声明外,均采用 CC BY-SA 4.0 许可协议。转载请注明出处!