


# react-native bundle 到 bundle 生成到底发生了什么(metro 打包流程简析)
本文结合代码约4万字左右,阅读大约需要1小时。
本文涉及 react-native及 metro 版本
react-native@0.63.2metro@0.58.0
先来看一波本文的实例代码:很简单吧,一个你好,世界
// App.js
import React from "react";
import { StyleSheet, Text, View } from "react-native";

export default class App extends React.Component {
  render() {
    return (
      <React.Fragment>
        <View style={styles.body}>
          <Text style={styles.text}>你好,世界</Text>
        </View>
      </React.Fragment>
    );
  }
}

const styles = StyleSheet.create({
  body: {
    backgroundColor: "white",
    flex: 1,
    justifyContent: "center",
    alignItems: "center",
  },

  text: {
    textAlign: "center",
    color: "red",
  },
});
# 一、前言
众所周知,
react-native(下文简称rn)需要打成bundle包供android,ios加载;通常我们的打包命令为react-native bundle --entry-file index.js --bundle-output ./bundle/ios.bundle --platform ios --assets-dest ./bundle --dev false;运行上述命令之后,rn 会默认使用metro作为打包工具,生成bundle包。
生成的 bundle 包大致分为四层:
- var 声明层: 对当前运行环境, bundle 启动时间,以及进程相关信息;
- polyfill 层:
!(function(r){}), 定义了对define(__d)、require(__r)、clear(__c)的支持,以及 module(react-native 及第三方 dependences 依赖的 module) 的加载逻辑; - 模块定义层: __d 定义的代码块,包括 RN 框架源码 js 部分、自定义 js 代码部分、图片资源信息,供 require 引入使用
- require 层: r 定义的代码块,找到 d 定义的代码块 并执行
格式如下:
// var声明层

var __BUNDLE_START_TIME__=this.nativePerformanceNow?nativePerformanceNow():Date.now(),__DEV__=false,process=this.process||{};process.env=process.env||{};process.env.NODE_ENV=process.env.NODE_ENV||"production";

//polyfill层

!(function(r){"use strict";r.__r=o,r.__d=function(r,i,n){if(null!=e[i])return;var o={dependencyMap:n,factory:r,hasError:!1,importedAll:t,importedDefault:t,isInitialized:!1,publicModule:{exports:{}}};e[i]=o}


...
// 模型定义层
__d(function(g,r,i,a,m,e,d){var n=r(d[0]),t=r(d[1]),o=n(r(d[2])),u=r(d[3]);t.AppRegistry.registerComponent(u.name,function(){return o.default})},0,[1,2,402,403]);
....
__d(function(a,e,t,i,R,S,c){R.exports={name:"ReactNativeSSR",displayName:"ReactNativeSSR"}},403,[]);

// require层
__r(93);
__r(0);
看完上面的代码不知你是否疑问?
var定义层和polyfill的代码是在什么时机生成的?我们知道
_d()有三个参数,分别是对应factory函数,当前moduleId以及module依赖关系metro使用什么去做整个工程的依赖分析?moduleId如何生成?
metro如何打包?
日常开发中我们可能并么有在意,整个 rn 打包逻辑;现在就让笔者带您走入 rn 打包的世界!
# 二、metro 打包流程
通过翻阅源码和 Metro 官网,我们知道 metro 打包的整个流程大致分为:
命令参数解析metro 打包服务启动打包 js 和资源文件- 解析,转化和生成
停止打包服务
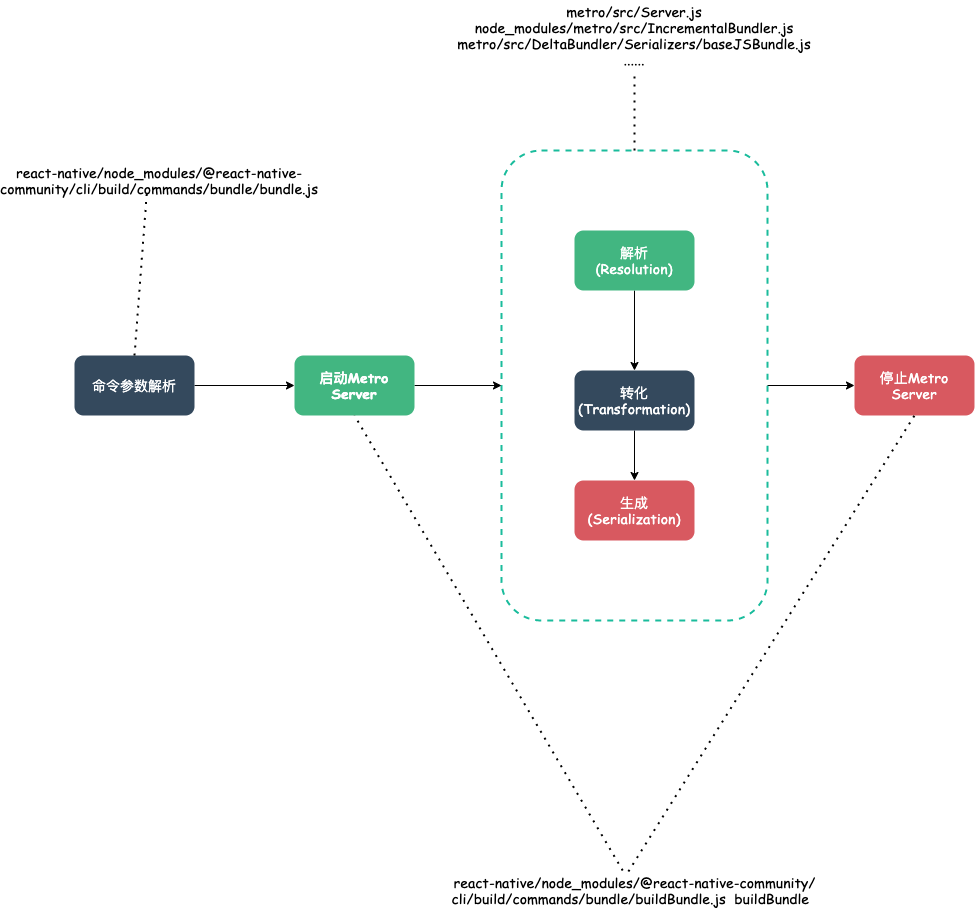
# 1. 命令参数解析
首先我们来看看 react-native bundle的实现以及参数如何解析;由于 bundle 是 react-native 的一个子命令,那么我们寻找的思路可以从 react-native 包入手;其文件路径如下
// node_modules/react-native/local-cli/cli.js
// react-native 命令入口

var cli = require('@react-native-community/cli');
if (require.main === module) {
  cli.run();
}


// node_modules/react-native/node_modules/@react-native-community/cli/build/index.js

run() -> setupAndRun() -> var _commands = require("./commands");

// 在node_modules/react-native/node_modules/@react-native-community/cli/build/commands/index.js 中注册了 react-native的所有命令

var _start = _interopRequireDefault(require("./start/start"));

var _bundle = _interopRequireDefault(require("./bundle/bundle"));

var _ramBundle = _interopRequireDefault(require("./bundle/ramBundle"));

var _link = _interopRequireDefault(require("./link/link"));

var _unlink = _interopRequireDefault(require("./link/unlink"));

var _install = _interopRequireDefault(require("./install/install"));

var _uninstall = _interopRequireDefault(require("./install/uninstall"));

var _upgrade = _interopRequireDefault(require("./upgrade/upgrade"));

var _info = _interopRequireDefault(require("./info/info"));

var _config = _interopRequireDefault(require("./config/config"));

var _init = _interopRequireDefault(require("./init"));

var _doctor = _interopRequireDefault(require("./doctor"));
由于本文主要分析 react-native 打包流程,所以只需查看react-native/node_modules/@react-native-community/cli/build/commands/bundle/bundle.js即可。
在 bundle.js 文件中主要注册了 bundle 命令,但是具体的实现却使用了buildBundle.js.
// node_modules/react-native/node_modules/@react-native-community/cli/build/commands/bundle/bundle.js

var _buildBundle = _interopRequireDefault(require("./buildBundle"));

var _bundleCommandLineArgs = _interopRequireDefault(
  require("./bundleCommandLineArgs")
);

function _interopRequireDefault(obj) {
  return obj && obj.__esModule ? obj : { default: obj };
}

function bundleWithOutput(_, config, args, output) {
  // bundle打包的具体实现
  return (0, _buildBundle.default)(args, config, output);
}

var _default = {
  name: "bundle",
  description: "builds the javascript bundle for offline use",
  func: bundleWithOutput,
  options: _bundleCommandLineArgs.default,
  // Used by `ramBundle.js`
  withOutput: bundleWithOutput,
};
exports.default = _default;
const withOutput = bundleWithOutput;
exports.withOutput = withOutput;
# 2. Metro Server 启动
在node_modules/react-native/node_modules/@react-native-community/cli/build/commands/bundle/buildBundle.js文件中默认导出的 buildBundle 方法才是整个react-native bundle执行的入口。在入口中主要做了如下几件事情:
合并 metro 默认配置和自定义配置,并设置 maxWorkers,resetCache
根据解析得到参数,构建 requestOptions,传递给打包函数
实例化 metro Server
启动 metro 构建 bundle
处理资源文件,解析
关闭 Metro Server
// node_modules/react-native/node_modules/@react-native-community/cli/build/commands/bundle/buildBundle.js
// metro打包服务,也是metro的核心
function _Server() {
  const data = _interopRequireDefault(require("metro/src/Server"));

  _Server = function() {
    return data;
  };

  return data;
}

function _bundle() {
  const data = _interopRequireDefault(
    require("metro/src/shared/output/bundle")
  );

  _bundle = function() {
    return data;
  };

  return data;
}

// 保存资源文件
var _saveAssets = _interopRequireDefault(require("./saveAssets"));
// 提供了metro的默认配置
var _loadMetroConfig = _interopRequireDefault(
  require("../../tools/loadMetroConfig")
);

async function buildBundle(args, ctx, output = _bundle().default) {
  // 合并metro默认配置和自定义配置,并设置maxWorkers,resetCache
  const config = await (0, _loadMetroConfig.default)(ctx, {
    maxWorkers: args.maxWorkers,
    resetCache: args.resetCache,
    config: args.config,
  });

  // ...

  process.env.NODE_ENV = args.dev ? "development" : "production";
  // 根据命令行的入参 --sourcemap-output 构建 sourceMapUrl
  let sourceMapUrl = args.sourcemapOutput;

  if (sourceMapUrl && !args.sourcemapUseAbsolutePath) {
    sourceMapUrl = _path().default.basename(sourceMapUrl);
  }
  // 根据解析得到参数,构建requestOptions,传递给打包函数
  const requestOpts = {
    entryFile: args.entryFile,
    sourceMapUrl,
    dev: args.dev,
    minify: args.minify !== undefined ? args.minify : !args.dev,
    platform: args.platform,
  };
  // 实例化metro 服务
  const server = new (_Server()).default(config);

  try {
    // 启动打包, what? 作者不是说的是Server打包吗?为什么是output? 答:下面会讲解
    const bundle = await output.build(server, requestOpts);
    // 将打包生成的bundle保存到对应的目录
    await output.save(bundle, args, _cliTools().logger.info); // Save the assets of the bundle
    //  处理资源文件,解析,并在下一步保存在--assets-dest指定的位置
    const outputAssets = await server.getAssets({
      ..._Server().default.DEFAULT_BUNDLE_OPTIONS,
      ...requestOpts,
      bundleType: "todo",
    }); // When we're done saving bundle output and the assets, we're done.
    // 保存资源文件到指定目录
    return await (0, _saveAssets.default)(
      outputAssets,
      args.platform,
      args.assetsDest
    );
  } finally {
    // 停止metro 打包服务
    server.end();
  }
}

var _default = buildBundle;
exports.default = _default;
从上述代码可以看到具体的打包实现都在output.build(server, requestOpts)中,output是outputBundle类型,这部分代码在 Metro JS` 中,具体的路径为:node_modules/metro/src/shared/output/bundle.js
// node_modules/metro/src/shared/output/bundle.js

function buildBundle(packagerClient, requestOptions) {
  return packagerClient.build(
    _objectSpread({}, Server.DEFAULT_BUNDLE_OPTIONS, requestOptions, {
      bundleType: "bundle",
    })
  );
}

exports.build = buildBundle;
exports.save = saveBundleAndMap;
exports.formatName = "bundle";
可以看到虽说使用的output.build(server, requestOpts)进行打包,其实是使用传入的packagerClient.build进行打包。而packagerClient是我们刚传入的Server。而Server就是下面我们要分析打包流程。其源码位置为:node_modules/metro/src/Server.js
# metro 构建 bundle: 流程入口
通过上面的分析,我们已经知晓整个react-native bundle 打包服务的启动在node_modules/metro/src/Server.js的build方法中:
class Server {
  // 构建函数,初始化属性
  constructor(config, options) {
    var _this = this;
    this._config = config;
    this._createModuleId = config.serializer.createModuleIdFactory();

    this._bundler = new IncrementalBundler(config, {
      watch: options ? options.watch : undefined,
    });
    this._nextBundleBuildID = 1;
  }

  build(options) {
    var _this2 = this;

    return _asyncToGenerator(function*() {
      // 将传递进来的参数,按照模块进行拆分,一遍更好的管理;其拆分的格式如下:
      //         {
      //     entryFile: options.entryFile,
      //     transformOptions: {
      //       customTransformOptions: options.customTransformOptions,
      //       dev: options.dev,
      //       hot: options.hot,
      //       minify: options.minify,
      //       platform: options.platform,
      //       type: "module"
      //     },
      //     serializerOptions: {
      //       excludeSource: options.excludeSource,
      //       inlineSourceMap: options.inlineSourceMap,
      //       modulesOnly: options.modulesOnly,
      //       runModule: options.runModule,
      //       sourceMapUrl: options.sourceMapUrl,
      //       sourceUrl: options.sourceUrl
      //     },
      //     graphOptions: {
      //       shallow: options.shallow
      //     },
      //     onProgress: options.onProgress
      //   }

      const _splitBundleOptions = splitBundleOptions(options),
        entryFile = _splitBundleOptions.entryFile,
        graphOptions = _splitBundleOptions.graphOptions,
        onProgress = _splitBundleOptions.onProgress,
        serializerOptions = _splitBundleOptions.serializerOptions,
        transformOptions = _splitBundleOptions.transformOptions;

      // metro打包核心:解析(Resolution)和转换(Transformation)
      const _ref13 = yield _this2._bundler.buildGraph(
          entryFile,
          transformOptions,
          {
            onProgress,
            shallow: graphOptions.shallow,
          }
        ),
        prepend = _ref13.prepend,
        graph = _ref13.graph;

      // 获取构建入口文件路径
      const entryPoint = path.resolve(_this2._config.projectRoot, entryFile);
      // 初始化构建参数,此处的参数来源于: 命令行 && 自定义metro配置metro.config.js && 默认的metro配置
      const bundleOptions = {
        asyncRequireModulePath:
          _this2._config.transformer.asyncRequireModulePath,
        processModuleFilter: _this2._config.serializer.processModuleFilter,
        createModuleId: _this2._createModuleId, // 里面自定义/默认的createModuleIdFactory给每个module生成id; 其默认生成规则详情请见: node_modules/metro/src/lib/createModuleIdFactory.js
        getRunModuleStatement: _this2._config.serializer.getRunModuleStatement, // 给方法签名
        // 默认值为     getRunModuleStatement: moduleId => `__r(${JSON.stringify(moduleId)});`,
        //  详情请见: node_modules/metro-config/src/defaults/index.js
        dev: transformOptions.dev,
        projectRoot: _this2._config.projectRoot,
        modulesOnly: serializerOptions.modulesOnly,
        runBeforeMainModule: _this2._config.serializer.getModulesRunBeforeMainModule(
          path.relative(_this2._config.projectRoot, entryPoint)
        ), // 指定在主模块前运行的模块, 默认值: getModulesRunBeforeMainModule: () => []
        // 详情请见: node_modules/metro-config/src/defaults/index.js

        runModule: serializerOptions.runModule,
        sourceMapUrl: serializerOptions.sourceMapUrl,
        sourceUrl: serializerOptions.sourceUrl,
        inlineSourceMap: serializerOptions.inlineSourceMap,
      };
      let bundleCode = null;
      let bundleMap = null;

      // 是否使用自定义生成,如果是,则调用自定义生成的函数,获取最终代码
      if (_this2._config.serializer.customSerializer) {
        const bundle = _this2._config.serializer.customSerializer(
          entryPoint,
          prepend,
          graph,
          bundleOptions
        );

        if (typeof bundle === "string") {
          bundleCode = bundle;
        } else {
          bundleCode = bundle.code;
          bundleMap = bundle.map;
        }
      } else {
        // 此处笔者将其拆分成两个步骤,比较容易分析

        // 将解析及转化之后的数据,生成如下格式化的数据
        // {
        //   pre: string, // var定义部分及poyfill部分的代码
        //   post: string, // require部分代码
        //   modules: [[number, string]], // 模块定义部分,第一个参数为number,第二个参数为具体的代码
        // }
        var base = baseJSBundle(entryPoint, prepend, graph, bundleOptions);
        // 将js module进行排序并进行字符串拼接生成最终的代码
        bundleCode = bundleToString(base).code;
      }
      //
      if (!bundleMap) {
        bundleMap = sourceMapString(
          _toConsumableArray(prepend).concat(
            _toConsumableArray(_this2._getSortedModules(graph))
          ),
          {
            excludeSource: serializerOptions.excludeSource,
            processModuleFilter: _this2._config.serializer.processModuleFilter,
          }
        );
      }

      return {
        code: bundleCode,
        map: bundleMap,
      };
    })();
  }
}
在这个 build 函数中,首先执行了 buildGraph,而 this._bundler 的初始化发生在 Server 的 constructor 中。
this._bundler = new IncrementalBundler(config, {
  watch: options ? options.watch : undefined,
});
此处的_bundler是 IncrementalBundler 的实例,它的 buildGraph 函数完成了打包过程中前两步 Resolution 和 Transformation 。 下面我们就来详细查看一下 Metro 解析,转换过程。
# metro 构建 bundle: 解析和转换
在上面一节我们知道 metro 使用IncrementalBundler进行 js 代码的解析和转换,在 Metro 使用IncrementalBundler进行解析转换的主要作用是:
- 返回了以入口文件为入口的所有相关依赖文件的依赖图谱和 babel 转换后的代码;
- 返回了var 定义部分及 polyfill 部分所有相关依赖文件的依赖图谱和 babel 转换后的代码;
整体流程如图所示:
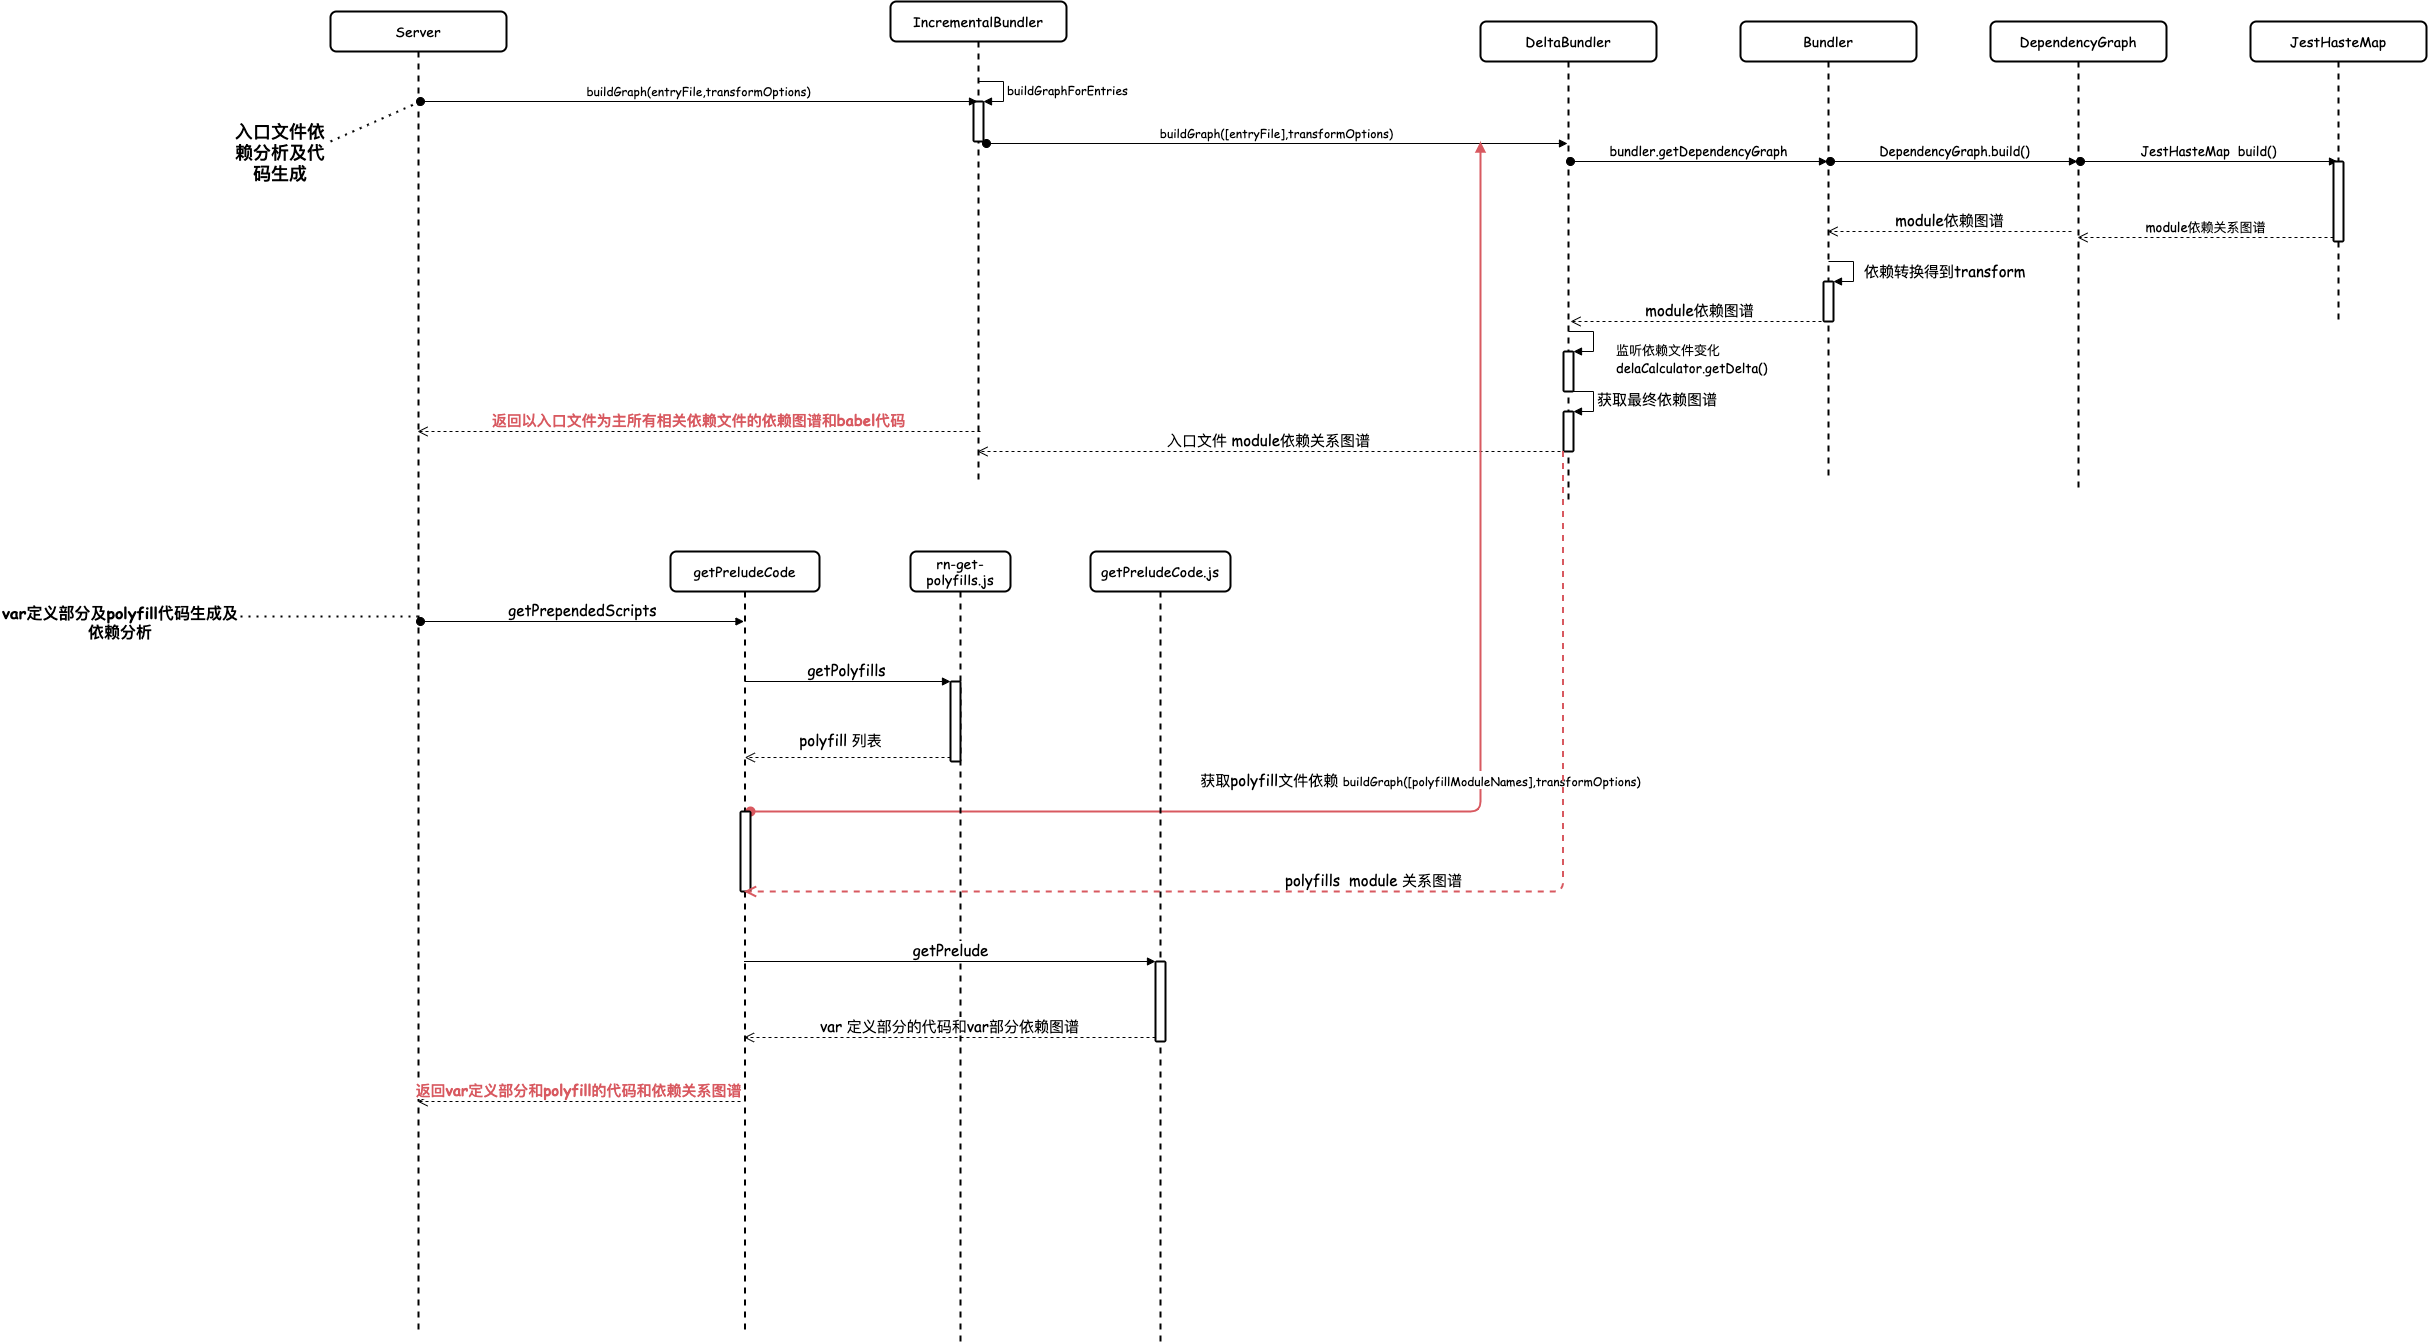
通过上述的流程我们总结如下几点:
- 整个 metro 进行依赖分析和 babel 转换主要通过了JestHasteMap (opens new window)去做依赖分析;
- 在做依赖分析的通过,metro 会监听当前目录的文件变化,然后以最小变化生成最终依赖关系图谱;
- 不管是入口文件解析还是 polyfill 文件的依赖解析都是使用了JestHasteMap (opens new window);
下面,我们来分析其具体过程如下:
// node_modules/metro/src/IncrementalBundler.js


buildGraph(entryFile, transformOptions) {
    var _this2 = this;

    let otherOptions =
      arguments.length > 2 && arguments[2] !== undefined
        ? arguments[2]
        : {
            onProgress: null,
            shallow: false
          };
    return _asyncToGenerator(function*() {
     // 核心构建在buildGraphForEntries中,通过入口文件进行依赖解析,得到bundle require部分和模块定义部分,其生成的格式为
    //    {
    //         dependencies: new Map(),
    //         entryPoints,
    //         importBundleNames: new Set()
    //    }
      const graph = yield _this2.buildGraphForEntries(
        [entryFile],
        transformOptions,
        otherOptions
      );
      const transformOptionsWithoutType = {
        customTransformOptions: transformOptions.customTransformOptions,
        dev: transformOptions.dev,
        experimentalImportSupport: transformOptions.experimentalImportSupport,
        hot: transformOptions.hot,
        minify: transformOptions.minify,
        unstable_disableES6Transforms:
          transformOptions.unstable_disableES6Transforms,
        platform: transformOptions.platform
      };
    //   bundle前面的var声明和polyfill,生成的格式为:
        // [
        //     {
        //         inverseDependencies: Set(0) {},
        //         path: '/Users/mrgaogang/Desktop/react-native-ssr/ReactNativeSSR/node_modules/react-native/Libraries/polyfills/Object.es7.js',
        //         dependencies: Map(0) {},
        //         getSource: [Function: getSource],
        //         output: [ [Object] ]
        //     }
        // ]
      const prepend = yield getPrependedScripts(
        _this2._config,
        transformOptionsWithoutType,
        _this2._bundler,
        _this2._deltaBundler
      );
      return {
        prepend,
        graph
      };
    })();
}
# require 和模块定义部分解析和依赖生成
在 buildGraphForEntries中利用_deltaBundler.buildGraph生成 graph,
// node_modules/metro/src/IncrementalBundler.js

  buildGraphForEntries(entryFiles, transformOptions) {
    return _asyncToGenerator(function*() {

      const absoluteEntryFiles = entryFiles.map(entryFile =>
        path.resolve(_this._config.projectRoot, entryFile)
      );
      // 调用 DeltaBundler.buildGraph
      const graph = yield _this._deltaBundler.buildGraph(absoluteEntryFiles, {
       // ... 一些其他的参数
      });
        // ....
      return graph;
    })();

// node_modules/metro/src/DeltaBundler.js
  buildGraph(entryPoints, options) {
    var _this = this;

    return _asyncToGenerator(function*() {
        // 使用node_modules/metro/src/Bundler.js 获取模块依赖图谱
      const depGraph = yield _this._bundler.getDependencyGraph();
      // 监听文件变化,如果文件存在变化则更新文件之间的依赖
      const deltaCalculator = new DeltaCalculator(
        entryPoints,
        depGraph,
        options
      );
      // 计算模块之间的变化,包括模块的增加删除和修改,如果有变化则第一时间更新
      yield deltaCalculator.getDelta({
        reset: true,
        shallow: options.shallow
      });
      // 根据返回的依赖图谱以及文件变化检测之后的结果,返回如下格式的的模块依赖信息。(完整格式化后面会给出)
    //    {
    //         dependencies: new Map(),
    //         entryPoints,
    //         importBundleNames: new Set()
    //    }
      const graph = deltaCalculator.getGraph();

      _this._deltaCalculators.set(graph, deltaCalculator);

      return graph;
    })();
  }

//  node_modules/metro/src/Bundler.js
//  依赖图谱分析
class Bundler {
  constructor(config, options) {
    // Bundler又使用DependencyGraph进行依赖分析,生成依赖图谱
    this._depGraphPromise = DependencyGraph.load(config, options);
    this._depGraphPromise
      .then(dependencyGraph => {
        this._transformer = new Transformer(
          config,
          dependencyGraph.getSha1.bind(dependencyGraph)
        );
      })
      .catch(error => {
        console.error("Failed to construct transformer: ", error);
      });
  }

  getDependencyGraph() {
    return this._depGraphPromise;
  }
}

// 依赖分析图谱 DependencyGraph.load使用 JestHasteMap进行依赖分析
// node_modules/metro/src/node-haste/DependencyGraph.js

static _createHaste(config, watch) {
    return new JestHasteMap({
      cacheDirectory: config.hasteMapCacheDirectory,
      computeDependencies: false,
      computeSha1: true,
      extensions: config.resolver.sourceExts.concat(config.resolver.assetExts),
      forceNodeFilesystemAPI: !config.resolver.useWatchman,
      hasteImplModulePath: config.resolver.hasteImplModulePath,
      ignorePattern: config.resolver.blacklistRE || / ^/,
      mapper: config.resolver.virtualMapper,
      maxWorkers: config.maxWorkers,
      mocksPattern: "",
      name: "metro-" + JEST_HASTE_MAP_CACHE_BREAKER,
      platforms: config.resolver.platforms,
      retainAllFiles: true,
      resetCache: config.resetCache,
      rootDir: config.projectRoot,
      roots: config.watchFolders,
      throwOnModuleCollision: true,
      useWatchman: config.resolver.useWatchman,
      watch: watch == null ? !ci.isCI : watch
    });
  }

  static load(config, options) {
    return _asyncToGenerator(function*() {
      const haste = DependencyGraph._createHaste(
        config,
        options && options.watch
      );

      const _ref2 = yield haste.build(),
        hasteFS = _ref2.hasteFS,
        moduleMap = _ref2.moduleMap;

      return new DependencyGraph({
        haste,
        initialHasteFS: hasteFS,
        initialModuleMap: moduleMap,
        config
      });
    })();
  }


//   JestHasteMap是一个用于node.js静态资源的依赖项管理系统。它提供了为节点模块解析和Facebook的haste模块系统静态解析JavaScript模块依赖性的功能。

// 由于haste map创建是同步的,且大多数任务被I / O阻塞,因此采用了电脑的多内核进行并行操作。
经过DependencyGraph.load和DeltaCalculator之后,生成的依赖图谱格式如下:
{
  dependencies: Map(404) {
      // 每一个模块的依赖信息等
    '/Users/mrgaogang/Desktop/react-native-ssr/ReactNativeSSR/index.js' => {

            inverseDependencies: Set(1) {
            '/Users/mrgaogang/Desktop/react-native-ssr/ReactNativeSSR/index.js'
            },
            path: '/Users/mrgaogang/Desktop/react-native-ssr/ReactNativeSSR/App.js', // 模块路径
            dependencies: Map(8) { // 该模块依赖的其他模块
            },
            getSource: [Function: getSource],
            output: [
            {
                data: {
                code: ``, // 打包的改模块的代码
                lineCount: 1,
                map: [
                ],
                functionMap: {
                    names: [ '<global>', 'App', 'render' ],
                    mappings: 'AAA;eCW;ECC;GDQ;CDC'
                }
                },
                type: 'js/module' // 类型,metro会通过是否startWidth('js')判断是否为js模块
            }
            ]
    },
  },
  entryPoints: [ // 入口
    '/Users/mrgaogang/Desktop/react-native-ssr/ReactNativeSSR/index.js'
  ],
  importBundleNames: Set(0) {}
}
# var 及 polyfill 部分解析
前面看到在IncrementalBundler.js的 buildGraph中通过getPrependedScripts获取到var 和 polyfill部分的代码;下面我们一些查看一下getPrependedScripts:
// node_modules/metro/src/lib/getPreludeCode.js
function _getPrependedScripts() {
  _getPrependedScripts = _asyncToGenerator(function*(
    config,
    options,
    bundler,
    deltaBundler
  ) {
    // 获取所有的polyfills,包括默认的和自定义的polyfill
    // 默认的polyfill请见: node_modules/react-native/node_modules/@react-native-community/cli/build/tools/loadMetroConfig.js getDefaultConfig:function 中使用了 node_modules/react-native/rn-get-polyfills.js 也即
    // module.exports = () => [
    //     require.resolve('./Libraries/polyfills/console.js'),
    //     require.resolve('./Libraries/polyfills/error-guard.js'),
    //     require.resolve('./Libraries/polyfills/Object.es7.js'),
    // ];

    const polyfillModuleNames = config.serializer
      .getPolyfills({
        platform: options.platform,
      })
      .concat(config.serializer.polyfillModuleNames);

    const transformOptions = _objectSpread({}, options, {
      type: "script",
    });
    // 通过  deltaBundler.buildGraph 分析 如下四个文件及自定义polyfill的依赖关系图谱
    //      metro/src/lib/polyfills/require.js
    //     require.resolve('./Libraries/polyfills/console.js'),
    //     require.resolve('./Libraries/polyfills/error-guard.js'),
    //     require.resolve('./Libraries/polyfills/Object.es7.js'),
    const graph = yield deltaBundler.buildGraph(
      [defaults.moduleSystem].concat(_toConsumableArray(polyfillModuleNames)),
      {
        resolve: yield transformHelpers.getResolveDependencyFn(
          bundler,
          options.platform
        ),
        transform: yield transformHelpers.getTransformFn(
          [defaults.moduleSystem].concat(
            _toConsumableArray(polyfillModuleNames)
          ),
          bundler,
          deltaBundler,
          config,
          transformOptions
        ),
        onProgress: null,
        experimentalImportBundleSupport:
          config.transformer.experimentalImportBundleSupport,
        shallow: false,
      }
    );
    return [
      // 返回 var定义部分和 经过  deltaBundler.buildGraph 分析的之后的polyfill依赖图谱
      _getPrelude({
        dev: options.dev,
      }),
    ].concat(_toConsumableArray(graph.dependencies.values()));
  });
  return _getPrependedScripts.apply(this, arguments);
}

function _getPrelude(_ref) {
  let dev = _ref.dev;
  const code = getPreludeCode({
    isDev: dev,
  });
  const name = "__prelude__";
  return {
    dependencies: new Map(),
    getSource: () => Buffer.from(code),
    inverseDependencies: new Set(),
    path: name,
    output: [
      {
        type: "js/script/virtual",
        data: {
          code,
          lineCount: countLines(code),
          map: [],
        },
      },
    ],
  };
}
// node_modules/metro/src/lib/getPreludeCode.js
// var定义部分的代码
function getPreludeCode(_ref) {
  let extraVars = _ref.extraVars,
    isDev = _ref.isDev;
  const vars = [
    "__BUNDLE_START_TIME__=this.nativePerformanceNow?nativePerformanceNow():Date.now()",
    `__DEV__=${String(isDev)}`,
  ].concat(_toConsumableArray(formatExtraVars(extraVars)), [
    "process=this.process||{}",
  ]);
  return `var ${vars.join(",")};${processEnv(
    isDev ? "development" : "production"
  )}`;
}
此处还有一个部分作者没有详细进行讲述,那就是使用JestHasteMap (opens new window) 进行文件依赖解析详细部分;后续笔者会单独出一篇文章进行讲解,关于查阅。
至此,metro 对入口文件及 polyfills 依赖分析及代码生成以及讲述完毕,回过头再看一下此章节的开头部分,不知您是否已豁然开朗。讲述了 Metro 的解析和转换,下面部分将讲述 Metro 如果通过转换后的文件依赖图谱生成最终的 bundle 代码。
# metro 构建 bundle: 生成
回到最开始的 Server 服务启动代码部分,我们发现经过buildGraph之后得到了prepend: var及polyfill部分的代码和依赖关系以及graph: 入口文件的依赖关系及代码;在没有提供自定义生成的情况下 metro 使用了baseJSBundle将依赖关系图谱和每个模块的代码经过一系列的操作最终使用 bundleToString 转换成最终的代码。
      // metro打包核心:解析(Resolution)和转换(Transformation)
      const _ref13 = yield _this2._bundler.buildGraph(
          entryFile,
          transformOptions,
          {
            onProgress,
            shallow: graphOptions.shallow,
          }
        ),
        prepend = _ref13.prepend,
        graph = _ref13.graph;
        // ....
        // 此处笔者将其拆分成两个步骤,比较容易分析

        // 将解析及转化之后的数据,生成如下格式化的数据
        // {
        //   pre: string, // var定义部分及poyfill部分的代码
        //   post: string, // require部分代码
        //   modules: [[number, string]], // 模块定义部分,第一个参数为number,第二个参数为具体的代码
        // }
        var base = baseJSBundle(entryPoint, prepend, graph, bundleOptions);
        // 将js module进行排序并进行字符串拼接生成最终的代码
        bundleCode = bundleToString(base).code;
在关注baseJSBundle之前,我们先来回顾一下,graph 和 prepend 的数据结构:其主要包括如下几个信息:
- 文件相关的依赖关系
- 指定 module 经过 babel 之后的代码
// graph
[
{
  dependencies: Map(404) { // 入口文件下每个文件所依赖其他文件的关系图谱
    '/Users/alexganggao/Desktop/react-native-ssr/ReactNativeSSR/index.js' => {
     {
    inverseDependencies: Set(1) {
      '/Users/alexganggao/Desktop/react-native-ssr/ReactNativeSSR/index.js'
    },
    path: '/Users/alexganggao/Desktop/react-native-ssr/ReactNativeSSR/App.js',
    dependencies: Map(8) {

      '@babel/runtime/helpers/createClass' => {
        absolutePath: '/Users/alexganggao/Desktop/react-native-ssr/ReactNativeSSR/node_modules/@babel/runtime/helpers/createClass.js',
        data: {
          name: '@babel/runtime/helpers/createClass',
          data: { isAsync: false }
        }
      },
      // ....
      'react' => {
        absolutePath: '/Users/alexganggao/Desktop/react-native-ssr/ReactNativeSSR/node_modules/react/index.js',
        data: { name: 'react', data: { isAsync: false } }
      },
      'react-native' => {
        absolutePath: '/Users/alexganggao/Desktop/react-native-ssr/ReactNativeSSR/node_modules/react-native/index.js',
        data: { name: 'react-native', data: { isAsync: false } }
      }
    },
    getSource: [Function: getSource],
    output: [
      {
        data: {// 对应文件转换后的代码
          code: `__d(function(g,r,i,a,m,e,d){var t=r(d[0]);Object.defineProperty(e,"__esModule",{value:!0}),e.default=void 0;var n=t(r(d[1])),u=t(r(d[2])),l=t(r(d[3])),c=t(r(d[4])),f=t(r(d[5])),o=t(r(d[6])),s=r(d[7]);function y(){if("undefined"==typeof Reflect||!Reflect.construct)return!1;if(Reflect.construct.sham)return!1;if("function"==typeof Proxy)return!0;try{return Date.prototype.toString.call(Reflect.construct(Date,[],function(){})),!0}catch(t){return!1}}var p=(function(t){(0,l.default)(R,t);var p,h,x=(p=R,h=y(),function(){var t,n=(0,f.default)(p);if(h){var u=(0,f.default)(this).constructor;t=Reflect.construct(n,arguments,u)}else t=n.apply(this,arguments);return(0,c.default)(this,t)});function R(){return(0,n.default)(this,R),x.apply(this,arguments)}return(0,u.default)(R,[{key:"render",value:function(){return o.default.createElement(o.default.Fragment,null,o.default.createElement(s.View,{style:v.body},o.default.createElement(s.Text,{style:v.text},"\\u4f60\\u597d\\uff0c\\u4e16\\u754c")))}}]),R})(o.default.Component);e.default=p;var v=s.StyleSheet.create({body:{backgroundColor:'white',flex:1,justifyContent:'center',alignItems:'center'},text:{textAlign:'center',color:'red'}})});`,
          lineCount: 1,
          map: [
            [ 1, 177, 9, 0, '_react' ],
            [ 1, 179, 9, 0, '_interopRequireDefault' ],
            [ 1, 181, 9, 0, 'r' ],
            [ 1, 183, 9, 0, 'd' ],
            [ 1, 185, 9, 0 ],
            [ 1, 190, 10, 0, '_reactNative' ],
            // .....
          ],
          functionMap: {
            names: [ '<global>', 'App', 'render' ],
            mappings: 'AAA;eCW;ECC;GDQ;CDC'
          }
        },
        type: 'js/module'
      }
    ]
  }
    },

    '/Users/alexganggao/Desktop/react-native-ssr/ReactNativeSSR/App.js' => {
      inverseDependencies: [Set],
      path: '/Users/alexganggao/Desktop/react-native-ssr/ReactNativeSSR/App.js',
      dependencies: [Map],
      getSource: [Function: getSource],
      output: [Array]
    },
    '/Users/alexganggao/Desktop/react-native-ssr/ReactNativeSSR/app.json' => {
      inverseDependencies: [Set],
      path: '/Users/alexganggao/Desktop/react-native-ssr/ReactNativeSSR/app.json',
      dependencies: Map(0) {},
      getSource: [Function: getSource],
      output: [Array]
    }
  },
  entryPoints: [ //入口文件
    '/Users/alexganggao/Desktop/react-native-ssr/ReactNativeSSR/index.js'
  ],
  importBundleNames: Set(0) {}
}

]
# baseJSBundle
下面我们我们重点关注一下baseJSBundle是如何处理上述的数据结构的:
baseJSBundle整体调用了三次processModules分别用于解析出:preCode,postCode和modules其对应的分别是var 和 polyfills 部分的代码 , require 部分的代码 , _d 部分的代码processModules经过两次filter过滤出所有类型为js/类型的数据,第二次过滤使用用户自定义filter函数;过滤完成之后使用wrapModule转换成_d(factory,moduleId,dependencies)的代码baseJSBundle
// node_modules/metro/src/DeltaBundler/Serializers/baseJSBundle.js
function baseJSBundle(entryPoint, preModules, graph, options) {
  for (const module of graph.dependencies.values()) {
    options.createModuleId(module.path);
  }

  const processModulesOptions = {
    filter: options.processModuleFilter,
    createModuleId: options.createModuleId,
    dev: options.dev,
    projectRoot: options.projectRoot,
  }; // Do not prepend polyfills or the require runtime when only modules are requested

  if (options.modulesOnly) {
    preModules = [];
  }
  // 通过processModules将metro解析后的prepend依赖关系图谱和代码,filter+join成对应的bundle出的代码
  const preCode = processModules(preModules, processModulesOptions)
    .map((_ref) => {
      let _ref2 = _slicedToArray(_ref, 2),
        _ = _ref2[0],
        code = _ref2[1];

      return code;
    })
    .join("\n");

  const modules = _toConsumableArray(graph.dependencies.values()).sort(
    (a, b) => options.createModuleId(a.path) - options.createModuleId(b.path)
  );
  // 使用getAppendScripts获取入口文件及所有的runBeforeMainModule文件的依赖图谱和 使用 getRunModuleStatement 方法生成_r(moduleId)的代码,调用processModules生成最终代码
  const postCode = processModules(
    getAppendScripts(
      entryPoint,
      _toConsumableArray(preModules).concat(_toConsumableArray(modules)),
      graph.importBundleNames,
      {
        asyncRequireModulePath: options.asyncRequireModulePath,
        createModuleId: options.createModuleId,
        getRunModuleStatement: options.getRunModuleStatement,
        inlineSourceMap: options.inlineSourceMap,
        projectRoot: options.projectRoot,
        runBeforeMainModule: options.runBeforeMainModule,
        runModule: options.runModule,
        sourceMapUrl: options.sourceMapUrl,
        sourceUrl: options.sourceUrl,
      }
    ),
    processModulesOptions
  )
    .map((_ref3) => {
      let _ref4 = _slicedToArray(_ref3, 2),
        _ = _ref4[0],
        code = _ref4[1];
      return code;
    })
    .join("\n");
  return {
    pre: preCode,
    post: postCode,
    modules: processModules(
      // 使用processModules获取所有`_d`部分的代码数组
      _toConsumableArray(graph.dependencies.values()),
      processModulesOptions
    ).map((_ref5) => {
      let _ref6 = _slicedToArray(_ref5, 2),
        module = _ref6[0],
        code = _ref6[1];

      return [options.createModuleId(module.path), code];
    }),
  };
}
- processModules
processModules 经过两次 filter 过滤出所有类型为 js/类型的数据,第二次过滤使用用户自定义 filter 函数;过滤完成之后使用 wrapModule 转换成_d(factory,moduleId,dependencies)的代码
// node_modules/metro/src/DeltaBundler/Serializers/helpers/processModules.js

function processModules(modules, _ref) {
  let _ref$filter = _ref.filter,
    filter = _ref$filter === void 0 ? () => true : _ref$filter,
    createModuleId = _ref.createModuleId,
    dev = _ref.dev,
    projectRoot = _ref.projectRoot;
  return _toConsumableArray(modules)
    .filter(isJsModule)
    .filter(filter)
    .map((module) => [
      module,
      wrapModule(module, {
        createModuleId,
        dev,
        projectRoot,
      }),
    ]);
}
// node_modules/metro/src/DeltaBundler/Serializers/helpers/js.js
function wrapModule(module, options) {
  const output = getJsOutput(module);
  // 如果类型为js/script则直接返回其代码
  if (output.type.startsWith("js/script")) {
    return output.data.code;
  }

  const moduleId = options.createModuleId(module.path);
  // d(factory,moduleId,dependencies)后面两个参数生成
  const params = [
    moduleId,
    Array.from(module.dependencies.values()).map((dependency) => {
      return options.createModuleId(dependency.absolutePath);
    }),
  ]; // Add the module relative path as the last parameter (to make it easier to do
  // requires by name when debugging).

  if (options.dev) {
    params.push(path.relative(options.projectRoot, module.path));
  }
  // 进行代码转换,因为在获取到的依赖图谱中只有_d(factory),需要加上用moduleId和依赖关系
  return addParamsToDefineCall.apply(void 0, [output.data.code].concat(params));
}
function getJsOutput(module) {
  const jsModules = module.output.filter((_ref) => {
    let type = _ref.type;
    return type.startsWith("js/");
  });
  invariant(
    jsModules.length === 1,
    `Modules must have exactly one JS output, but ${module.path} has ${
      jsModules.length
    } JS outputs.`
  );
  const jsOutput = jsModules[0];
  invariant(
    Number.isFinite(jsOutput.data.lineCount),
    `JS output must populate lineCount, but ${module.path} has ${
      jsOutput.type
    } output with lineCount '${jsOutput.data.lineCount}'`
  );
  return jsOutput;
}

function isJsModule(module) {
  return module.output.filter(isJsOutput).length > 0;
}

function isJsOutput(output) {
  return output.type.startsWith("js/");
}
// node_modules/metro/src/lib/addParamsToDefineCall.js
function addParamsToDefineCall(code) {
  const index = code.lastIndexOf(")");

  for (
    var _len = arguments.length,
      paramsToAdd = new Array(_len > 1 ? _len - 1 : 0),
      _key = 1;
    _key < _len;
    _key++
  ) {
    paramsToAdd[_key - 1] = arguments[_key];
  }

  const params = paramsToAdd.map((param) =>
    param !== undefined ? JSON.stringify(param) : "undefined"
  );
  return code.slice(0, index) + "," + params.join(",") + code.slice(index);
}
- getAppendScripts
上面讲到 getAppendScripts 主要作用是: 获取入口文件及所有的 runBeforeMainModule 文件的依赖图谱和 使用 getRunModuleStatement 方法生成_r(moduleId)的代码
function getAppendScripts(entryPoint, modules, importBundleNames, options) {
  const output = [];
  // 如果有importBundleNames插入对应代码
  if (importBundleNames.size) {
    const importBundleNamesObject = Object.create(null);
    importBundleNames.forEach((absolutePath) => {
      const bundlePath = path.relative(options.projectRoot, absolutePath);
      importBundleNamesObject[options.createModuleId(absolutePath)] =
        bundlePath.slice(0, -path.extname(bundlePath).length) + ".bundle";
    });
    const code = `(function(){var $$=${options.getRunModuleStatement(
      options.createModuleId(options.asyncRequireModulePath)
    )}$$.addImportBundleNames(${String(
      JSON.stringify(importBundleNamesObject)
    )})})();`;
    output.push({
      path: "$$importBundleNames",
      dependencies: new Map(),
      getSource: () => Buffer.from(""),
      inverseDependencies: new Set(),
      output: [
        {
          type: "js/script/virtual",
          data: {
            code,
            lineCount: countLines(code),
            map: [],
          },
        },
      ],
    });
  }
  if (options.runModule) {
    // 聚合runBeforeMainModule和入口文件,前讲过runBeforeMainModule的默认值为: /node_modules/metro/src/lib/polyfills/require.js
    const paths = _toConsumableArray(options.runBeforeMainModule).concat([
      entryPoint,
    ]);

    for (const path of paths) {
      if (modules.some((module) => module.path === path)) {
        // 通过getRunModuleStatement函数生成 _r(moduleId)的代码
        //   getRunModuleStatement默认值详情请见: node_modules/metro-config/src/defaults/index.js
        const code = options.getRunModuleStatement(
          options.createModuleId(path)
        );
        output.push({
          path: `require-${path}`,
          dependencies: new Map(),
          getSource: () => Buffer.from(""),
          inverseDependencies: new Set(),
          output: [
            {
              type: "js/script/virtual",
              data: {
                code,
                lineCount: countLines(code),
                map: [],
              },
            },
          ],
        });
      }
    }
  }
  // ...

  return output;
}
至此 baseJSBundle我们已经分析完成。
# bundleToString
经过前面一个步骤bundleToBundle我们分别获取到了: preCode , postCode 和 modules 其对应的分别是var 和 polyfills 部分的代码 , require 部分的代码 , _d 部分的代码
而bundleToString的作用如下:
- 先将 var 及 polyfill 部分的代码使用\n 进行字符串拼接;
- 然后将
_d部分的代码使用moduleId进行升序排列并使用字符串拼接的方式构造_d部分的代码; - 最后合如
_r部分的代码
function bundleToString(bundle) {
  let code = bundle.pre.length > 0 ? bundle.pre + "\n" : "";
  const modules = [];
  const sortedModules = bundle.modules
    .slice() // The order of the modules needs to be deterministic in order for source
    // maps to work properly.
    .sort((a, b) => a[0] - b[0]);

  for (const _ref of sortedModules) {
    var _ref2 = _slicedToArray(_ref, 2);

    const id = _ref2[0];
    const moduleCode = _ref2[1];

    if (moduleCode.length > 0) {
      code += moduleCode + "\n";
    }

    modules.push([id, moduleCode.length]);
  }

  if (bundle.post.length > 0) {
    code += bundle.post;
  } else {
    code = code.slice(0, -1);
  }

  return {
    code,
    metadata: {
      pre: bundle.pre.length,
      post: bundle.post.length,
      modules,
    },
  };
}
# 总结
- react-native 使用 metro 打包之后的 bundle 大致分为四层
bundle 包大致分为四层:
- var 声明层: 对当前运行环境, bundle 启动时间,以及进程相关信息;
- poyfill 层:
!(function(r){}), 定义了对define(__d)、require(__r)、clear(__c)的支持,以及 module(react-native 及第三方 dependences 依赖的 module) 的加载逻辑; - 模块定义层:
__d定义的代码块,包括 RN 框架源码 js 部分、自定义 js 代码部分、图片资源信息,供 require 引入使用 - require 层: r 定义的代码块,找到 d 定义的代码块 并执行
react-native使用metro进行打包主要分为三个步骤: 解析,转化和生成;解析和转化部分: Metro Server 使用
IncrementalBundler进行 js 代码的解析和转换
在 Metro 使用IncrementalBundler进行解析转换的主要作用是:
- 返回了以入口文件为入口的所有相关依赖文件的依赖图谱和 babel 转换后的代码;
- 返回了var 定义部分及 polyfill 部分所有相关依赖文件的依赖图谱和 babel 转换后的代码;
整体流程如图所示:
通过上述的流程我们总结如下几点:
- 整个 metro 进行依赖分析和 babel 转换主要通过了JestHasteMap (opens new window)去做依赖分析;
- 在做依赖分析的通过,metro 会监听当前目录的文件变化,然后以最小变化生成最终依赖关系图谱;
- 不管是入口文件解析还是 polyfill 文件的依赖解析都是使用了JestHasteMap (opens new window);
生成的对应依赖关系图谱格式如下:
// graph
[
{
  dependencies: Map(404) { // 入口文件下每个文件所依赖其他文件的关系图谱
    '/Users/alexganggao/Desktop/react-native-ssr/ReactNativeSSR/index.js' => {
     {
    inverseDependencies: Set(1) {
      '/Users/alexganggao/Desktop/react-native-ssr/ReactNativeSSR/index.js'
    },
    path: '/Users/alexganggao/Desktop/react-native-ssr/ReactNativeSSR/App.js',
    dependencies: Map(8) {

      '@babel/runtime/helpers/createClass' => {
        absolutePath: '/Users/alexganggao/Desktop/react-native-ssr/ReactNativeSSR/node_modules/@babel/runtime/helpers/createClass.js',
        data: {
          name: '@babel/runtime/helpers/createClass',
          data: { isAsync: false }
        }
      },
      // ....
      'react' => {
        absolutePath: '/Users/alexganggao/Desktop/react-native-ssr/ReactNativeSSR/node_modules/react/index.js',
        data: { name: 'react', data: { isAsync: false } }
      },
      'react-native' => {
        absolutePath: '/Users/alexganggao/Desktop/react-native-ssr/ReactNativeSSR/node_modules/react-native/index.js',
        data: { name: 'react-native', data: { isAsync: false } }
      }
    },
    getSource: [Function: getSource],
    output: [
      {
        data: {// 对应文件转换后的代码
          code: `__d(function(g,r,i,a,m,e,d){var t=r(d[0]);Object.defineProperty(e,"__esModule",{value:!0}),e.default=void 0;var n=t(r(d[1])),u=t(r(d[2])),l=t(r(d[3])),c=t(r(d[4])),f=t(r(d[5])),o=t(r(d[6])),s=r(d[7]);function y(){if("undefined"==typeof Reflect||!Reflect.construct)return!1;if(Reflect.construct.sham)return!1;if("function"==typeof Proxy)return!0;try{return Date.prototype.toString.call(Reflect.construct(Date,[],function(){})),!0}catch(t){return!1}}var p=(function(t){(0,l.default)(R,t);var p,h,x=(p=R,h=y(),function(){var t,n=(0,f.default)(p);if(h){var u=(0,f.default)(this).constructor;t=Reflect.construct(n,arguments,u)}else t=n.apply(this,arguments);return(0,c.default)(this,t)});function R(){return(0,n.default)(this,R),x.apply(this,arguments)}return(0,u.default)(R,[{key:"render",value:function(){return o.default.createElement(o.default.Fragment,null,o.default.createElement(s.View,{style:v.body},o.default.createElement(s.Text,{style:v.text},"\\u4f60\\u597d\\uff0c\\u4e16\\u754c")))}}]),R})(o.default.Component);e.default=p;var v=s.StyleSheet.create({body:{backgroundColor:'white',flex:1,justifyContent:'center',alignItems:'center'},text:{textAlign:'center',color:'red'}})});`,
          lineCount: 1,
          map: [
            [ 1, 177, 9, 0, '_react' ],
            [ 1, 179, 9, 0, '_interopRequireDefault' ],
            [ 1, 181, 9, 0, 'r' ],
            [ 1, 183, 9, 0, 'd' ],
            [ 1, 185, 9, 0 ],
            [ 1, 190, 10, 0, '_reactNative' ],
            // .....
          ],
          functionMap: {
            names: [ '<global>', 'App', 'render' ],
            mappings: 'AAA;eCW;ECC;GDQ;CDC'
          }
        },
        type: 'js/module'
      }
    ]
  }
    },

    '/Users/alexganggao/Desktop/react-native-ssr/ReactNativeSSR/App.js' => {
      inverseDependencies: [Set],
      path: '/Users/alexganggao/Desktop/react-native-ssr/ReactNativeSSR/App.js',
      dependencies: [Map],
      getSource: [Function: getSource],
      output: [Array]
    },
    '/Users/alexganggao/Desktop/react-native-ssr/ReactNativeSSR/app.json' => {
      inverseDependencies: [Set],
      path: '/Users/alexganggao/Desktop/react-native-ssr/ReactNativeSSR/app.json',
      dependencies: Map(0) {},
      getSource: [Function: getSource],
      output: [Array]
    }
  },
  entryPoints: [ //入口文件
    '/Users/alexganggao/Desktop/react-native-ssr/ReactNativeSSR/index.js'
  ],
  importBundleNames: Set(0) {}
}

]
- metro 代码生成部分使用
baseJSBundle得到代码,并使用baseToString拼接最终Bundle代码
在 baseJSBundle 中:
baseJSBundle整体调用了三次processModules分别用于解析出:preCode,postCode和modules其对应的分别是var 和 polyfills 部分的代码 , require 部分的代码 ,_d部分的代码processModules经过两次filter过滤出所有类型为js/类型的数据,第二次过滤使用用户自定义filter函数;过滤完成之后使用wrapModule转换成_d(factory,moduleId,dependencies)的代码
在baseToString中:
- 先将 var 及 polyfill 部分的代码使用\n 进行字符串拼接;
- 然后将
_d部分的代码使用moduleId进行升序排列并使用字符串拼接的方式构造_d部分的代码; - 最后合如
_r部分的代码
- 本文链接: https://mrgaogang.github.io/react/react-native_bundle%E5%88%B0bundle%E7%94%9F%E6%88%90%E5%88%B0%E5%BA%95%E5%8F%91%E7%94%9F%E4%BA%86%E4%BB%80%E4%B9%88.html
- 版权声明: 本博客所有文章除特别声明外,均采用 CC BY-SA 4.0 许可协议。转载请注明出处!